
 This online help page is dedicated to the SurgeONE.ai Roles page and its associated functionalities. You can use this page to create, edit, view or clone the roles of the users associated with your organization.
1. Navigating to the Roles page
Click on the left panel Settings menu and then click on the expanded Roles menu option.
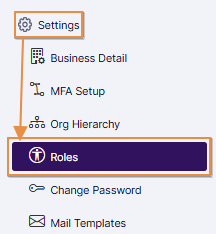 Fig: 1 - Roles sub-menu option under the Settings menu option
Clicking on this menu option loads the Roles page showing the list of all questionnaire templates from all modules existing in SurgeONE.ai. Here is the view of the loaded page.
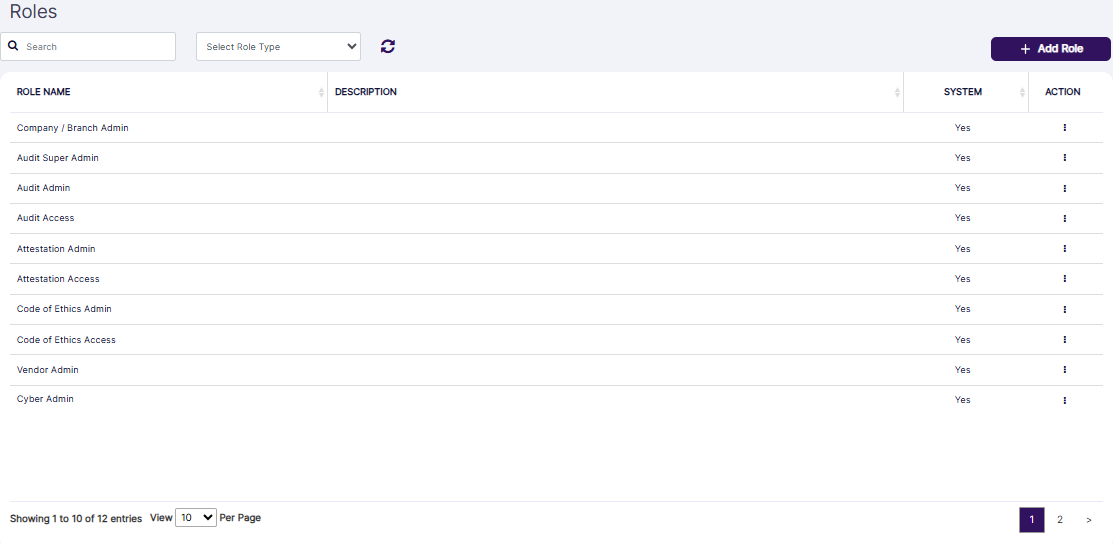
Fig: 2 - Roles page
 NOTE: The menu label can be updated from the Settings > Customize Menu page by the permitted user.
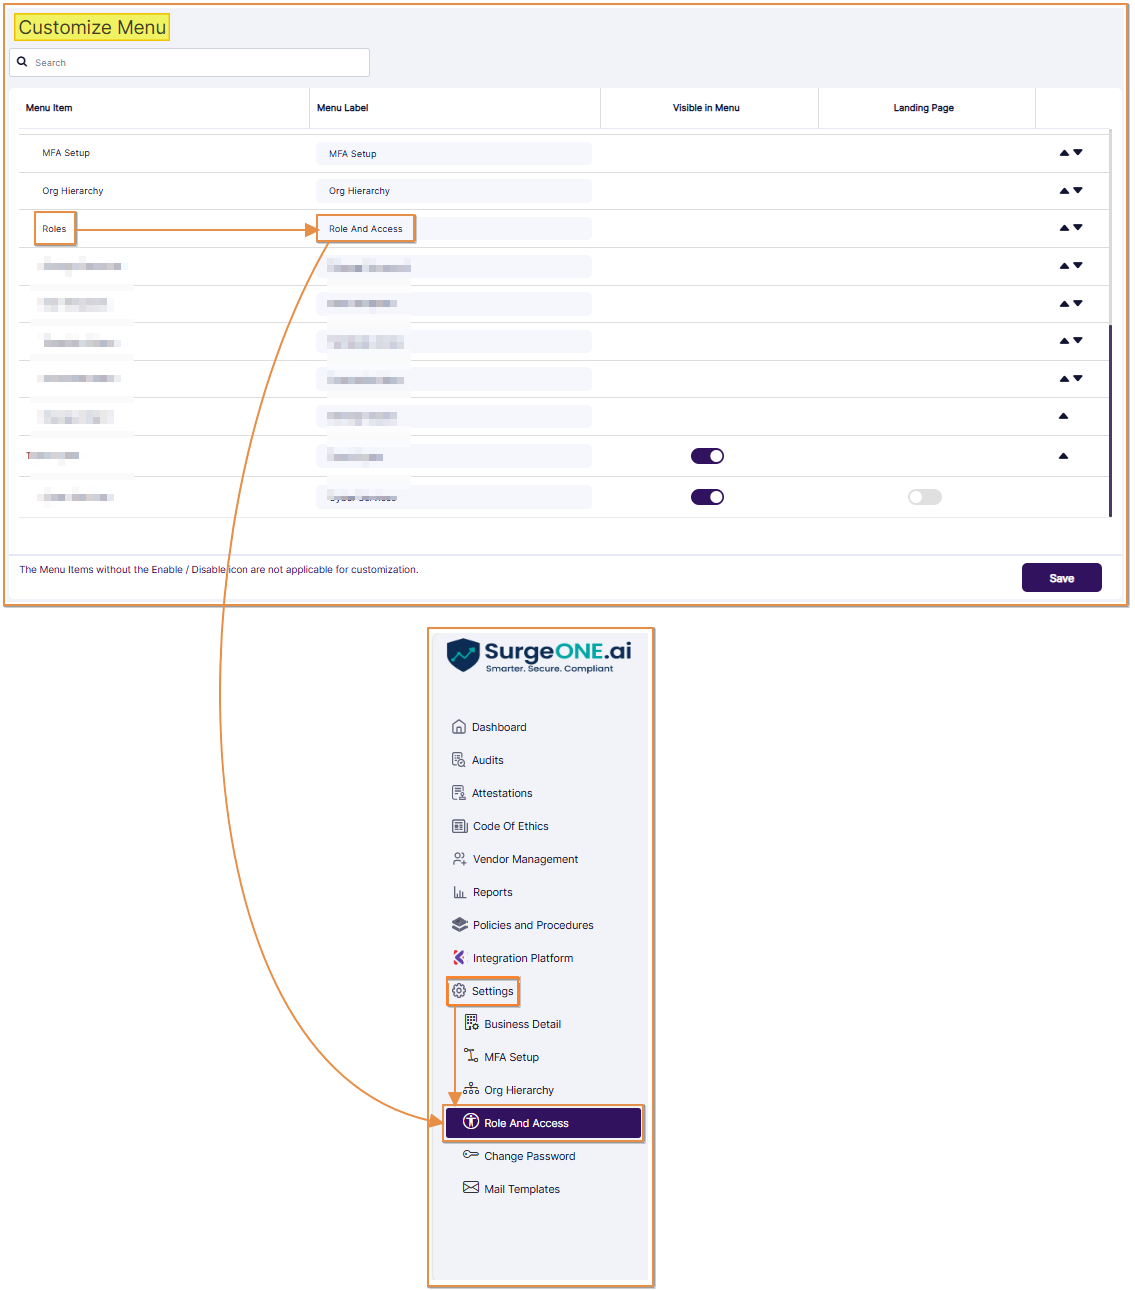 Fig: 3 - Renamed Roles sub-menu option under the Settings menu option
1.1. Basic Functionalities of the Roles page
SurgeONE.ai Roles module has the following basic functionalities:
- View pre-defined system Roles
- Create custom Role
- View existing system and custom Roles
- Rename a custom Role name and modify its description
- Delete an existing Custom Role
- Clone an existing Role from a system or custom Role
- Assign or remove users from system and custom Roles
- Assign / edit / revoke permissions / access to a custom Role
1.2. System Defined Roles
In SurgeONE.ai, when a company or a sub-company is created, a set of default system Roles gets automatically created for that company for each of the modules existing in SurgeONE.ai. All those default Roles are listed below, grouped by modules:
- Company
- Company / Branch Admin
- Audit Module
- Audit Super Admin
- Audit Admin
- Audit Access
- Attestation Module
- Attestation Admin
- Attestation Access
- Code of Ethics Module
- Code of Ethics Admin
- Code of Ethics Access
- Vendor Management Module
- Vendor Admin
- Cyber Compliance Module
- Cyber Admin
- Registered Representative
- (The Registered Representative role user can do all operations related to Cyber Dashboard in terms of viewing as well as widget and dashboard configurations and can do partial operations in Audit, Attestation and Code of Ethics modules)
- Incident Manager
- Incident Resolution Team
- Marketing Review
- Marketing Review Super Admin
- Marketing Review Content Approver
- Marketing Review Content Provider
- E-Comms Surveillance
- E-Comms Surveillance Super Admin
- E-Comms Surveillance Admin
- E-Comms Surveillance Access
NOTE:
- Accesses to any of the system roles are pre-defined and cannot be changed
- The name of a system defined role will not be allowed to be modified
- The description of a system defined role will not be allowed to be modified
- A system role cannot be deleted
- Users can be assigned or revoked from any of the system roles
- Users who are permitted to access the Settings > Roles page can view the details of a system role in terms of:
- Role Name
- Description
- Accesses granted
- Users assigned
- Vendor Access system role visibility:
- Vendor Access role will be hidden from the frontend application UI
- Any Vendor Contacts created against any vendor will be automatically assigned to the Vendor Access role by the system
- The reason for keeping it hidden is to restrict other users from being assigned to this role apart from the Vendor Contacts
2. Understanding the various elements of the Roles page
Refer to the following screenshot which is marked with numerical values that correspond to the below stated points.
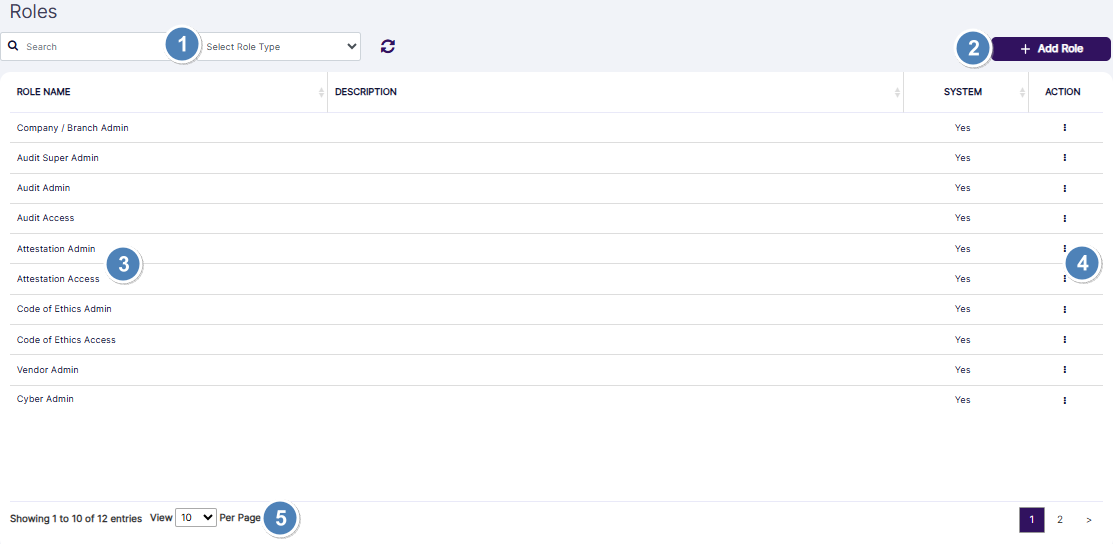
Fig: 4 - Understanding the various elements of the Roles page
- Search options to filter out results
- + Add Role button to create a new custom role
- Grid view populates the loaded or filtered roles
- ACTION column contains the row-context menu options
- Pagination options are provided at the bottom to control the page items limit and to navigate to other page entries
NOTE: The following sub-sections elaborate further to the above-stated points.
2.1. Searching for Roles
Here is the view of filters section:
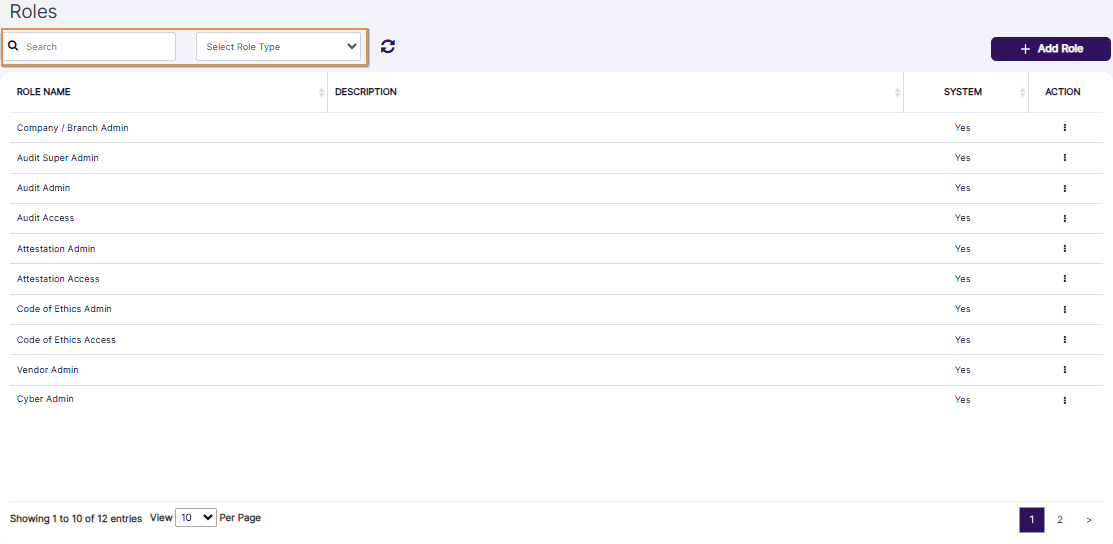 Fig: 5 - Search bar and role type selection filter along with the reset icon
- You can use the search bar to enter text and find matching results.
- You can also filter out listed items using the Select Role Type dropdown. All, System, and Custom are provided as the dropdown options.
- Based on the selection made here, or the filter set, matching results are listed out.
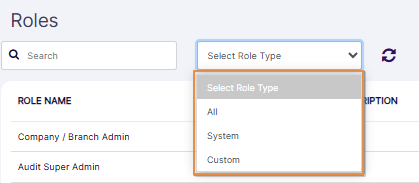 Fig: 6 - Select Role Type filter dropdown options
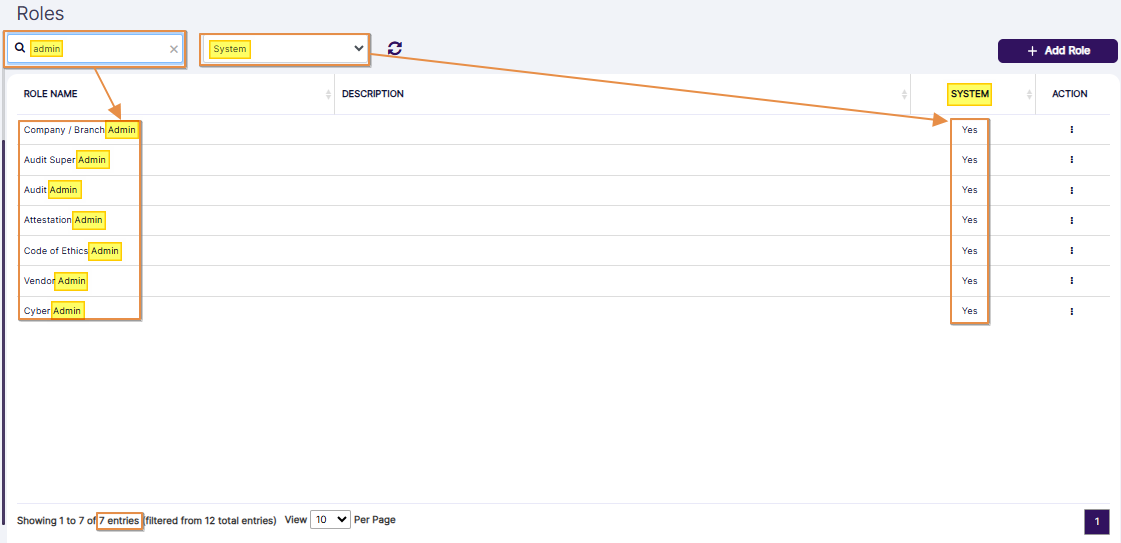 Fig: 7 - Filtered results
NOTE:
- Click on reset
 icon to remove any search query or dropdown filter set.
- The search operation can be executed on the Description value also instead of the Role Name.
 Fig: 8 - Option to reset any filters set
 Fig: 9 - Search operation by role description
2.2. Creating a new Role
NOTE: A user belonging to the Company / Branch Admin role can create custom roles. One can create a custom role from scratch or by cloning an existing role. Provide a role name, a brief description, and grant all or selected accesses from the list of available accesses. All accesses are listed in the respective tabs.

- Click on the + Add Role button at the top right, to proceed to create a new custom role for your organization.
- The following page loads for the Add Role feature, where you need to provide the name of the custom role first in the Role Name field.
- The module selection tabs and its permission categories are disabled by default. Only after you enter text in the Role Name field, the module selection tabs, and its permission categories get enabled below the Description field.
- The Assign User button at the bottom is disabled on page load. You cannot assign users unless you specify a role name.
- The Submit button at the bottom is also disabled on page load. You cannot save the custom role unless you specify a role name.
- Next, you can enter a brief description or one-liner about this new custom role in the Description field. You can also skip this field, as it is optional.
- Company - It is selected by default
- System Objects - It contains modular tab elements as follows - Audit, Attestation, Code Of Ethics, Vendor Management, Cyber, Marketing_Review and E_Comms
- Custom Objects - It is populated when custom objects are created in the system
- Let us illustrate this example of creating a new custom role by first understanding the Company tab. A slider is present against a permission grouping labeled as Can do all operations in all the modules in SurgeONE. Click on the right arrow icon at the left of the Can do all operations in all the modules in SurgeONE label. The permission category labeled as Can Access Settings expands below it. Its slider is enabled by default.
- Can Access Roles
- Can Access Mail Templates
- Can Access Manage Objects
- Can View Roles
- Can Add / Edit / Clone / Delete Roles
- Can View Mail Templates
- Can Edit Mail Templates
- Can View Manage Objects
- Can Add / Edit / Delete Manage Objects
- You can change the slider states of these granular permissions. Disabling any slider state prompts a confirmation modal window.
- Clicking on the Yes button provides the confirmation and changes the slider color from violet to grey to indicate its disabled state. The parent category sliders update to sky blue color to indicate its partially enabled state.
- Next, click on the System Objects tab. The Audit tab is displayed after you click on it. Click on the right arrow icon at the left of the Can do all operation in Audit module label. The permission categories expand below it. All the sliders are enabled by default.
- By default, each slider of all System Objects tabs are enabled
- Add Role page lists the top-level accesses for the Company module in collapsed mode as the default tab view
- The first access of the Company tab is Can do all operations in all the modules in SurgeONE
- The first access of the System Objects tab is Can do all operations in Audit module of the Audit tab under it. If this is checked then by default all underlying accesses are checked. If this option is unchecked, then you can move to the next level of accesses which are grouped under three logical groupings - View Accesses, Add / Edit Accesses and Delete Accesses.
- All view related accesses are under View Accesses group
- All add and edit related accesses are under Add / Edit Accesses group
- All delete related accesses are under Delete Accesses group
- If you expand each of these groups then further underlying accesses specific to that group will be displayed. If the slider is enabled against each of these groups, then all underlying accesses are checked or granted by default. If the slider against the group is disabled you can move down to the next level to grant or check selected accesses specific to this group.
- This same design for granting accesses is followed for all the associated modules of SurgeONE.ai
- You can change the slider states. You can also drill down the permission categories. click on the right arrow icon at the left of the View Accesses category. The associated granular permissions expand below it. All the sliders are enabled by default.
- Can View All Audits
- Can View Audits assign to me
- Can Download an Audit Report
- Can View Past / Completed Audit Reports
- You can change the slider states of these granular permissions. Disabling any slider state prompts a confirmation modal window.
- Clicking on the Yes button provides the confirmation and changes the slider color from violet to grey to indicate its disabled state. The parent category sliders update to sky blue color to indicate its partially enabled state.
- You can click on the right arrow icon at the left of the Add / Edit Accesses category. The associated granular permissions expand below it. All the sliders are enabled by default. You can make the necessary slider selections.
- Can Add / Edit an Audit
- Can Attest an Audit
- Can Remediate an Audit
- Can Resolve Red Flagged Questions
- Can Add / Edit Questionnaire Template
- You can click on the right arrow icon at the left of the Delete Accesses category. It has one associated granular permission which expands below it. The slider is enabled by default. You can make the necessary slider selections.
- Can Delete a (Not Started) Audit
- Proceed to make necessary permission changes or selections in the other tabs. Since the process is the same as described above, it has not been repeated here. More details on system defined role-wise permissions settings and its elaboration has been provided in the following sub-section.
- Can View All Attestations
- Can View Attestations assign to me
- Can View Past Attestation Reports (All)
- Can View Past Attestation Reports (Self)
- Can Add / Edit an Attestation
- Can Attest an Attestation
- Can Remediate an Attestation
- Can Resolve Red Flagged Questions
- Can Add / Edit Questionnaire Template
- Can Send Reminder
- Can Delete a (Not Started) Attestation
- Can View All Requests
- Can View Requests Submitted by Me or my subordinates
- Can View Rules
- Can View all Completed Requests
- Can View Completed Code of Ethics Requests submitted by me and my subordinates
- Can Add Requests
- Can Approve or Reject all Requests
- Can Approve / Reject Requests Submitted by my subordinates
- Can Add / Edit Rules
- Can View All VDD
- Can View My VDD
- Can Download a VDD Report
- Can View Past / Completed Vendor Assessment Reports
- Can Add / Edit a Vendor
- Can Add / Edit an Assessment for all Vendors
- Can Conduct All Assessments
- Can Remediate Assessments
- Can Resolve Red Flagged Questions
- Can Add / Edit Questionnaire Template
- Can do all operations related to Cyber Dashboard in terms of viewing as well as widget and dashboard configurations
- Can do all operations related to Incident
- Can resolve Incident
- Can do all operations in the Marketing Review module
- Can View Marketing Review
- Can View Marketing Review Assign to me
- Add / Edit Marketing Review
- Delete Marketing Review
- Upload Marketing Review
- Approve Marketing Review
- Can do all operations in the E-Comms Surveillance module
- Can View E-Comms Surveillance
- Can View E-Comms Surveillance Assign to me
- Add / Edit E-Comms Surveillance
- Delete E-Comms Surveillance
- Click on the Assign User button once appropriate permissions are set in the respective modular tabs. You must assign at least one user to this new custom role.
- A modal window loads where you can assign user. There you can find two panels, one on the left and one on the right, labeled as Available Users and Assigned Users, respectively. The former lists out the existing users of your organization, while the latter lists out the users who are currently assigned to this role. Since here a custom role is being created, there are no users assigned to it yet.
- Ensure that at least one listed user is moved from the Available Users panel to the Assigned Users panel. To move listed users, you can use the buttons provided in the middle of the modal window. Refer to the following four points stated below to understand how to move users between the panels.
- Right arrow (>) button - Click on it after making checkbox selection(s) of the listed users of the Available Users panel to move the selected users to the Assigned Users panel.
- Left arrow (<) button - Click on it after making checkbox selection(s) of the listed users of the Assigned Users panel to move the selected users to the Available Users panel.
- Double right arrow (>>) button - Click on it to move the displayed users of the Available Users panel to the Assigned Users panel. If you have performed a search operation and then click on this button, then only the filtered users will be moved, while the other users who were not fetched by the search operation, will not be moved.
- Double left arrow (<<) button - Click on it to move the displayed users of the Assigned Users panel to the Available Users panel. If you have performed a search operation and then click on this button, then only the filtered users will be moved, while the other users who were not fetched by the search operation, will not be moved.
- You cannot proceed to assign users to the role, unless there are existing users listed in the modal window.
- The system will prompt a validation tooltip when you do not move any listed user to the Assigned Users panel and click on the Done button.
- Click on the Done button to confirm user(s) assignment based on the selection(s) made.
- The modal window closes. Click on the Submit button after appropriate permissions are set and at least one user is assigned to this custom role.
- The custom role gets created. The new role gets listed in the Roles grid view. A No label can be seen against the System column.
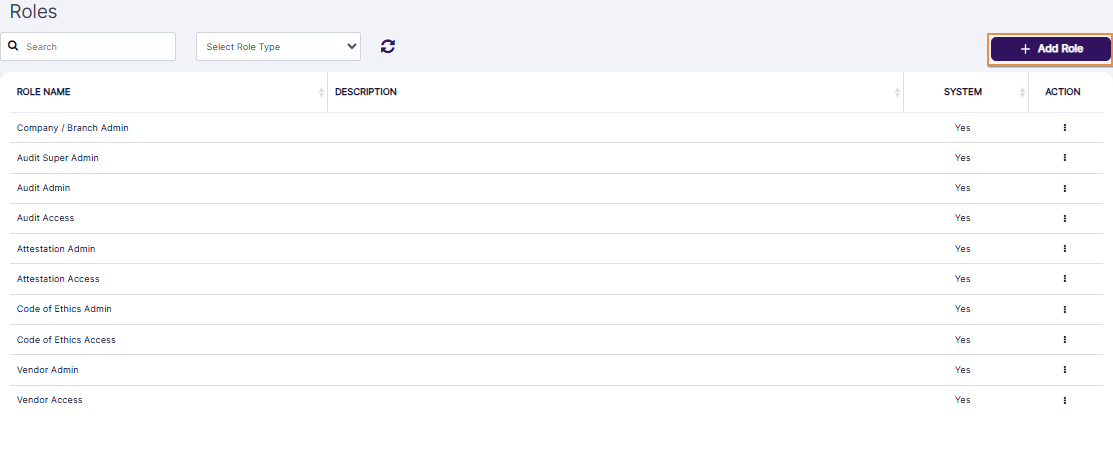 Fig: 10 - + Add Role button
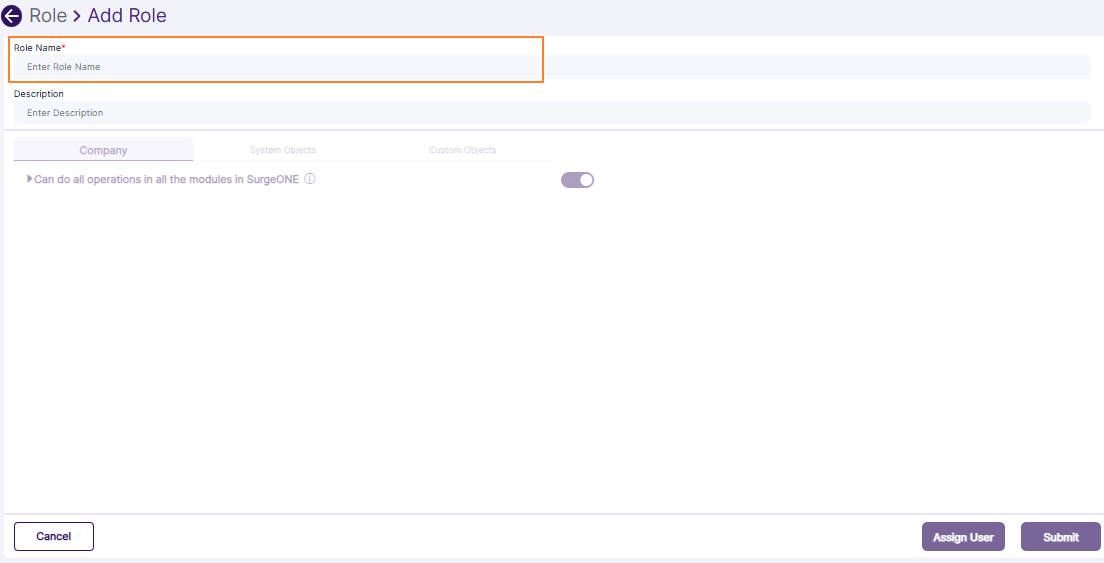 Fig: 11 - Role Name field
NOTE:
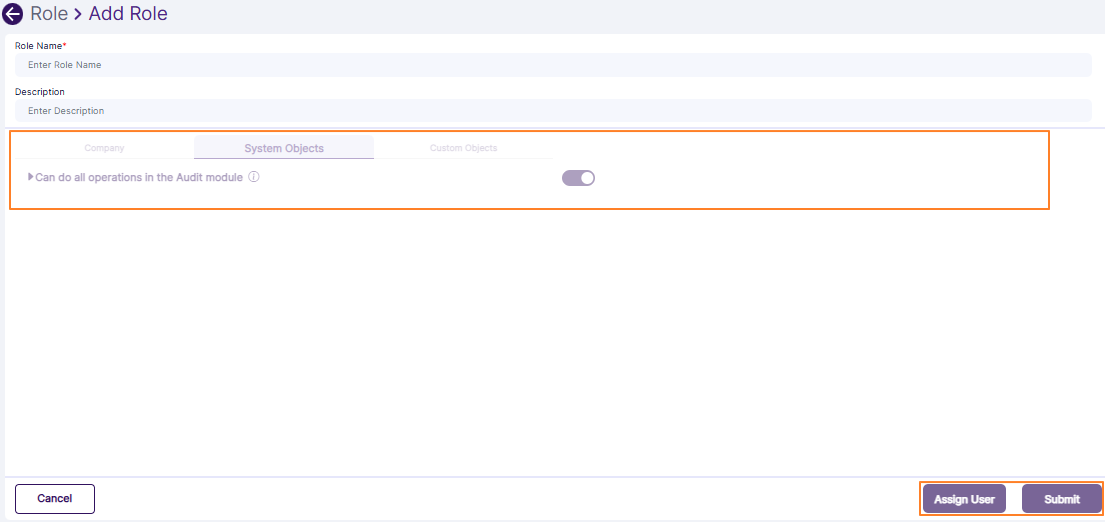 Fig: 12 - Disabled permission setting tabs and buttons
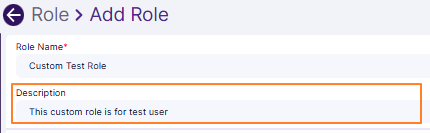 Fig: 13 - Entering role description
Now you can proceed to make appropriate module selections from the provided tabs and assign permissions by enabling / disabling / partially disabling its operational sliders. There are three tabs which contain various modular group(s) and sliders related to associated permissions. They are as follows:
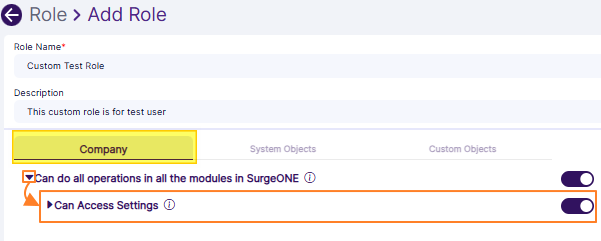 Fig: 14 - View of the expanding permission category after clicking on the left arrow icon against Can do all operations in all the modules in SurgeONE
When you expand the Can Access Settings category from within the Company tab, then the following permissions are revealed:
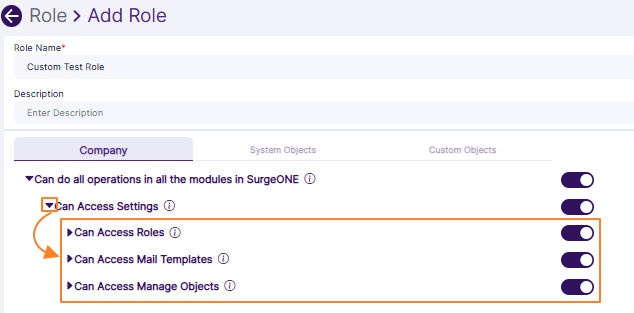 Fig: 15 - View of the expanding permission category after clicking on the left arrow icon against Can Access Settings
When you expand the Can Access Roles sub-category of the Can Access Settings category from within the Company tab, then the following permissions are revealed:
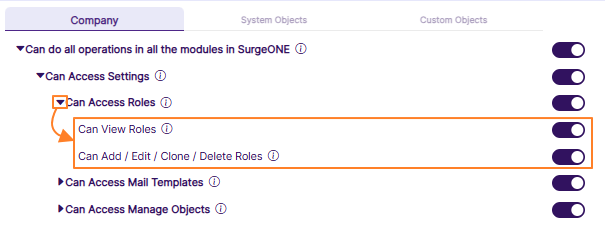 Fig: 16 - View of the expanding permission category after clicking on the left arrow icon against Can Access Roles
When you expand the Can Access Mail Templates sub-category of the Can Access Settings category from within the Company tab, then the following permissions are revealed:
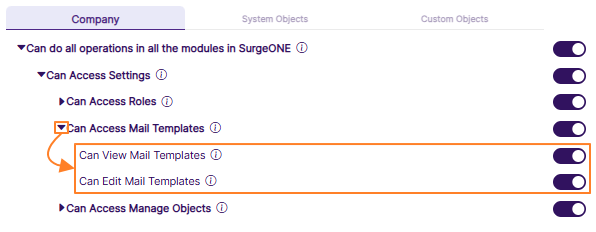 Fig: 17 - View of the expanding permission category after clicking on the left arrow icon against Can Access Mail Templates
When you expand the Can Access Manage Objects sub-category of the Can Access Settings category from within the Company tab, then the following permissions are revealed:
 Fig: 18 - View of the expanding permission category after clicking on the left arrow icon against Can Access Manage Objects
By default, all of the sliders are enabled in the Company tab. You can also drill down the permission categories.
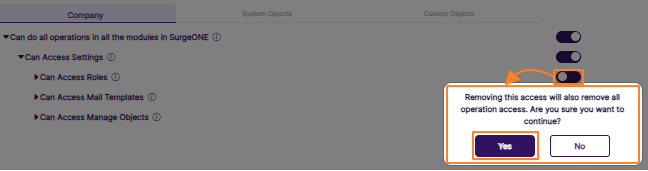 Fig: 19 - Prompted confirmation window to disable an auto-enabled slider
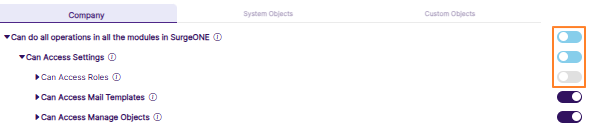 Fig: 20 - Updated slider state
NOTE: This confirmation prompt is not triggered again if you disable another slider when you have already provided confirmation.
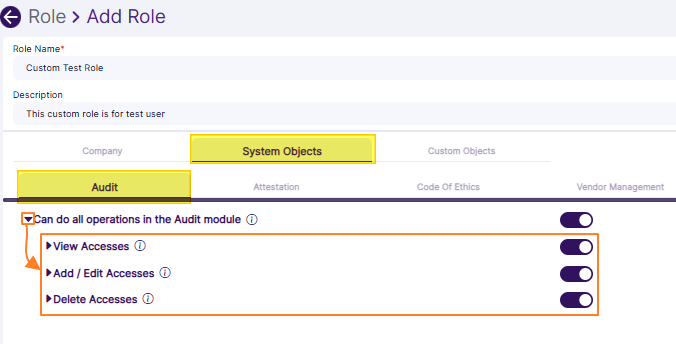 Fig: 21 - Audit module permission categories
NOTE:
When you expand the View Accesses category of the Audit tab, then the following permissions are revealed:
 Fig: 22 - Loaded granular permissions when View Access category is expanded in Audit tab
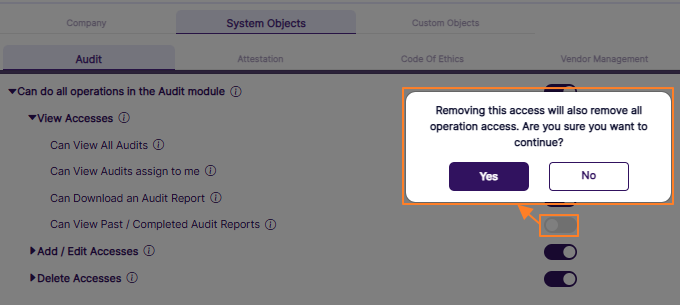 Fig: 23 - Prompted confirmation window to disable an auto-enabled slider
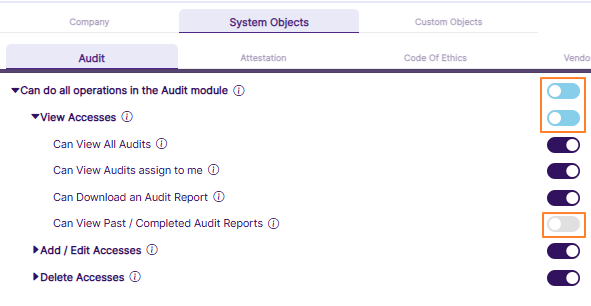 Fig: 24 - Updated slider state
NOTE: This confirmation prompt is not triggered again if you disable another slider when you have already provided confirmation.
When you expand the Add / Edit Accesses category of the Audit tab, then the following permissions are revealed:
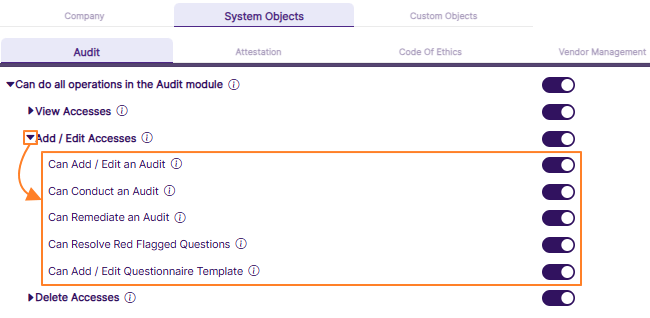 Fig: 25 - Loaded granular permissions when Add / Edit Access category is expanded in Audit tab
When you expand the Delete Accesses category of the Audit tab, then the following permission is revealed:
 Fig: 26 - Loaded granular permission when Delete Access category is expanded in Audit tab
When you expand the View Accesses category of the Attestation tab, then the following permissions are revealed:
When you expand the Add / Edit Accesses category of the Attestation tab, then the following permissions are revealed:
When you expand the Delete Accesses category of the Attestation tab, then the following permission is revealed:
When you expand the View Accesses category of the Code of Ethics tab, then the following permissions are revealed:
When you expand the Add / Edit Accesses category of the Code of Ethics tab, then the following permissions are revealed:
When you expand the View Accesses category of the Vendor Management tab, then the following permissions are revealed:
When you expand the Add / Edit Accesses category of the Vendor Management tab, then the following permissions are revealed:
When you navigate to the Cyber tab, then the following permission category is revealed:
When you expand the Can do all operations related to Cyber Dashboard in terms of viewing as well as widget and dashboard configurations category of the Cyber tab, then the following granular permissions are revealed:
When you navigate to the Marketing_Review tab, then the following permission category is revealed:
When you expand the Can do all operations in the Marketing Review module category of the Marketing_Review tab, then the following granular permissions are revealed:
When you navigate to the E_Comms tab, then the following permission category is revealed:
When you expand the Can do all operations in the E-Comms Surveillance module category of the E_Comms tab, then the following granular permissions are revealed:
NOTE: You can also assign permissions to custom modules if custom objects are created in the system.
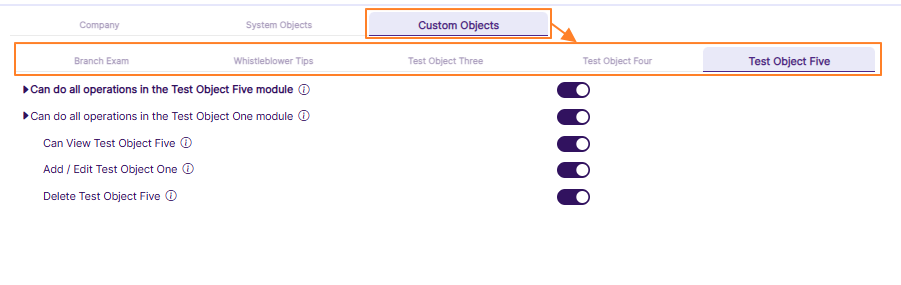 Fig: 27 - Custom Objects permissions
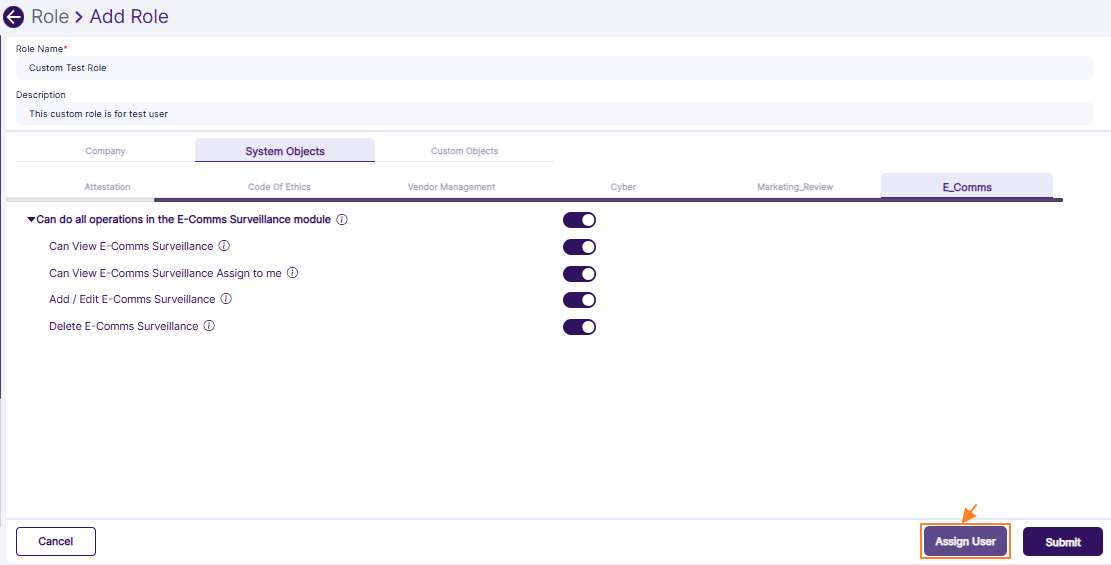 Fig: 28 - Button to assign user(s) to new custom role
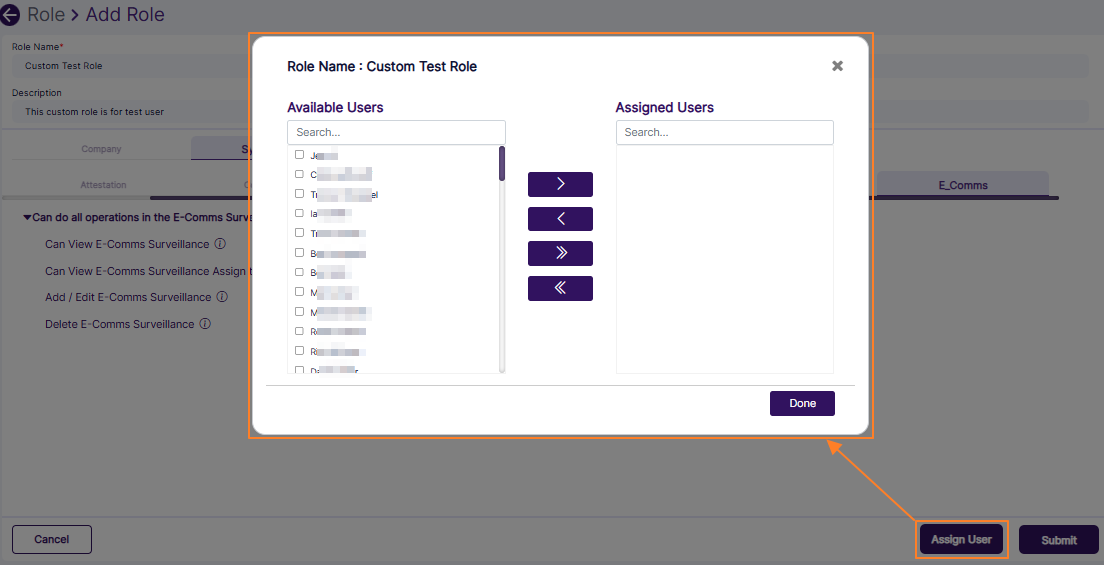 Fig: 29 - Modal window to assign user(s) to new custom role
A search facility is also provided in both the panels. The following screenshot displays a search operation executed in the Available Users panel.
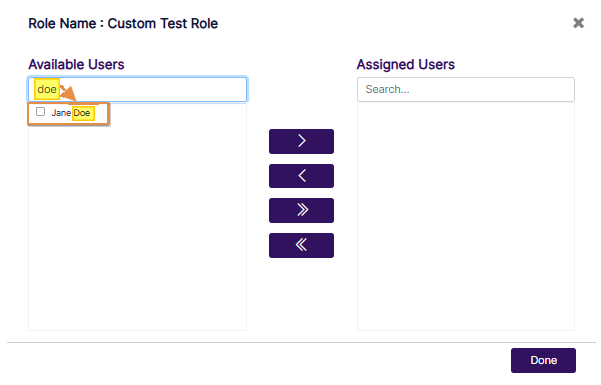 Fig: 30 - Search facility in the modal window to assign user(s) to new custom role
NOTE:
 Fig: 31 - Validation to select user(s) to assign to new custom role
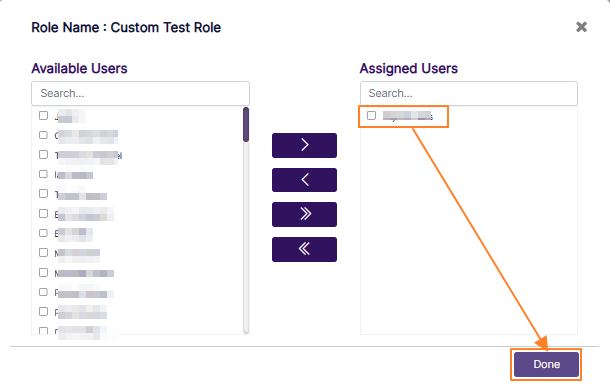 Fig: 32 - Button to confirm user(s) assignment to the custom role
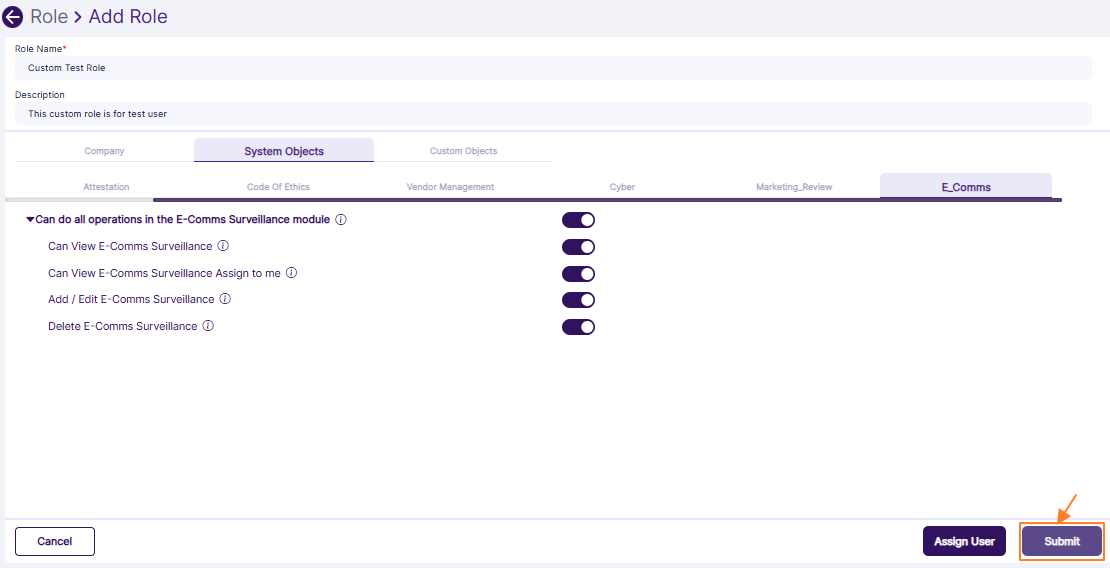 Fig: 33 - Button to save new custom role
 Fig: 34 - New custom role getting listed in grid view and success notification getting displayed
NOTE:
- Validation is employed on the granted permissions. The system will prompt the following tooltip if you proceed to create a custom role without assigning any granted permissions.
- Validation is employed on the assigned users. The system will prompt the following tooltip if you proceed to create a custom role without assigning any existing user.
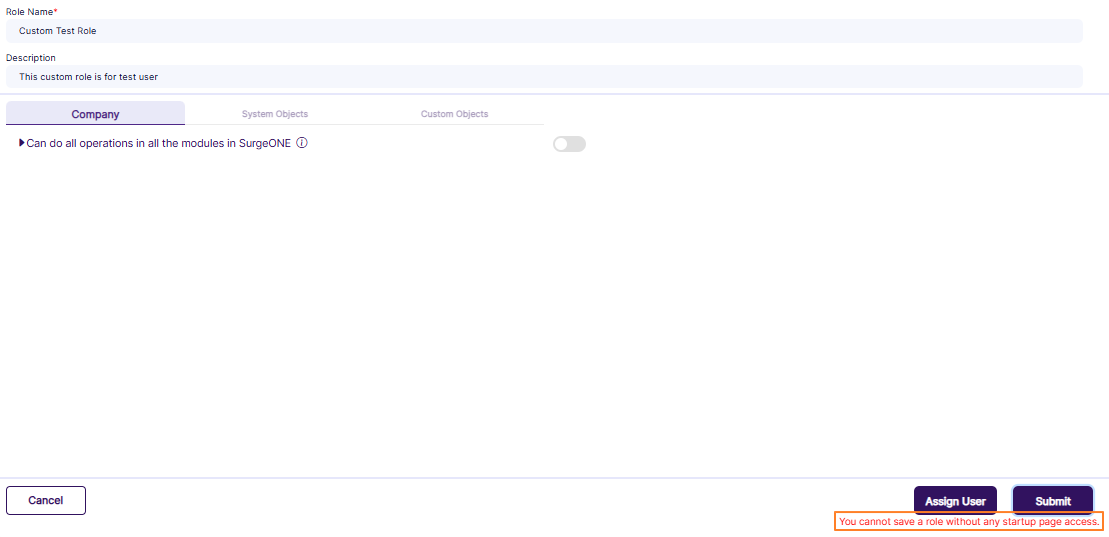 Fig: 35 - Validation on granted permissions while creating a custom role
 Fig: 36 - Validation on assigned user while creating a custom role
2.2.1. Tabular View of Summary of Role-wise Permitted Operations
| Module | Role | Accesses |
|---|---|---|
| Company | Company / Branch Admin | Can do all operations in all the modules in SurgeONE.ai.
|
| Audit | Audit Super Admin | Can do all operations in the Audit module.
|
| Audit Admin | Can do partial operations in the Audit module.
|
|
| Audit Access | Can be selected as a Recipient to participate in an Audit.
|
|
| Attestation | Attestation Admin | Can do all operations in Attestation module only.
|
| Attestation Access | Can be invited to participate in Attestations. Can do partial operations in the Attestation module.
|
|
| Code of Ethics | Code of Ethics Admin | Can do all operations in Code of Ethics module only.
|
| Code of Ethics Access | Can do partial operations in the Code of Ethics module.
|
|
| Vendor Management | Vendor Admin | Can do all operations in Vendor Management module only.
|
| Cyber | Cyber Admin | Can do all operations related to Cyber Dashboard in terms of viewing as well as widget and dashboard configurations.
|
| Registered Representative | Can do all operations related to Cyber Dashboard in terms of viewing as well as widget and dashboard configurations. Can do partial operations in Audit, Attestation and Code of Ethics.
|
|
| Incident Manager | Can do all operations related to Cyber Compliance > Incident Management page only. Cannot access any other module except for Set Password and MFA pages.
|
|
| Incident Resolution Team | Can resolve any incidents which are assigned to the user. Cannot perform any other actions in any module except for Set Password and MFA pages.
|
|
| Marketing Review | Marketing Review Super Admin | Can do all operation for the Marketing Review module only.
|
| Marketing Review Content Approver | Can do partial operations in the Marketing Review module.
|
|
| Marketing Review Content Provider | Can view the Marketing Review entries which are assigned to self.
|
|
| E-Comms Surveillance | E-Comms Surveillance Super Admin | Can do all operation for the E-Comms Surveillance module.
|
| E-Comms Surveillance Admin | Can do partial operations in the E-Comms Surveillance module.
|
|
| E-Comms Surveillance Access | Can view the E-Comms Surveillance entries which are assigned to self.
|
NOTE:
- Users belonging to the Registered Representative role will have accesses except the following:
- Cannot edit Business Details
- Cannot Manage Users
- Cannot create / schedule Audit
- Cannot access Template Library
- Cannot access Mail Templates
- Cannot access Roles
- Cannot create / schedule Attestation
- Cannot create Code of Ethics Rules
- Cannot view all requests in Audits, Attestations or Code of Ethics modules
- Cannot access Vendor Management module
- Cannot access Settings module
- Cannot access Marketing Review module
- Cannot access E-Comms Surveillance module
- Users belonging to a role(s) who has the following accesses enabled will be populated in the Auditor field:
- Can Add / Edit Audit
- Can Conduct Audit
- Can Remediate an Audit
- Can Resolve Red Flagged Questions
- Users belonging to a role(s) who has the following access enabled will be populated in the Recipient field:
- Can Conduct Audit
- Can Remediate an Audit
- Users belonging to a role(s) who has the following access enabled will be populated in the Incident Resolution Team modal window - which loads after clicking on any unresolved (Incident Management grid view entry with Needs Review Status) incident's Action column > Assign menu option.
- Can resolve Incident
2.3. Roles Grid View
About the Roles grid view:
- The grid view of the Roles page displays the system defined roles by default, as well as any custom roles, if created.
- The number of row entries of various roles which populate the grid view depending on the pagination options set by the logged-in user.
- Ten entries are display per page view by default.
The layout comprises of the following columns:
- ROLE NAME - This column displays the role label. If you create custom roles then those role labels are also displayed here. The listed items change according to search operations executed and filter set.
- DESCRIPTION - This column displays the role description. Role descriptions are displayed here if they were provided at the time of the role creation. The listed items change according to search operations executed and the role type dropdown filter set.
- SYSTEM - This column displays the role type. There can be two types. The system defined roles are displayed with a Yes label under this column, while any created custom roles are displayed with a No label.
- ACTION - This column contains a vertical ellipsis icon for each row entry. This icon can be toggled to reveal the row-context menu options. More information on these menu options have been provided in the following sub-sections.
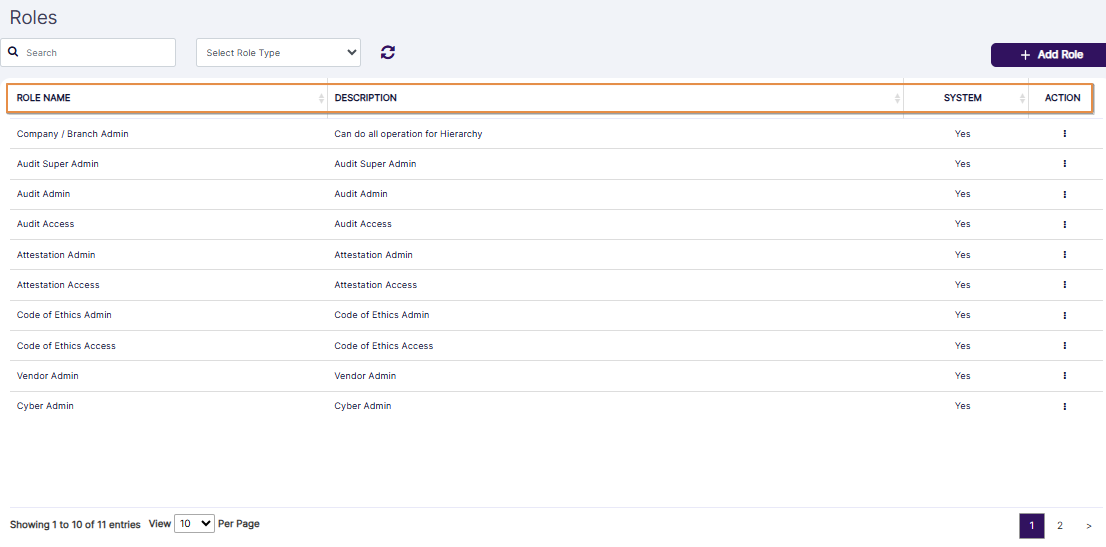 Fig: 37 - Roles grid view
2.4. Understanding the ACTION Menu Options
There are five menu options as follows:
- Edit - Use it to modify any custom role. System roles cannot be edited. This option is greyed-out for system roles.
- Delete - Use it to delete any custom role. System roles cannot be deleted. This option is greyed-out for system roles.
- View - Use it to view any custom role.
- Assign User(s) - Use it to assign user(s) to or remove assigned user(s) from any system or custom role.
- Clone - Use it to make a copy of any system or custom role configuration.
Here is the view of the menu options for a system defined role.
 Fig: 38 - Expanded view of the system role menu options of the ACTION column
Here is the view of the menu options for a custom role.
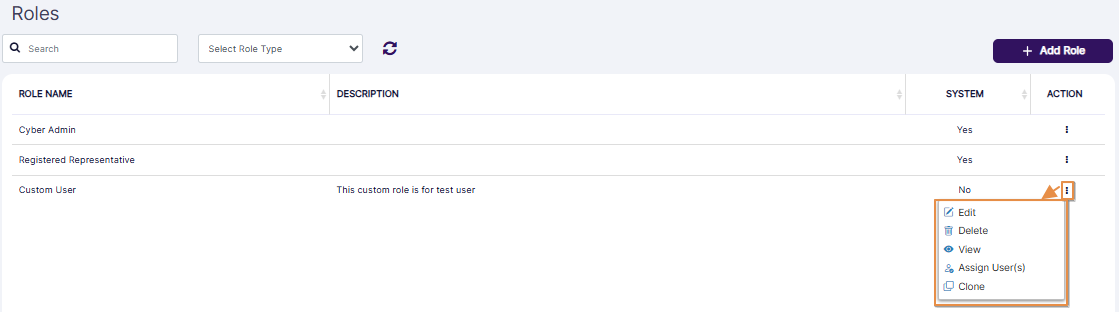 Fig: 39 - Expanded view of the custom role menu options of the ACTION column
2.4.1. Editing Roles
Editing System Roles
Click on the vertical ellipsis icon of the ACTION column against a system defined role row entry to load the menu options. The Edit option is disabled. Hence, you cannot edit a system defined role.
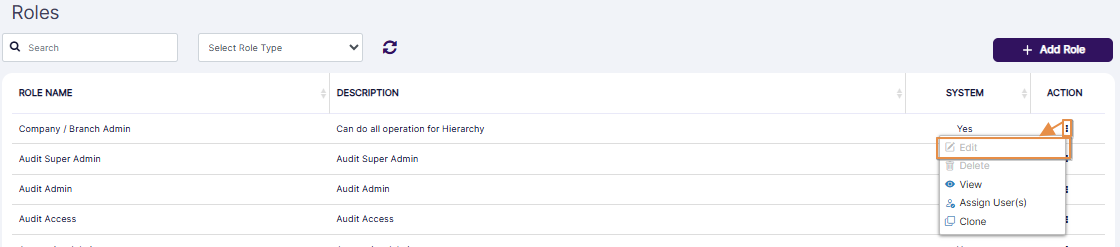 Fig: 40 - Disabled Edit menu option
- Click on the vertical ellipsis icon of the ACTION column against a custom role row entry to load the menu options. Click on the Edit option to get navigated to the Role > Edit Role view.
- You can change the role label, the description (if present), and the assigned permissions. You can also assign users or remove any previously assigned ones.
- Can Access Roles
- Can Access Mail Templates
- Can Access Manage Objects
- Can View Roles
- Can Add / Edit / Clone / Delete Roles
- Can View Mail Templates
- Can Edit Mail Templates
- Can View Manage Objects
- Can Add / Edit / Delete Manage Objects
- Next, click on the System Objects tab. The Audit tab is displayed after you click on it.
- Can View All Audits
- Can View Audits assign to me
- Can Download an Audit Report
- Can View Past / Completed Audit Reports
- Can Add / Edit an Audit
- Can Attest an Audit
- Can Remediate an Audit
- Can Resolve Red Flagged Questions
- Can Add / Edit Questionnaire Template
- Can Delete a (Not Started) Audit
- Can View All Attestations
- Can View Attestations assign to me
- Can View Past Attestation Reports (All)
- Can View Past Attestation Reports (Self)
- Can Add / Edit an Attestation
- Can Attest an Attestation
- Can Remediate an Attestation
- Can Resolve Red Flagged Questions
- Can Add / Edit Questionnaire Template
- Can Send Reminder
- Can Delete a (Not Started) Attestation
- Can View All Requests
- Can View Requests Submitted by Me or my subordinates
- Can View Rules
- Can View all Completed Requests
- Can View Completed Code of Ethics Requests submitted by me and my subordinates
- Can Add Requests
- Can Approve or Reject all Requests
- Can Approve / Reject Requests Submitted by my subordinates
- Can Add / Edit Rules
- Can View All VDD
- Can View My VDD
- Can Download a VDD Report
- Can View Past / Completed Vendor Assessment Reports
- Can Add / Edit a Vendor
- Can Add / Edit an Assessment for all Vendors
- Can Conduct All Assessments
- Can Remediate Assessments
- Can Resolve Red Flagged Questions
- Can Add / Edit Questionnaire Template
- Can do all operations related to Cyber Dashboard in terms of viewing as well as widget and dashboard configurations
- Can do all operations related to Incident
- Can resolve Incident
- Can do all operations in the Marketing Review module
- Can View Marketing Review
- Can View Marketing Review Assign to me
- Add / Edit Marketing Review
- Delete Marketing Review
- Upload Marketing Review
- Approve Marketing Review
- Can do all operations in the E-Comms Surveillance module
- Can View E-Comms Surveillance
- Can View E-Comms Surveillance Assign to me
- Add / Edit E-Comms Surveillance
- Delete E-Comms Surveillance
- You can make applicable changes to the above-mentioned slider states.
- Click on the Assign User button to proceed to make modifications to the user(s) list who are included and belonging to this custom role.
- Click on the Submit button to confirm your changes. You will get redirected to the Roles page.
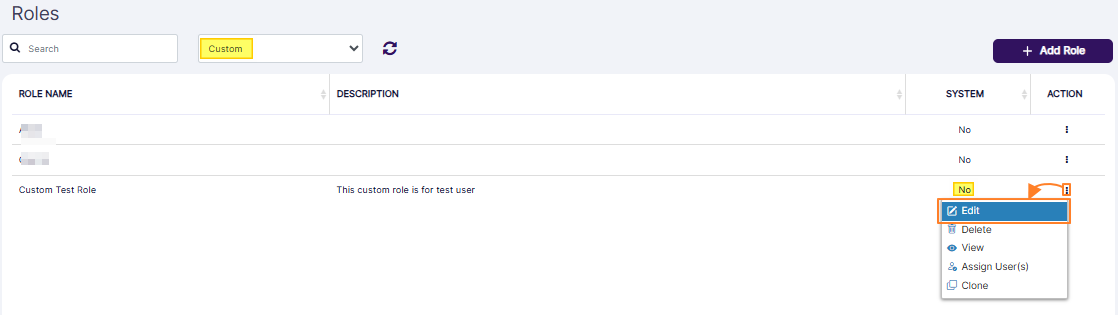 Fig: 41 - Enabled Edit menu option
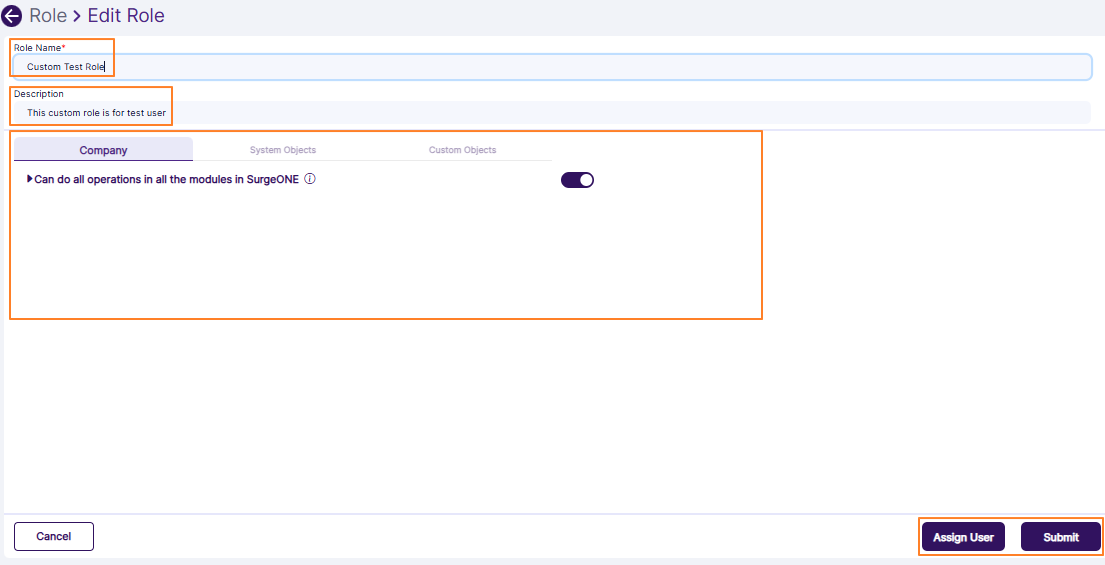 Fig: 42 - Edit Role view
The Company tab is selected by default. When you expand the Can Access Settings category from within the Company tab, then the following permissions are revealed:
When you expand the Can Access Roles sub-category of the Can Access Settings category from within the Company tab, then the following permissions are revealed:
When you expand the Can Access Mail Templates sub-category of the Can Access Settings category from within the Company tab, then the following permissions are revealed:
When you expand the Can Access Manage Objects sub-category of the Can Access Settings category from within the Company tab, then the following permissions are revealed:
When you expand the View Accesses category of the Audit tab, then the following permissions are revealed:
When you expand the Add / Edit Accesses category of the Audit tab, then the following permissions are revealed:
When you expand the Delete Accesses category of the Audit tab, then the following permission is revealed:
When you expand the View Accesses category of the Attestation tab, then the following permissions are revealed:
When you expand the Add / Edit Accesses category of the Attestation tab, then the following permissions are revealed:
When you expand the Delete Accesses category of the Attestation tab, then the following permission is revealed:
When you expand the View Accesses category of the Code of Ethics tab, then the following permissions are revealed:
When you expand the Add / Edit Accesses category of the Code of Ethics tab, then the following permissions are revealed:
When you expand the View Accesses category of the Vendor Management tab, then the following permissions are revealed:
When you expand the Add / Edit Accesses category of the Vendor Management tab, then the following permissions are revealed:
When you navigate to the Cyber tab, then the following permission category is revealed:
When you expand the Can do all operations related to Cyber Dashboard in terms of viewing as well as widget and dashboard configurations category of the Cyber tab, then the following granular permissions are revealed:
When you navigate to the Marketing_Review tab, then the following permission category is revealed:
When you expand the Can do all operations in the Marketing Review module category of the Marketing_Review tab, then the following granular permissions are revealed:
When you navigate to the E_Comms tab, then the following permission category is revealed:
When you expand the Can do all operations in the E-Comms Surveillance module category of the E_Comms tab, then the following granular permissions are revealed:
NOTE: For more details refer to this Creating a new Role section.
2.4.2. Deleting Roles
Deleting System Roles
Click on the vertical ellipsis icon of the ACTION column against a system defined role row entry to load the menu options. The Delete option is disabled. Hence, you cannot delete a system defined role.
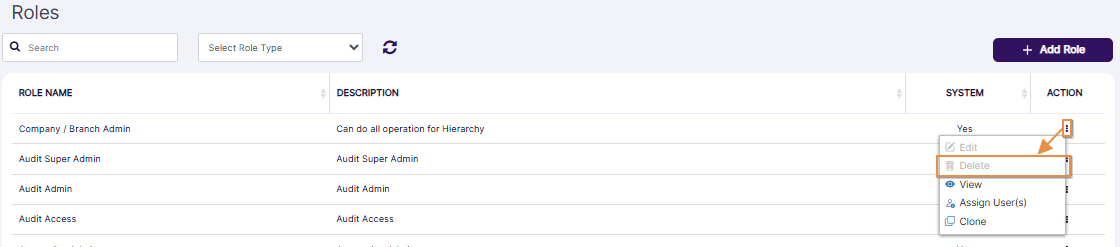 Fig: 43 - Disabled Delete menu option
- Click on the vertical ellipsis icon of the ACTION column against a custom role row entry to load the menu options. Click on the Delete option to remove the custom role.
- A modal window gets prompted to obtain your confirmation. Click on the Yes button to proceed to delete the custom role. The custom role gets removed from the grid view and is deleted from the application only if the assigned user(s) of this role are assigned to another role.
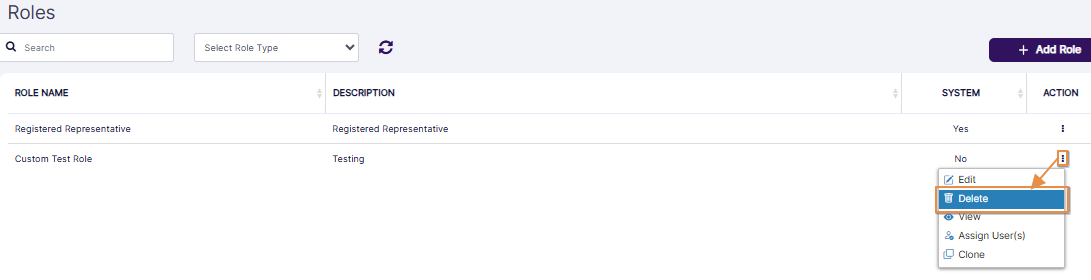 Fig: 44 - Enabled Delete menu option
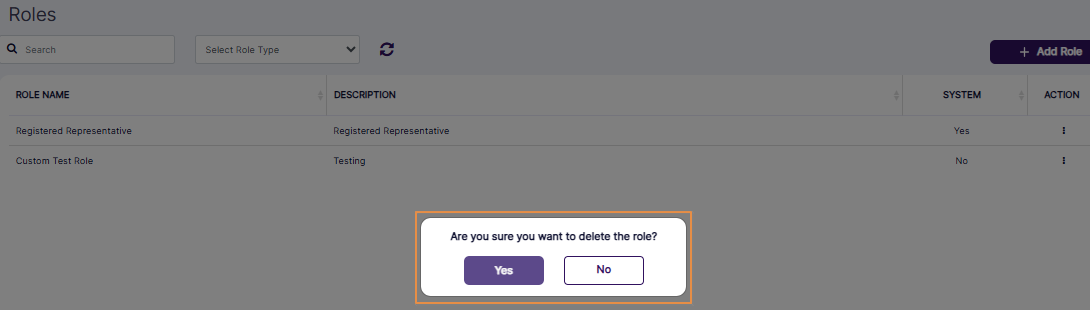 Fig: 45 - Confirmation modal prompt to remove custom role
NOTE: If the assigned user of the role which you are trying to delete is not assigned to any other role, then the following modal window is prompted, and the role does not get deleted.
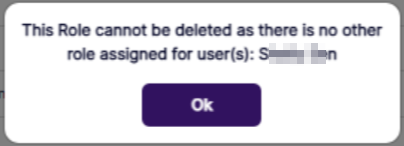 Fig: 46 - Validation on assigned user while deleting a custom role
2.4.3. Viewing Roles
The following system defined roles are displayed by default:
- Company / Branch Admin
- Audit Super Admin
- Audit Admin
- Audit Access
- Attestation Admin
- Attestation Access
- Code of Ethics Admin
- Code of Ethics Access
- Vendor Admin
- Cyber Admin
- Registered Representative
- Incident Manager
- Incident Resolution Team
- Marketing Review Super Admin
- Marketing Review Content Approver
- Marketing Review Content Provider
- E-Comms Surveillance Super Admin
- E-Comms Surveillance Admin
- E-Comms Surveillance Access
Each of the roles are described in the following sub-sections.
NOTE: Custom roles can also be viewed. Click on the vertical ellipsis icon of the ACTION column against the custom role row to load the menu options. Click on the View option to get navigated to the Role > View Role page.
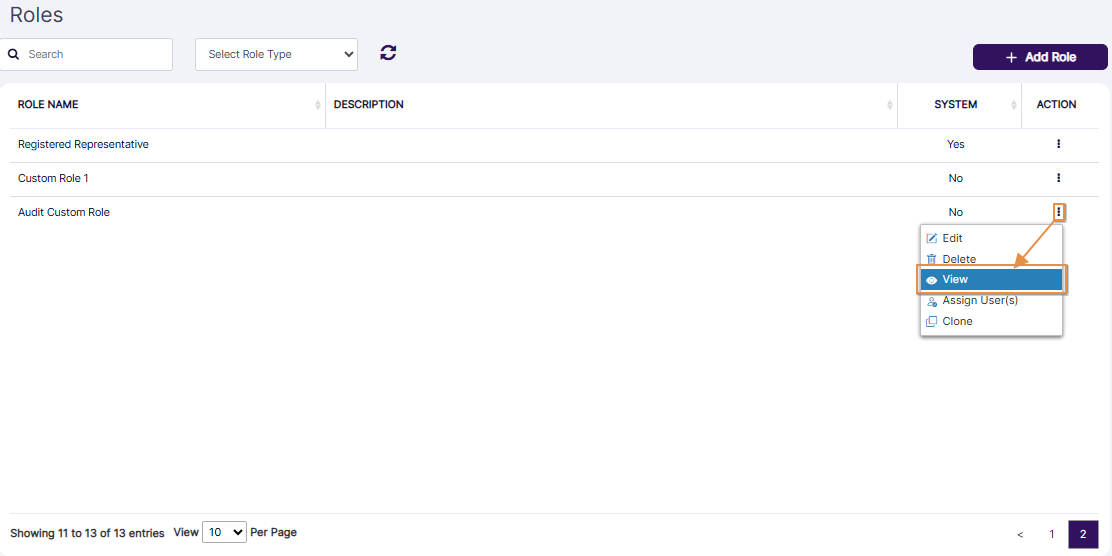 Fig: 47 - Viewing a custom role
2.4.3.1. Understanding the Company / Branch Admin Role
Navigating to the Company / Branch Admin Role
Click on the vertical ellipsis icon of the ACTION column against the Company / Branch Admin row to load the menu options. Click on the View option to get navigated to the role assignment view.
Tab Elements
The Role Name field displays the role label. Below it, the Description field is displayed. It is blank for all system defined roles.
Below it, there are permissions related to the SurgeONE.ai modules in the eight primary tabs labeled as follows:
- The Company main tab
- The Audit sub-tab under the System Objects main tab
- The Attestation sub-tab under the System Objects main tab
- The Code of Ethics sub-tab under the System Objects main tab
- The Vendor Management sub-tab under the System Objects main tab
- The Cyber sub-tab under the System Objects main tab
- The Marketing Review sub-tab under the System Objects main tab
- The E-Comms sub-tab under the System Objects main tab
You can view the assigned permission related to the role in the applicable tab(s). Different roles have permissions enabled in different permission categories and these permissions can be in different tab(s).
Tab Functionality
- The Company main tab is displayed by default.
- You can click on any module-wise tab under the System Objects main tab to view its modular permissions. Usually permission(s) are granted in the related modules which are associated with the role.
- Indented permissions which are granted will have their corresponding slider automatically enabled and will remain in collapsed view by default. One can expand to see the granular accesses.
- From within most of the tabs you can expand the permission category (for example: View, Edit, Delete) to reveal its associated permissions. Click on the right arrow to do so. It will change to a down arrow. The same is applicable for its sub-categories.
- All view related accesses are under the View Accesses group
- All add and edit related accesses are under the Add / Edit Accesses group
- All delete related accesses are under the Delete Accesses group
- If you expand each of these groups then further underlying accesses specific to that group will be displayed. If the slider is enabled against each of these groups, then all underlying accesses are checked or granted by default. If the slider against the group is disabled you can move down to the next level to grant or check selected accesses specific to this group.
- Sliders are present to signify whether the permission category, sub-category and individual permissions are enabled (purple color when ON), partially enabled (sky blue color when a child-level permission is OFF) or disabled (grey when OFF).
- You cannot change the slider states for any of the system defined roles.
Table of Company / Branch Admin Role Permissions
The table which elaborates the permissions granted to the Company / Branch Admin Role in the various tabs and its outcomes, is provided in the Annexure section #3.1.
2.4.3.2. Understanding the Audit Super Admin Role
Navigating to the Audit Super Admin Role
Click on the vertical ellipsis icon of the ACTION column against the Audit Super Admin row to load the menu options. Click on the View option to get navigated to the role assignment view.
Tab Elements
The Role Name field displays the role label. Below it, the Description field is displayed. It is blank for all system defined roles.
Below it, there are permissions related to the SurgeONE.ai modules in the eight primary tabs labeled as follows:
- The Company main tab
- The Audit sub-tab under the System Objects main tab
- The Attestation sub-tab under the System Objects main tab
- The Code of Ethics sub-tab under the System Objects main tab
- The Vendor Management sub-tab under the System Objects main tab
- The Cyber sub-tab under the System Objects main tab
- The Marketing Review sub-tab under the System Objects main tab
- The E-Comms sub-tab under the System Objects main tab
You can view the assigned permission related to the role in the applicable tab(s). Different roles have permissions enabled in different permission categories and these permissions can be in different tab(s).
Tab Functionality
- The Company main tab is displayed by default.
- You can click on any module-wise tab under the System Objects main tab to view its modular permissions. Usually permission(s) are granted in the related modules which are associated with the role.
- Indented permissions which are granted will have their corresponding slider automatically enabled and will remain in collapsed view by default. One can expand to see the granular accesses.
- From within most of the tabs you can expand the permission category (for example: View, Edit, Delete) to reveal its associated permissions. Click on the right arrow to do so. It will change to a down arrow. The same is applicable for its sub-categories.
- All view related accesses are under the View Accesses group
- All add and edit related accesses are under the Add / Edit Accesses group
- All delete related accesses are under the Delete Accesses group
- If you expand each of these groups then further underlying accesses specific to that group will be displayed. If the slider is enabled against each of these groups, then all underlying accesses are checked or granted by default. If the slider against the group is disabled you can move down to the next level to grant or check selected accesses specific to this group.
- Sliders are present to signify whether the permission category, sub-category and individual permissions are enabled (purple color when ON), partially enabled (sky blue color when a child-level permission is OFF) or disabled (grey when OFF).
- You cannot change the slider states for any of the system defined roles.
Table of Audit Super Admin Role Permissions
The table which elaborates the permissions granted to the Audit Super Admin Role in the relevant tab and its outcomes, is provided in the Annexure section #3.2.
2.4.3.3. Understanding the Audit Admin Role
Navigating to the Audit Admin Role
Click on the vertical ellipsis icon of the ACTION column against the Audit Admin row to load the menu options. Click on the View option to get navigated to the role assignment view.
Tab Elements
The Role Name field displays the role label. Below it, the Description field is displayed. It is blank for all system defined roles.
Below it, there are permissions related to the SurgeONE.ai modules in the eight primary tabs labeled as follows:
- The Company main tab
- The Audit sub-tab under the System Objects main tab
- The Attestation sub-tab under the System Objects main tab
- The Code of Ethics sub-tab under the System Objects main tab
- The Vendor Management sub-tab under the System Objects main tab
- The Cyber sub-tab under the System Objects main tab
- The Marketing Review sub-tab under the System Objects main tab
- The E-Comms sub-tab under the System Objects main tab
You can view the assigned permission related to the role in the applicable tab(s). Different roles have permissions enabled in different permission categories and these permissions can be in different tab(s).
Tab Functionality
- The Company main tab is displayed by default.
- You can click on any module-wise tab under the System Objects main tab to view its modular permissions. Usually permission(s) are granted in the related modules which are associated with the role.
- Indented permissions which are granted will have their corresponding slider automatically enabled and will remain in collapsed view by default. One can expand to see the granular accesses.
- From within most of the tabs you can expand the permission category (for example: View, Edit, Delete) to reveal its associated permissions. Click on the right arrow to do so. It will change to a down arrow. The same is applicable for its sub-categories.
- All view related accesses are under the View Accesses group
- All add and edit related accesses are under the Add / Edit Accesses group
- All delete related accesses are under the Delete Accesses group
- If you expand each of these groups then further underlying accesses specific to that group will be displayed. If the slider is enabled against each of these groups, then all underlying accesses are checked or granted by default. If the slider against the group is disabled you can move down to the next level to grant or check selected accesses specific to this group.
- Sliders are present to signify whether the permission category, sub-category and individual permissions are enabled (purple color when ON), partially enabled (sky blue color when a child-level permission is OFF) or disabled (grey when OFF).
- You cannot change the slider states for any of the system defined roles.
Table of Audit Admin Role Permissions
The table which elaborates the permissions granted to the Audit Admin Role in the relevant tab and its outcomes, is provided in the Annexure section #3.3.
2.4.3.4. Understanding the Audit Access Role
Navigating to the Audit Access Role
Click on the vertical ellipsis icon of the ACTION column against the Audit Access row to load the menu options. Click on the View option to get navigated to the role assignment view.
Tab Elements
The Role Name field displays the role label. Below it, the Description field is displayed. It is blank for all system defined roles.
Below it, there are permissions related to the SurgeONE.ai modules in the eight primary tabs labeled as follows:
- The Company main tab
- The Audit sub-tab under the System Objects main tab
- The Attestation sub-tab under the System Objects main tab
- The Code of Ethics sub-tab under the System Objects main tab
- The Vendor Management sub-tab under the System Objects main tab
- The Cyber sub-tab under the System Objects main tab
- The Marketing Review sub-tab under the System Objects main tab
- The E-Comms sub-tab under the System Objects main tab
You can view the assigned permission related to the role in the applicable tab(s). Different roles have permissions enabled in different permission categories and these permissions can be in different tab(s).
Tab Functionality
- The Company main tab is displayed by default.
- You can click on any module-wise tab under the System Objects main tab to view its modular permissions. Usually permission(s) are granted in the related modules which are associated with the role.
- Indented permissions which are granted will have their corresponding slider automatically enabled and will remain in collapsed view by default. One can expand to see the granular accesses.
- From within most of the tabs you can expand the permission category (for example: View, Edit, Delete) to reveal its associated permissions. Click on the right arrow to do so. It will change to a down arrow. The same is applicable for its sub-categories.
- All view related accesses are under the View Accesses group
- All add and edit related accesses are under the Add / Edit Accesses group
- All delete related accesses are under the Delete Accesses group
- If you expand each of these groups then further underlying accesses specific to that group will be displayed. If the slider is enabled against each of these groups, then all underlying accesses are checked or granted by default. If the slider against the group is disabled you can move down to the next level to grant or check selected accesses specific to this group.
- Sliders are present to signify whether the permission category, sub-category and individual permissions are enabled (purple color when ON), partially enabled (sky blue color when a child-level permission is OFF) or disabled (grey when OFF).
- You cannot change the slider states for any of the system defined roles.
Table of Audit Access Role Permissions
The table which elaborates the permissions granted to the Audit Access Role in the relevant tab and its outcomes, is provided in the Annexure section #3.4.
2.4.3.5. Understanding the Attestation Admin Role
Navigating to the Attestation Admin Role
Click on the vertical ellipsis icon of the ACTION column against the Attestation Admin row to load the menu options. Click on the View option to get navigated to the role assignment view.
Tab Elements
The Role Name field displays the role label. Below it, the Description field is displayed. It is blank for all system defined roles.
Below it, there are permissions related to the SurgeONE.ai modules in the eight primary tabs labeled as follows:
- The Company main tab
- The Audit sub-tab under the System Objects main tab
- The Attestation sub-tab under the System Objects main tab
- The Code of Ethics sub-tab under the System Objects main tab
- The Vendor Management sub-tab under the System Objects main tab
- The Cyber sub-tab under the System Objects main tab
- The Marketing Review sub-tab under the System Objects main tab
- The E-Comms sub-tab under the System Objects main tab
You can view the assigned permission related to the role in the applicable tab(s). Different roles have permissions enabled in different permission categories and these permissions can be in different tab(s).
Tab Functionality
- The Company main tab is displayed by default.
- You can click on any module-wise tab under the System Objects main tab to view its modular permissions. Usually permission(s) are granted in the related modules which are associated with the role.
- Indented permissions which are granted will have their corresponding slider automatically enabled and will remain in collapsed view by default. One can expand to see the granular accesses.
- From within most of the tabs you can expand the permission category (for example: View, Edit, Delete) to reveal its associated permissions. Click on the right arrow to do so. It will change to a down arrow. The same is applicable for its sub-categories.
- All view related accesses are under the View Accesses group
- All add and edit related accesses are under the Add / Edit Accesses group
- All delete related accesses are under the Delete Accesses group
- If you expand each of these groups then further underlying accesses specific to that group will be displayed. If the slider is enabled against each of these groups, then all underlying accesses are checked or granted by default. If the slider against the group is disabled you can move down to the next level to grant or check selected accesses specific to this group.
- Sliders are present to signify whether the permission category, sub-category and individual permissions are enabled (purple color when ON), partially enabled (sky blue color when a child-level permission is OFF) or disabled (grey when OFF).
- You cannot change the slider states for any of the system defined roles.
Table of Attestation Admin Role Permissions
The table which elaborates the permissions granted to the Attestation Admin Role in the relevant tab and its outcomes, is provided in the Annexure section #3.5.
2.4.3.6. Understanding the Attestation Access Role
Navigating to the Attestation Access Role
Click on the vertical ellipsis icon of the ACTION column against the Attestation Access row to load the menu options. Click on the View option to get navigated to the role assignment view.
Tab Elements
The Role Name field displays the role label. Below it, the Description field is displayed. It is blank for all system defined roles.
Below it, there are permissions related to the SurgeONE.ai modules in the eight primary tabs labeled as follows:
- The Company main tab
- The Audit sub-tab under the System Objects main tab
- The Attestation sub-tab under the System Objects main tab
- The Code of Ethics sub-tab under the System Objects main tab
- The Vendor Management sub-tab under the System Objects main tab
- The Cyber sub-tab under the System Objects main tab
- The Marketing Review sub-tab under the System Objects main tab
- The E-Comms sub-tab under the System Objects main tab
You can view the assigned permission related to the role in the applicable tab(s). Different roles have permissions enabled in different permission categories and these permissions can be in different tab(s).
Tab Functionality
- The Company main tab is displayed by default.
- You can click on any module-wise tab under the System Objects main tab to view its modular permissions. Usually permission(s) are granted in the related modules which are associated with the role.
- Indented permissions which are granted will have their corresponding slider automatically enabled and will remain in collapsed view by default. One can expand to see the granular accesses.
- From within most of the tabs you can expand the permission category (for example: View, Edit, Delete) to reveal its associated permissions. Click on the right arrow to do so. It will change to a down arrow. The same is applicable for its sub-categories.
- All view related accesses are under the View Accesses group
- All add and edit related accesses are under the Add / Edit Accesses group
- All delete related accesses are under the Delete Accesses group
- If you expand each of these groups then further underlying accesses specific to that group will be displayed. If the slider is enabled against each of these groups, then all underlying accesses are checked or granted by default. If the slider against the group is disabled you can move down to the next level to grant or check selected accesses specific to this group.
- Sliders are present to signify whether the permission category, sub-category and individual permissions are enabled (purple color when ON), partially enabled (sky blue color when a child-level permission is OFF) or disabled (grey when OFF).
- You cannot change the slider states for any of the system defined roles.
Table of Attestation Access Role Permissions
The table which elaborates the permissions granted to the Attestation Access Role in the relevant tab and its outcomes, is provided in the Annexure section #3.6.
2.4.3.7. Understanding the Code of Ethics Admin Role
Navigating to the Code of Ethics Admin Role
Click on the vertical ellipsis icon of the ACTION column against the Code of Ethics Admin row to load the menu options. Click on the View option to get navigated to the role assignment view.
Tab Elements
The Role Name field displays the role label. Below it, the Description field is displayed. It is blank for all system defined roles.
Below it, there are permissions related to the SurgeONE.ai modules in the eight primary tabs labeled as follows:
- The Company main tab
- The Audit sub-tab under the System Objects main tab
- The Attestation sub-tab under the System Objects main tab
- The Code of Ethics sub-tab under the System Objects main tab
- The Vendor Management sub-tab under the System Objects main tab
- The Cyber sub-tab under the System Objects main tab
- The Marketing Review sub-tab under the System Objects main tab
- The E-Comms sub-tab under the System Objects main tab
You can view the assigned permission related to the role in the applicable tab(s). Different roles have permissions enabled in different permission categories and these permissions can be in different tab(s).
Tab Functionality
- The Company main tab is displayed by default.
- You can click on any module-wise tab under the System Objects main tab to view its modular permissions. Usually permission(s) are granted in the related modules which are associated with the role.
- Indented permissions which are granted will have their corresponding slider automatically enabled and will remain in collapsed view by default. One can expand to see the granular accesses.
- From within most of the tabs you can expand the permission category (for example: View, Edit, Delete) to reveal its associated permissions. Click on the right arrow to do so. It will change to a down arrow. The same is applicable for its sub-categories.
- All view related accesses are under the View Accesses group
- All add and edit related accesses are under the Add / Edit Accesses group
- All delete related accesses are under the Delete Accesses group
- If you expand each of these groups then further underlying accesses specific to that group will be displayed. If the slider is enabled against each of these groups, then all underlying accesses are checked or granted by default. If the slider against the group is disabled you can move down to the next level to grant or check selected accesses specific to this group.
- Sliders are present to signify whether the permission category, sub-category and individual permissions are enabled (purple color when ON), partially enabled (sky blue color when a child-level permission is OFF) or disabled (grey when OFF).
- You cannot change the slider states for any of the system defined roles.
Table of Code of Ethics Admin Role Permissions
The table which elaborates the permissions granted to the Code of Ethics Admin Role in the relevant tab and its outcomes, is provided in the Annexure section #3.7.
2.4.3.8. Understanding the Code of Ethics Access Role
Navigating to the Code of Ethics Access Role
Click on the vertical ellipsis icon of the ACTION column against the Code of Ethics Access row to load the menu options. Click on the View option to get navigated to the role assignment view.
Tab Elements
The Role Name field displays the role label. Below it, the Description field is displayed. It is blank for all system defined roles.
Below it, there are permissions related to the SurgeONE.ai modules in the eight primary tabs labeled as follows:
- The Company main tab
- The Audit sub-tab under the System Objects main tab
- The Attestation sub-tab under the System Objects main tab
- The Code of Ethics sub-tab under the System Objects main tab
- The Vendor Management sub-tab under the System Objects main tab
- The Cyber sub-tab under the System Objects main tab
- The Marketing Review sub-tab under the System Objects main tab
- The E-Comms sub-tab under the System Objects main tab
You can view the assigned permission related to the role in the applicable tab(s). Different roles have permissions enabled in different permission categories and these permissions can be in different tab(s).
Tab Functionality
- The Company main tab is displayed by default.
- You can click on any module-wise tab under the System Objects main tab to view its modular permissions. Usually permission(s) are granted in the related modules which are associated with the role.
- Indented permissions which are granted will have their corresponding slider automatically enabled and will remain in collapsed view by default. One can expand to see the granular accesses.
- From within most of the tabs you can expand the permission category (for example: View, Edit, Delete) to reveal its associated permissions. Click on the right arrow to do so. It will change to a down arrow. The same is applicable for its sub-categories.
- All view related accesses are under the View Accesses group
- All add and edit related accesses are under the Add / Edit Accesses group
- All delete related accesses are under the Delete Accesses group
- If you expand each of these groups then further underlying accesses specific to that group will be displayed. If the slider is enabled against each of these groups, then all underlying accesses are checked or granted by default. If the slider against the group is disabled you can move down to the next level to grant or check selected accesses specific to this group.
- Sliders are present to signify whether the permission category, sub-category and individual permissions are enabled (purple color when ON), partially enabled (sky blue color when a child-level permission is OFF) or disabled (grey when OFF).
- You cannot change the slider states for any of the system defined roles.
Table of Code of Ethics Access Role Permissions
The table which elaborates the permissions granted to the Code of Ethics Access Role in the relevant tab and its outcomes, is provided in the Annexure section #3.8.
2.4.3.9. Understanding the Vendor Admin Role
Navigating to the Vendor Admin Role
Click on the vertical ellipsis icon of the ACTION column against the Vendor Admin row to load the menu options. Click on the View option to get navigated to the role assignment view.
Tab Elements
The Role Name field displays the role label. Below it, the Description field is displayed. It is blank for all system defined roles.
Below it, there are permissions related to the SurgeONE.ai modules in the eight primary tabs labeled as follows:
- The Company main tab
- The Audit sub-tab under the System Objects main tab
- The Attestation sub-tab under the System Objects main tab
- The Code of Ethics sub-tab under the System Objects main tab
- The Vendor Management sub-tab under the System Objects main tab
- The Cyber sub-tab under the System Objects main tab
- The Marketing Review sub-tab under the System Objects main tab
- The E-Comms sub-tab under the System Objects main tab
You can view the assigned permission related to the role in the applicable tab(s). Different roles have permissions enabled in different permission categories and these permissions can be in different tab(s).
Tab Functionality
- The Company main tab is displayed by default.
- You can click on any module-wise tab under the System Objects main tab to view its modular permissions. Usually permission(s) are granted in the related modules which are associated with the role.
- Indented permissions which are granted will have their corresponding slider automatically enabled and will remain in collapsed view by default. One can expand to see the granular accesses.
- From within most of the tabs you can expand the permission category (for example: View, Edit, Delete) to reveal its associated permissions. Click on the right arrow to do so. It will change to a down arrow. The same is applicable for its sub-categories.
- All view related accesses are under the View Accesses group
- All add and edit related accesses are under the Add / Edit Accesses group
- All delete related accesses are under the Delete Accesses group
- If you expand each of these groups then further underlying accesses specific to that group will be displayed. If the slider is enabled against each of these groups, then all underlying accesses are checked or granted by default. If the slider against the group is disabled you can move down to the next level to grant or check selected accesses specific to this group.
- Sliders are present to signify whether the permission category, sub-category and individual permissions are enabled (purple color when ON), partially enabled (sky blue color when a child-level permission is OFF) or disabled (grey when OFF).
- You cannot change the slider states for any of the system defined roles.
Table of Vendor Admin Role Permissions
The table which elaborates the permissions granted to the Vendor Admin Role in the relevant tab and its outcomes, is provided in the Annexure section #3.9.
2.4.3.10. Understanding the Cyber Admin Role
Navigating to the Cyber Admin Role
Click on the vertical ellipsis icon of the ACTION column against the Cyber Admin row to load the menu options. Click on the View option to get navigated to the role assignment view.
Tab Elements
The Role Name field displays the role label. Below it, the Description field is displayed. It is blank for all system defined roles.
Below it, there are permissions related to the SurgeONE.ai modules in the eight primary tabs labeled as follows:
- The Company main tab
- The Audit sub-tab under the System Objects main tab
- The Attestation sub-tab under the System Objects main tab
- The Code of Ethics sub-tab under the System Objects main tab
- The Vendor Management sub-tab under the System Objects main tab
- The Cyber sub-tab under the System Objects main tab
- The Marketing Review sub-tab under the System Objects main tab
- The E-Comms sub-tab under the System Objects main tab
You can view the assigned permission related to the role in the applicable tab(s). Different roles have permissions enabled in different permission categories and these permissions can be in different tab(s).
Tab Functionality
- The Company main tab is displayed by default.
- You can click on any module-wise tab under the System Objects main tab to view its modular permissions. Usually permission(s) are granted in the related modules which are associated with the role.
- Indented permissions which are granted will have their corresponding slider automatically enabled and will remain in collapsed view by default. One can expand to see the granular accesses.
- From within most of the tabs you can expand the permission category (for example: View, Edit, Delete) to reveal its associated permissions. Click on the right arrow to do so. It will change to a down arrow. The same is applicable for its sub-categories.
- All view related accesses are under the View Accesses group
- All add and edit related accesses are under the Add / Edit Accesses group
- All delete related accesses are under the Delete Accesses group
- If you expand each of these groups then further underlying accesses specific to that group will be displayed. If the slider is enabled against each of these groups, then all underlying accesses are checked or granted by default. If the slider against the group is disabled you can move down to the next level to grant or check selected accesses specific to this group.
- Sliders are present to signify whether the permission category, sub-category and individual permissions are enabled (purple color when ON), partially enabled (sky blue color when a child-level permission is OFF) or disabled (grey when OFF).
- You cannot change the slider states for any of the system defined roles.
Table of Cyber Admin Role Permissions
The table which elaborates the permissions granted to the Cyber Admin Role in the relevant tab and its outcomes, is provided in the Annexure section #3.10.
2.4.3.11. Understanding the Registered Representative Role
Navigating to the Registered Representative Role
Click on the vertical ellipsis icon of the ACTION column against the Registered Representative row to load the menu options. Click on the View option to get navigated to the role assignment view.
Tab Elements
The Role Name field displays the role label. Below it, the Description field is displayed. It is blank for all system defined roles.
Below it, there are permissions related to the SurgeONE.ai modules in the eight primary tabs labeled as follows:
- The Company main tab
- The Audit sub-tab under the System Objects main tab
- The Attestation sub-tab under the System Objects main tab
- The Code of Ethics sub-tab under the System Objects main tab
- The Vendor Management sub-tab under the System Objects main tab
- The Cyber sub-tab under the System Objects main tab
- The Marketing Review sub-tab under the System Objects main tab
- The E-Comms sub-tab under the System Objects main tab
You can view the assigned permission related to the role in the applicable tab(s). Different roles have permissions enabled in different permission categories and these permissions can be in different tab(s).
Tab Functionality
- The Company main tab is displayed by default.
- You can click on any module-wise tab under the System Objects main tab to view its modular permissions. Usually permission(s) are granted in the related modules which are associated with the role.
- Indented permissions which are granted will have their corresponding slider automatically enabled and will remain in collapsed view by default. One can expand to see the granular accesses.
- From within most of the tabs you can expand the permission category (for example: View, Edit, Delete) to reveal its associated permissions. Click on the right arrow to do so. It will change to a down arrow. The same is applicable for its sub-categories.
- All view related accesses are under the View Accesses group
- All add and edit related accesses are under the Add / Edit Accesses group
- All delete related accesses are under the Delete Accesses group
- If you expand each of these groups then further underlying accesses specific to that group will be displayed. If the slider is enabled against each of these groups, then all underlying accesses are checked or granted by default. If the slider against the group is disabled you can move down to the next level to grant or check selected accesses specific to this group.
- Sliders are present to signify whether the permission category, sub-category and individual permissions are enabled (purple color when ON), partially enabled (sky blue color when a child-level permission is OFF) or disabled (grey when OFF).
- You cannot change the slider states for any of the system defined roles.
Table of Registered Representative Role Permissions
The table which elaborates the permissions granted to the Registered Representative Role in the relevant tabs and its outcomes, is provided in the Annexure section #3.11.
2.4.3.12. Understanding the Incident Manager Role
Navigating to the Incident Manager Role
Click on the vertical ellipsis icon of the ACTION column against the Incident Manager row to load the menu options. Click on the View option to get navigated to the role assignment view.
Tab Elements
The Role Name field displays the role label. Below it, the Description field is displayed. It is blank for all system defined roles.
Below it, there are permissions related to the SurgeONE.ai modules in the eight primary tabs labeled as follows:
- The Company main tab
- The Audit sub-tab under the System Objects main tab
- The Attestation sub-tab under the System Objects main tab
- The Code of Ethics sub-tab under the System Objects main tab
- The Vendor Management sub-tab under the System Objects main tab
- The Cyber sub-tab under the System Objects main tab
- The Marketing Review sub-tab under the System Objects main tab
- The E-Comms sub-tab under the System Objects main tab
You can view the assigned permission related to the role in the applicable tab(s). Different roles have permissions enabled in different permission categories and these permissions can be in different tab(s).
Tab Functionality
- The Company main tab is displayed by default.
- You can click on any module-wise tab under the System Objects main tab to view its modular permissions. Usually permission(s) are granted in the related modules which are associated with the role.
- Indented permissions which are granted will have their corresponding slider automatically enabled and will remain in collapsed view by default. One can expand to see the granular accesses.
- From within most of the tabs you can expand the permission category (for example: View, Edit, Delete) to reveal its associated permissions. Click on the right arrow to do so. It will change to a down arrow. The same is applicable for its sub-categories.
- All view related accesses are under the View Accesses group
- All add and edit related accesses are under the Add / Edit Accesses group
- All delete related accesses are under the Delete Accesses group
- If you expand each of these groups then further underlying accesses specific to that group will be displayed. If the slider is enabled against each of these groups, then all underlying accesses are checked or granted by default. If the slider against the group is disabled you can move down to the next level to grant or check selected accesses specific to this group.
- Sliders are present to signify whether the permission category, sub-category and individual permissions are enabled (purple color when ON), partially enabled (sky blue color when a child-level permission is OFF) or disabled (grey when OFF).
- You cannot change the slider states for any of the system defined roles.
Table of Incident Manager Role Permissions
The table which elaborates the permissions granted to the Incident Manager Role in the relevant tab and its outcomes, is provided in the Annexure section #3.12.
2.4.3.13. Understanding the Incident Resolution Team Role
Navigating to the Incident Resolution Team Role
Click on the vertical ellipsis icon of the ACTION column against the Incident Resolution Team row to load the menu options. Click on the View option to get navigated to the role assignment view.
Tab Elements
The Role Name field displays the role label. Below it, the Description field is displayed. It is blank for all system defined roles.
Below it, there are permissions related to the SurgeONE.ai modules in the eight primary tabs labeled as follows:
- The Company main tab
- The Audit sub-tab under the System Objects main tab
- The Attestation sub-tab under the System Objects main tab
- The Code of Ethics sub-tab under the System Objects main tab
- The Vendor Management sub-tab under the System Objects main tab
- The Cyber sub-tab under the System Objects main tab
- The Marketing Review sub-tab under the System Objects main tab
- The E-Comms sub-tab under the System Objects main tab
You can view the assigned permission related to the role in the applicable tab(s). Different roles have permissions enabled in different permission categories and these permissions can be in different tab(s).
Tab Functionality
- The Company main tab is displayed by default.
- You can click on any module-wise tab under the System Objects main tab to view its modular permissions. Usually permission(s) are granted in the related modules which are associated with the role.
- Indented permissions which are granted will have their corresponding slider automatically enabled and will remain in collapsed view by default. One can expand to see the granular accesses.
- From within most of the tabs you can expand the permission category (for example: View, Edit, Delete) to reveal its associated permissions. Click on the right arrow to do so. It will change to a down arrow. The same is applicable for its sub-categories.
- All view related accesses are under the View Accesses group
- All add and edit related accesses are under the Add / Edit Accesses group
- All delete related accesses are under the Delete Accesses group
- If you expand each of these groups then further underlying accesses specific to that group will be displayed. If the slider is enabled against each of these groups, then all underlying accesses are checked or granted by default. If the slider against the group is disabled you can move down to the next level to grant or check selected accesses specific to this group.
- Sliders are present to signify whether the permission category, sub-category and individual permissions are enabled (purple color when ON), partially enabled (sky blue color when a child-level permission is OFF) or disabled (grey when OFF).
- You cannot change the slider states for any of the system defined roles.
Table of Incident Resolution Team Role Permissions
The table which elaborates the permissions granted to the Incident Resolution Team Role in the relevant tab and its outcomes, is provided in the Annexure section #3.13.
2.4.3.14. Understanding the Marketing Review Super Admin Role
Navigating to the Marketing Review Super Admin Role
Click on the vertical ellipsis icon of the ACTION column against the Marketing Review Super Admin row to load the menu options. Click on the View option to get navigated to the role assignment view.
Tab Elements
The Role Name field displays the role label. Below it, the Description field is displayed. It is blank for all system defined roles.
Below it, there are permissions related to the SurgeONE.ai modules in the eight primary tabs labeled as follows:
- The Company main tab
- The Audit sub-tab under the System Objects main tab
- The Attestation sub-tab under the System Objects main tab
- The Code of Ethics sub-tab under the System Objects main tab
- The Vendor Management sub-tab under the System Objects main tab
- The Cyber sub-tab under the System Objects main tab
- The Marketing Review sub-tab under the System Objects main tab
- The E-Comms sub-tab under the System Objects main tab
You can view the assigned permission related to the role in the applicable tab(s). Different roles have permissions enabled in different permission categories and these permissions can be in different tab(s).
Tab Functionality
- The Company main tab is displayed by default.
- You can click on any module-wise tab under the System Objects main tab to view its modular permissions. Usually permission(s) are granted in the related modules which are associated with the role.
- Indented permissions which are granted will have their corresponding slider automatically enabled and will remain in collapsed view by default. One can expand to see the granular accesses.
- From within most of the tabs you can expand the permission category (for example: View, Edit, Delete) to reveal its associated permissions. Click on the right arrow to do so. It will change to a down arrow. The same is applicable for its sub-categories.
- All view related accesses are under the View Accesses group
- All add and edit related accesses are under the Add / Edit Accesses group
- All delete related accesses are under the Delete Accesses group
- If you expand each of these groups then further underlying accesses specific to that group will be displayed. If the slider is enabled against each of these groups, then all underlying accesses are checked or granted by default. If the slider against the group is disabled you can move down to the next level to grant or check selected accesses specific to this group.
- Sliders are present to signify whether the permission category, sub-category and individual permissions are enabled (purple color when ON), partially enabled (sky blue color when a child-level permission is OFF) or disabled (grey when OFF).
- You cannot change the slider states for any of the system defined roles.
Table of Marketing Review Super Admin Role Permissions
The table which elaborates the permissions granted to the Marketing Review Super Admin Role in the relevant tab and its outcomes, is provided in the Annexure section #3.14.
2.4.3.15. Understanding the Marketing Review Content Approver Role
Navigating to the Marketing Review Content Approver Role
Click on the vertical ellipsis icon of the ACTION column against the Marketing Review Content Approver row to load the menu options. Click on the View option to get navigated to the role assignment view.
Tab Elements
The Role Name field displays the role label. Below it, the Description field is displayed. It is blank for all system defined roles.
Below it, there are permissions related to the SurgeONE.ai modules in the eight primary tabs labeled as follows:
- The Company main tab
- The Audit sub-tab under the System Objects main tab
- The Attestation sub-tab under the System Objects main tab
- The Code of Ethics sub-tab under the System Objects main tab
- The Vendor Management sub-tab under the System Objects main tab
- The Cyber sub-tab under the System Objects main tab
- The Marketing Review sub-tab under the System Objects main tab
- The E-Comms sub-tab under the System Objects main tab
You can view the assigned permission related to the role in the applicable tab(s). Different roles have permissions enabled in different permission categories and these permissions can be in different tab(s).
Tab Functionality
- The Company main tab is displayed by default.
- You can click on any module-wise tab under the System Objects main tab to view its modular permissions. Usually permission(s) are granted in the related modules which are associated with the role.
- Indented permissions which are granted will have their corresponding slider automatically enabled and will remain in collapsed view by default. One can expand to see the granular accesses.
- From within most of the tabs you can expand the permission category (for example: View, Edit, Delete) to reveal its associated permissions. Click on the right arrow to do so. It will change to a down arrow. The same is applicable for its sub-categories.
- All view related accesses are under the View Accesses group
- All add and edit related accesses are under the Add / Edit Accesses group
- All delete related accesses are under the Delete Accesses group
- If you expand each of these groups then further underlying accesses specific to that group will be displayed. If the slider is enabled against each of these groups, then all underlying accesses are checked or granted by default. If the slider against the group is disabled you can move down to the next level to grant or check selected accesses specific to this group.
- Sliders are present to signify whether the permission category, sub-category and individual permissions are enabled (purple color when ON), partially enabled (sky blue color when a child-level permission is OFF) or disabled (grey when OFF).
- You cannot change the slider states for any of the system defined roles.
Table of Marketing Review Content Approver Role Permissions
The table which elaborates the permissions granted to the Marketing Review Content Approver Role in the relevant tab and its outcomes, is provided in the Annexure section #3.15.
2.4.3.16. Understanding the Marketing Review Content Provider Role
Navigating to the Marketing Review Content Provider Role
Click on the vertical ellipsis icon of the ACTION column against the Marketing Review Content Provider row to load the menu options. Click on the View option to get navigated to the role assignment view.
Tab Elements
The Role Name field displays the role label. Below it, the Description field is displayed. It is blank for all system defined roles.
Below it, there are permissions related to the SurgeONE.ai modules in the eight primary tabs labeled as follows:
- The Company main tab
- The Audit sub-tab under the System Objects main tab
- The Attestation sub-tab under the System Objects main tab
- The Code of Ethics sub-tab under the System Objects main tab
- The Vendor Management sub-tab under the System Objects main tab
- The Cyber sub-tab under the System Objects main tab
- The Marketing Review sub-tab under the System Objects main tab
- The E-Comms sub-tab under the System Objects main tab
You can view the assigned permission related to the role in the applicable tab(s). Different roles have permissions enabled in different permission categories and these permissions can be in different tab(s).
Tab Functionality
- The Company main tab is displayed by default.
- You can click on any module-wise tab under the System Objects main tab to view its modular permissions. Usually permission(s) are granted in the related modules which are associated with the role.
- Indented permissions which are granted will have their corresponding slider automatically enabled and will remain in collapsed view by default. One can expand to see the granular accesses.
- From within most of the tabs you can expand the permission category (for example: View, Edit, Delete) to reveal its associated permissions. Click on the right arrow to do so. It will change to a down arrow. The same is applicable for its sub-categories.
- All view related accesses are under the View Accesses group
- All add and edit related accesses are under the Add / Edit Accesses group
- All delete related accesses are under the Delete Accesses group
- If you expand each of these groups then further underlying accesses specific to that group will be displayed. If the slider is enabled against each of these groups, then all underlying accesses are checked or granted by default. If the slider against the group is disabled you can move down to the next level to grant or check selected accesses specific to this group.
- Sliders are present to signify whether the permission category, sub-category and individual permissions are enabled (purple color when ON), partially enabled (sky blue color when a child-level permission is OFF) or disabled (grey when OFF).
- You cannot change the slider states for any of the system defined roles.
Table of Marketing Review Content Provider Role Permissions
The table which elaborates the permissions granted to the Marketing Review Content Provider Role in the relevant tab and its outcomes, is provided in the Annexure section #3.16.
2.4.3.17. Understanding the E-Comms Surveillance Super Admin Role
Navigating to the E-Comms Surveillance Super Admin Role
Click on the vertical ellipsis icon of the ACTION column against the E-Comms Surveillance Super Admin row to load the menu options. Click on the View option to get navigated to the role assignment view.
Tab Elements
The Role Name field displays the role label. Below it, the Description field is displayed. It is blank for all system defined roles.
Below it, there are permissions related to the SurgeONE.ai modules in the eight primary tabs labeled as follows:
- The Company main tab
- The Audit sub-tab under the System Objects main tab
- The Attestation sub-tab under the System Objects main tab
- The Code of Ethics sub-tab under the System Objects main tab
- The Vendor Management sub-tab under the System Objects main tab
- The Cyber sub-tab under the System Objects main tab
- The Marketing Review sub-tab under the System Objects main tab
- The E-Comms sub-tab under the System Objects main tab
You can view the assigned permission related to the role in the applicable tab(s). Different roles have permissions enabled in different permission categories and these permissions can be in different tab(s).
Tab Functionality
- The Company main tab is displayed by default.
- You can click on any module-wise tab under the System Objects main tab to view its modular permissions. Usually permission(s) are granted in the related modules which are associated with the role.
- Indented permissions which are granted will have their corresponding slider automatically enabled and will remain in collapsed view by default. One can expand to see the granular accesses.
- From within most of the tabs you can expand the permission category (for example: View, Edit, Delete) to reveal its associated permissions. Click on the right arrow to do so. It will change to a down arrow. The same is applicable for its sub-categories.
- All view related accesses are under the View Accesses group
- All add and edit related accesses are under the Add / Edit Accesses group
- All delete related accesses are under the Delete Accesses group
- If you expand each of these groups then further underlying accesses specific to that group will be displayed. If the slider is enabled against each of these groups, then all underlying accesses are checked or granted by default. If the slider against the group is disabled you can move down to the next level to grant or check selected accesses specific to this group.
- Sliders are present to signify whether the permission category, sub-category and individual permissions are enabled (purple color when ON), partially enabled (sky blue color when a child-level permission is OFF) or disabled (grey when OFF).
- You cannot change the slider states for any of the system defined roles.
Table of E-Comms Surveillance Super Admin Role Permissions
The table which elaborates the permissions granted to the E-Comms Surveillance Super Admin Role in the relevant tab and its outcomes, is provided in the Annexure section #3.17.
2.4.3.18. Understanding the E-Comms Surveillance Admin Role
Navigating to the E-Comms Surveillance Admin Role
Click on the vertical ellipsis icon of the ACTION column against the E-Comms Surveillance Admin row to load the menu options. Click on the View option to get navigated to the role assignment view.
Tab Elements
The Role Name field displays the role label. Below it, the Description field is displayed. It is blank for all system defined roles.
Below it, there are permissions related to the SurgeONE.ai modules in the eight primary tabs labeled as follows:
- The Company main tab
- The Audit sub-tab under the System Objects main tab
- The Attestation sub-tab under the System Objects main tab
- The Code of Ethics sub-tab under the System Objects main tab
- The Vendor Management sub-tab under the System Objects main tab
- The Cyber sub-tab under the System Objects main tab
- The Marketing Review sub-tab under the System Objects main tab
- The E-Comms sub-tab under the System Objects main tab
You can view the assigned permission related to the role in the applicable tab(s). Different roles have permissions enabled in different permission categories and these permissions can be in different tab(s).
Tab Functionality
- The Company main tab is displayed by default.
- You can click on any module-wise tab under the System Objects main tab to view its modular permissions. Usually permission(s) are granted in the related modules which are associated with the role.
- Indented permissions which are granted will have their corresponding slider automatically enabled and will remain in collapsed view by default. One can expand to see the granular accesses.
- From within most of the tabs you can expand the permission category (for example: View, Edit, Delete) to reveal its associated permissions. Click on the right arrow to do so. It will change to a down arrow. The same is applicable for its sub-categories.
- All view related accesses are under the View Accesses group
- All add and edit related accesses are under the Add / Edit Accesses group
- All delete related accesses are under the Delete Accesses group
- If you expand each of these groups then further underlying accesses specific to that group will be displayed. If the slider is enabled against each of these groups, then all underlying accesses are checked or granted by default. If the slider against the group is disabled you can move down to the next level to grant or check selected accesses specific to this group.
- Sliders are present to signify whether the permission category, sub-category and individual permissions are enabled (purple color when ON), partially enabled (sky blue color when a child-level permission is OFF) or disabled (grey when OFF).
- You cannot change the slider states for any of the system defined roles.
Table of E-Comms Surveillance Admin Role Permissions
The table which elaborates the permissions granted to the E-Comms Surveillance Admin Role in the relevant tab and its outcomes, is provided in the Annexure section #3.18.
2.4.3.19. Understanding the E-Comms Surveillance Access Role
Navigating to the E-Comms Surveillance Access Role
Click on the vertical ellipsis icon of the ACTION column against the E-Comms Surveillance Access row to load the menu options. Click on the View option to get navigated to the role assignment view.
Tab Elements
The Role Name field displays the role label. Below it, the Description field is displayed. It is blank for all system defined roles.
Below it, there are permissions related to the SurgeONE.ai modules in the eight primary tabs labeled as follows:
- The Company main tab
- The Audit sub-tab under the System Objects main tab
- The Attestation sub-tab under the System Objects main tab
- The Code of Ethics sub-tab under the System Objects main tab
- The Vendor Management sub-tab under the System Objects main tab
- The Cyber sub-tab under the System Objects main tab
- The Marketing Review sub-tab under the System Objects main tab
- The E-Comms sub-tab under the System Objects main tab
You can view the assigned permission related to the role in the applicable tab(s). Different roles have permissions enabled in different permission categories and these permissions can be in different tab(s).
Tab Functionality
- The Company main tab is displayed by default.
- You can click on any module-wise tab under the System Objects main tab to view its modular permissions. Usually permission(s) are granted in the related modules which are associated with the role.
- Indented permissions which are granted will have their corresponding slider automatically enabled and will remain in collapsed view by default. One can expand to see the granular accesses.
- From within most of the tabs you can expand the permission category (for example: View, Edit, Delete) to reveal its associated permissions. Click on the right arrow to do so. It will change to a down arrow. The same is applicable for its sub-categories.
- All view related accesses are under the View Accesses group
- All add and edit related accesses are under the Add / Edit Accesses group
- All delete related accesses are under the Delete Accesses group
- If you expand each of these groups then further underlying accesses specific to that group will be displayed. If the slider is enabled against each of these groups, then all underlying accesses are checked or granted by default. If the slider against the group is disabled you can move down to the next level to grant or check selected accesses specific to this group.
- Sliders are present to signify whether the permission category, sub-category and individual permissions are enabled (purple color when ON), partially enabled (sky blue color when a child-level permission is OFF) or disabled (grey when OFF).
- You cannot change the slider states for any of the system defined roles.
Table of E-Comms Surveillance Access Role Permissions
The table which elaborates the permissions granted to the E-Comms Surveillance Access Role in the relevant tab and its outcomes, is provided in the Annexure section #3.19.
2.4.4. Assigning User(s) to a Role
- Click on the vertical ellipsis icon of the ACTION column against a custom role row entry to load the menu options. Click on the Assign User(s) option to load the role assignment modal where you can assign relevant users to the existing role. This menu option is enabled for both system defined and custom created roles.
- The following modal window loads where you can assign user(s) or make modifications to the existing assigned user(s) list. There you can find two panels, one on the left and one on the right, labeled as Available Users and Assigned Users, respectively. The former lists out the existing users of your organization, while the latter lists out the users who are currently assigned to this role.
- Ensure that at least one listed user is moved from the Available Users panel to the Assigned Users panel. To move listed users, you can use the buttons provided in the middle of the modal window. Refer to the following four points stated below to understand how to move users between the panels.
- Right arrow (>) button - Click on it after making checkbox selection(s) of the listed users of the Available Users panel to move the selected users to the Assigned Users panel. Multiple checkbox selection is permitted. Alternatively, you can also double click on the label to move it, instead of clicking on the right arrow icon.
- Left arrow (<) button - Click on it after making checkbox selection(s) of the listed users of the Assigned Users panel to move the selected users to the Available Users panel. Multiple checkbox selection is permitted. Alternatively, you can also double click on the label to move it, instead of clicking on the left arrow icon.
- Double right arrow (>>) button - Click on it to move the displayed users of the Available Users panel to the Assigned Users panel. If you have performed a search operation and then click on this button, then only the filtered users will be moved, while the other users who were not fetched by the search operation, will not be moved.
- Double left arrow (<<) button - Click on it to move the displayed users of the Assigned Users panel to the Available Users panel. If you have performed a search operation and then click on this button, then only the filtered users will be moved, while the other users who were not fetched by the search operation, will not be moved.
- Click on the Done button to confirm user assignment based on the selection(s) made.
- The modal window closes.
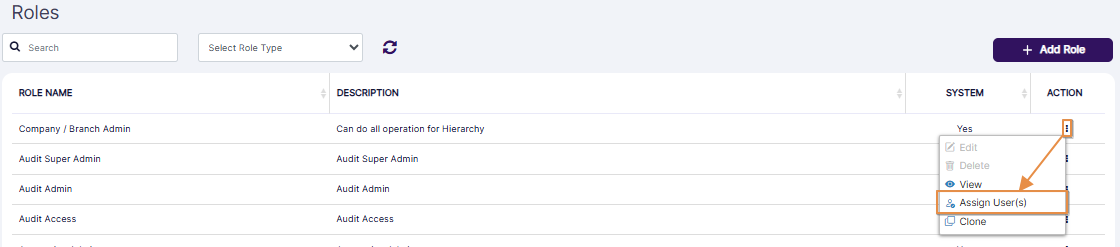 Fig: 48 - Enabled Assign User(s) menu option
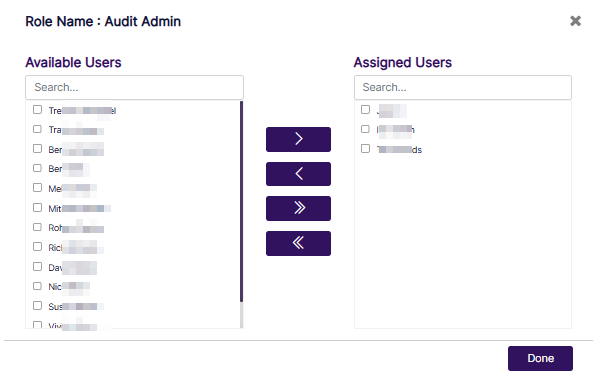 Fig: 49 - Modal window to assign user(s) to chosen role
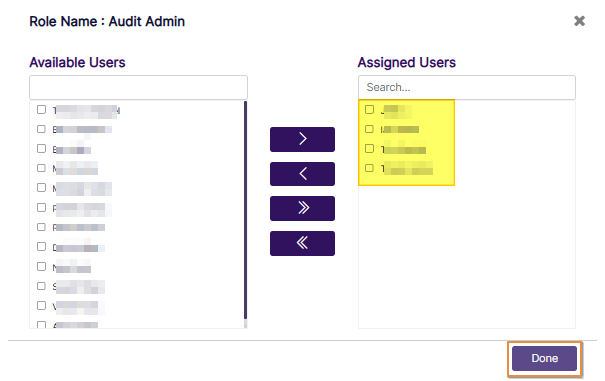 Fig: 50 - Button to confirm user(s) assignment to the custom role
No Access to a Module:
If a user is not assigned to any of the roles specific to a module, then he/she will not get access to that entire module. For example, if a user is not a member of the Audit Super Admin, Audit Admin, and Audit Access Roles, then that user will not get the Audit Menu link on the navigation bar.
NOTE:
- A search facility is also provided in both the panels. The following screenshot displays a search operation executed in the Available Users panel.
- You cannot proceed to assign users to the role, unless there are existing users listed in the modal window.
- The system will prompt a validation tooltip when you do not move any listed user to the Assigned Users panel and click on the Done button.
- The system will prompt a validation tooltip when you try to remove any listed user from the Assigned Users panel and that user is not assigned to any other existing role. The workaround would be to first assign this user to another role and then try to remove the user from the assigned users of this role.
- You can assign users when you are creating a custom role or editing an existing custom role or simply when viewing a role. Since the process is similar to the one explained in Creating a new Role section, it has not been repeated here.
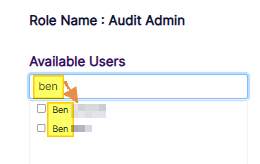 Fig: 51 - Search facility in the modal window to execute search operation among the listed users
Fig: 52 - Validation to select user(s) to assign to new custom role
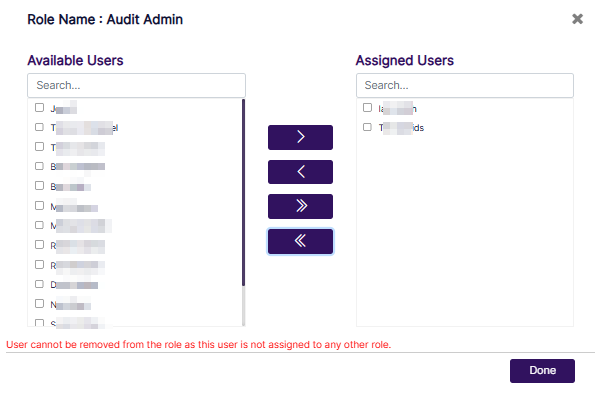 Fig: 53 - Validation tooltip when you try to remove any listed user from the Assigned Users panel and that user is not assigned to any other existing role
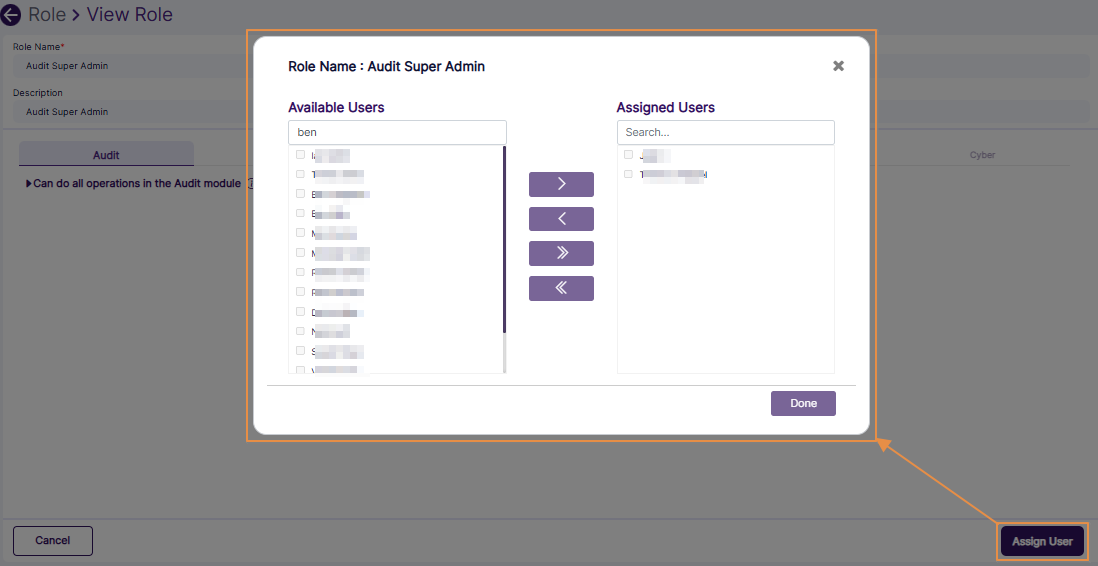 Fig: 54 - Assigning users when viewing a role
2.4.5. Cloning a Role
A Company Admin user can clone an existing system or a custom role to create a new role. All users assigned and accesses granted to the source role will be copied over to the new one, and you can remove some of the assigned accesses and assign new accesses to this new one. The same is applicable for users as well. This would facilitate creating roles in a very short time.
- Click on the vertical ellipsis icon of the ACTION column against a custom role row entry to load the menu options. Click on the Clone option to load the role assignment modal. This menu option is enabled for both system defined and custom created roles.
- The following modal window loads where you may update the role name and the role description. The role name and description field values are loaded as the same, but a prefix label of Copy of is added before the role name.
- Can Access Roles
- Can Access Mail Templates
- Can Access Manage Objects
- Can View Roles
- Can Add / Edit / Clone / Delete Roles
- Can View Mail Templates
- Can Edit Mail Templates
- Can View Manage Objects
- Can Add / Edit / Delete Manage Objects
- Next, click on the System Objects tab. The Audit tab is displayed after you click on it.
- Can View All Audits
- Can View Audits assign to me
- Can Download an Audit Report
- Can View Past / Completed Audit Reports
- Can Add / Edit an Audit
- Can Attest an Audit
- Can Remediate an Audit
- Can Resolve Red Flagged Questions
- Can Add / Edit Questionnaire Template
- Can Delete a (Not Started) Audit
- Can View All Attestations
- Can View Attestations assign to me
- Can View Past Attestation Reports (All)
- Can View Past Attestation Reports (Self)
- Can Add / Edit an Attestation
- Can Attest an Attestation
- Can Remediate an Attestation
- Can Resolve Red Flagged Questions
- Can Add / Edit Questionnaire Template
- Can Send Reminder
- Can Delete a (Not Started) Attestation
- Can View All Requests
- Can View Requests Submitted by Me or my subordinates
- Can View Rules
- Can View all Completed Requests
- Can View Completed Code of Ethics Requests submitted by me and my subordinates
- Can Add Requests
- Can Approve or Reject all Requests
- Can Approve / Reject Requests Submitted by my subordinates
- Can Add / Edit Rules
- Can View All VDD
- Can View My VDD
- Can Download a VDD Report
- Can View Past / Completed Vendor Assessment Reports
- Can Add / Edit a Vendor
- Can Add / Edit an Assessment for all Vendors
- Can Conduct All Assessments
- Can Remediate Assessments
- Can Resolve Red Flagged Questions
- Can Add / Edit Questionnaire Template
- Can do all operations related to Cyber Dashboard in terms of viewing as well as widget and dashboard configurations
- Can do all operations related to Incident
- Can resolve Incident
- Can do all operations in the Marketing Review module
- Can View Marketing Review
- Can View Marketing Review Assign to me
- Add / Edit Marketing Review
- Delete Marketing Review
- Upload Marketing Review
- Approve Marketing Review
- Can do all operations in the E-Comms Surveillance module
- Can View E-Comms Surveillance
- Can View E-Comms Surveillance Assign to me
- Add / Edit E-Comms Surveillance
- Delete E-Comms Surveillance
- The permissions granted in the parent role, or the role being used to create this cloned copy are also copied over as it is. You can make applicable changes to the above-mentioned slider states. After the permissions are granted as required, ensure that at least one listed user is moved from the Available Users panel to the Assigned Users panel when assigning users. During cloning, assigned users are not copied over to the cloned copy of the role, even if users were assigned to the parent or original role from which the cloned role is being made.
- Click on the Done button to confirm user assignment based on the selection(s) made.
- Click on the Submit button to create this cloned role.
- Get redirected to the Roles page. The cloned role gets listed in the grid view. The System column displays a No label since this cloned role is also a custom role.
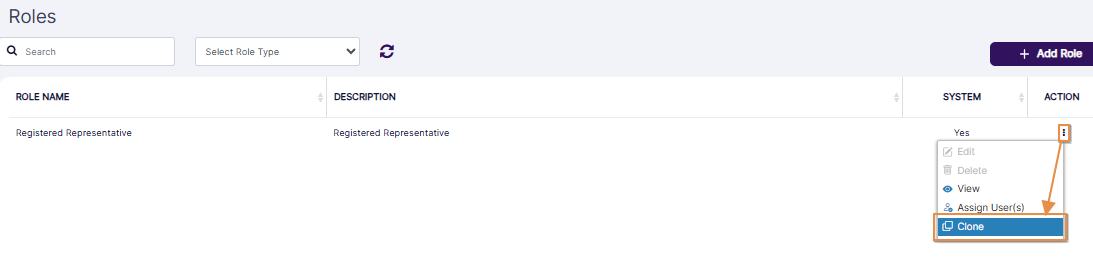 Fig: 55 - Clone menu option
 Fig: 56 - Clone Role page view
The Company tab is selected by default. When you expand the Can Access Settings category from within the Company tab, then the following permissions are revealed:
When you expand the Can Access Roles sub-category of the Can Access Settings category from within the Company tab, then the following permissions are revealed:
When you expand the Can Access Mail Templates sub-category of the Can Access Settings category from within the Company tab, then the following permissions are revealed:
When you expand the Can Access Manage Objects sub-category of the Can Access Settings category from within the Company tab, then the following permissions are revealed:
When you expand the View Accesses category of the Audit tab, then the following permissions are revealed:
When you expand the Add / Edit Accesses category of the Audit tab, then the following permissions are revealed:
When you expand the Delete Accesses category of the Audit tab, then the following permission is revealed:
When you expand the View Accesses category of the Attestation tab, then the following permissions are revealed:
When you expand the Add / Edit Accesses category of the Attestation tab, then the following permissions are revealed:
When you expand the Delete Accesses category of the Attestation tab, then the following permission is revealed:
When you expand the View Accesses category of the Code of Ethics tab, then the following permissions are revealed:
When you expand the Add / Edit Accesses category of the Code of Ethics tab, then the following permissions are revealed:
When you expand the View Accesses category of the Vendor Management tab, then the following permissions are revealed:
When you expand the Add / Edit Accesses category of the Vendor Management tab, then the following permissions are revealed:
When you navigate to the Cyber tab, then the following permission category is revealed:
When you expand the Can do all operations related to Cyber Dashboard in terms of viewing as well as widget and dashboard configurations category of the Cyber tab, then the following granular permissions are revealed:
When you navigate to the Marketing_Review tab, then the following permission category is revealed:
When you expand the Can do all operations in the Marketing Review module category of the Marketing_Review tab, then the following granular permissions are revealed:
When you navigate to the E_Comms tab, then the following permission category is revealed:
When you expand the Can do all operations in the E-Comms Surveillance module category of the E_Comms tab, then the following granular permissions are revealed:
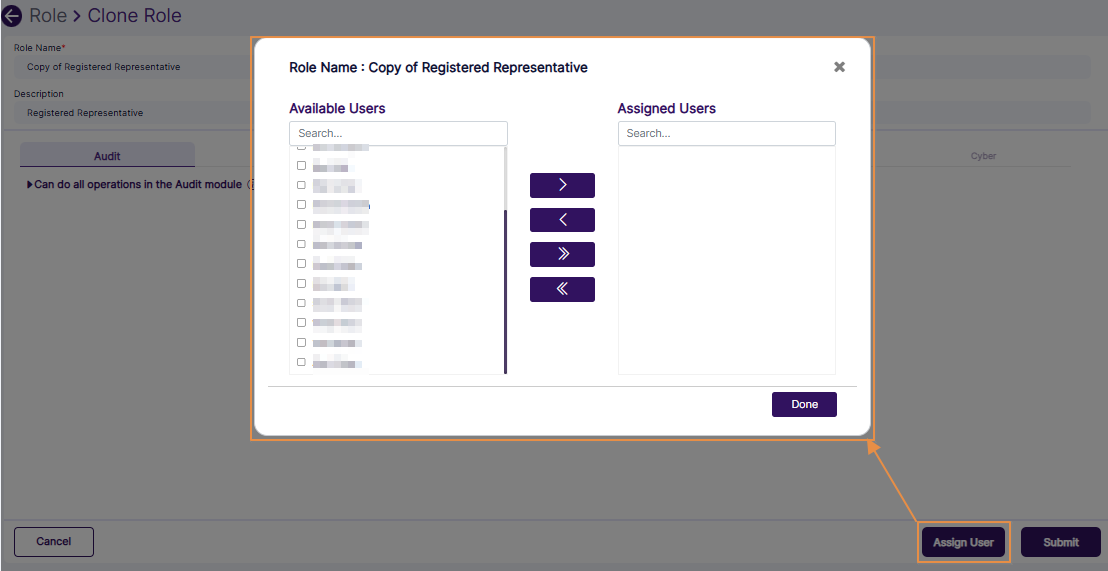 Fig: 57 - Assigning users to the cloned role
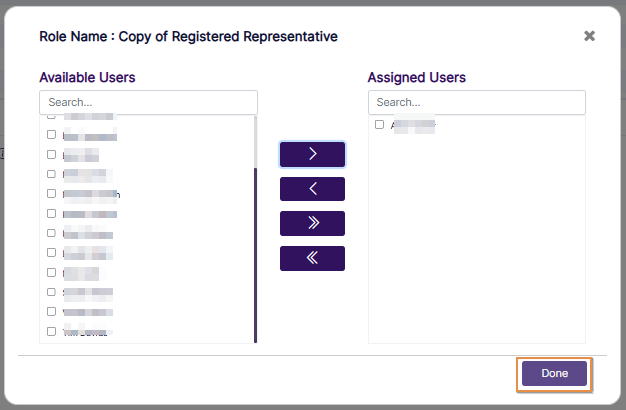 Fig: 58 - Button to confirm user(s) assignment to the custom role
 Fig: 59 - Submit button to create cloned role
 Fig: 60 - Cloned role getting listed
NOTE:
- You cannot proceed to assign users to the role, unless there are existing users listed in the modal window.
- The system will prompt a validation tooltip when you do not move any listed user to the Assigned Users panel and click on the Done button.
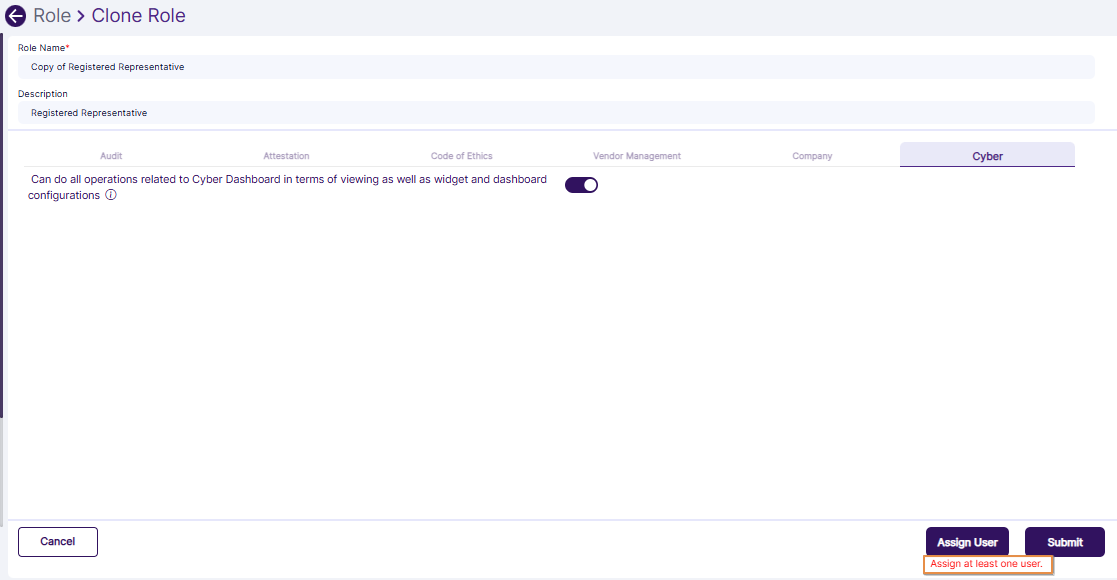 Fig: 61 - Validation to select user(s) to assign to new custom role
2.5. Pagination
Pagination options are provided at the bottom, to navigate through multiple pages of roles, which populate the grid view as per the selected count of items per page.
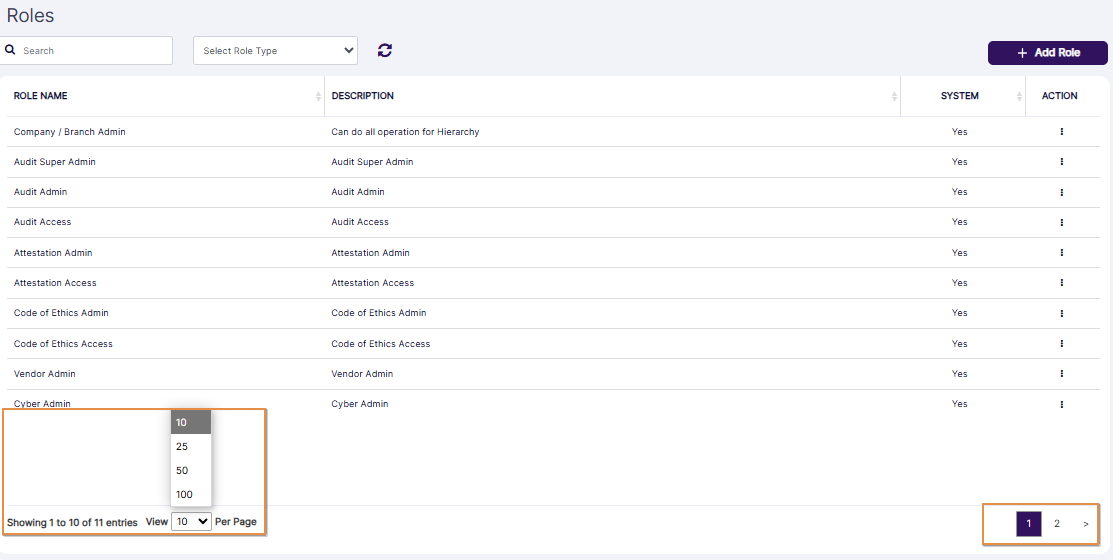 Fig: 62 - Pagination options
3. Annexure > Tables for System Defined Roles
3.1. Table of Company / Branch Admin Role Permissions
Permissions of the Company tab
| Main Tab Header | Sub-Tab Label | Operations | 1st Level | 2nd Level | 3rd Level | Permission | Permission Description |
|---|---|---|---|---|---|---|---|
|
Company |
N/A |
Can do all operations in all the modules in SurgeONE |
Can Access Settings |
|
|
Granted |
This access will allow to do all operations across the entire SurgeONE application |
|
Can Access Roles |
|
Granted |
This access will expose the Settings menu link on the navigation bar |
||||
|
Can View Roles |
Granted |
This access will allow to view all the existing roles defined for the organization |
|||||
|
Can Add / Edit / Clone / Delete Roles |
Granted |
This access will allow to add, edit, clone and delete roles for the organization |
|||||
|
Can Access Mail Templates |
|
Granted |
This access will expose the Mail Templates menu link on the navigation bar |
||||
|
Can View Mail Templates |
Granted |
This access will allow to view all the existing mail templates defined for the organization |
|||||
|
Can Edit Mail Templates |
Granted |
This access will allow to add and edit mail templates for the organization |
|||||
|
Can Access Manage Objects |
|
Granted |
This access will expose the Manage Objects menu link on the navigation bar |
||||
|
Can View Manage Objects |
Granted |
This access will allow to view all the existing attributes defined for the organization |
|||||
|
Can Add / Edit / Delete Manage Objects |
Granted |
This access will allow to add, edit and delete attributes for the organization |
Permissions of the System Objects tab
| Main Tab Header | Sub-Tab Label | Operations | 1st Level | 2nd Level | Permission | Permission Description | |
|---|---|---|---|---|---|---|---|
|
System Objects |
Audits |
Can do all operations in the Audit module |
|
|
Granted |
This access will allow to do all operations in the Audit module |
|
|
View Accesses |
|
Granted |
This access will allow all view related permissions in the Audit module |
||||
|
Can View All Audits |
Granted |
This access will allow to view all audits submitted in the application |
|||||
|
Can View Audits assign to me |
Granted |
This access will allow to view those specific audits for which the logged in user is either the Submitter or Auditor or Auditee |
|||||
|
Can Download an Audit Report |
Granted |
This access will allow to download an audit report for each audit from the Audit Calendar page or from the Past Audits report page |
|||||
|
Can View Past / Completed Audit Reports |
Granted |
This access will allow to view all completed audit reports |
|||||
|
Add / Edit Accesses |
|
Granted |
This access will allow add and edit related accesses in the Audit module |
||||
|
Can Add / Edit an Audit |
Granted |
This access will allow to schedule an audit and edit existing audits that have not yet been started |
|||||
|
Can Conduct an Audit |
Granted |
This access will allow to conduct or execute an unassigned audit |
|||||
|
Can Remediate an Audit |
Granted |
This access will allow to remediate an audit with red flags post execution stage |
|||||
|
Can Resolve Red Flagged Questions |
Granted |
This access will expose the Resolve button and will allow to resolve the red flagged questions in the remediation stage of an audit |
|||||
|
Can Add / Edit Questionnaire Template |
Granted |
This access will allow to add a new questionnaire template and edit an existing questionnaire template in the Audit module |
|||||
|
Delete Accesses |
|
Granted |
This access will allow all delete related actions in the Audit module |
||||
|
Can Delete a (Not Started) Audit |
Granted |
This access will allow to delete an audit that is in Not Started status |
|||||
|
Attestations |
Can do all operations in the Attestation module |
|
|
Granted |
This access will allow to do all operations in the Attestation module |
||
|
View Accesses |
|
Granted |
This access will allow all view related permissions in the Attestation module |
||||
|
Can View All Attestations |
Granted |
This access will allow to view all attestations submitted in the attestation |
|||||
|
Can View Attestations assign to me |
Granted |
This access will allow to view specific attestations for which the logged in user is Submitter or Attestor |
|||||
|
Can View Past Attestation Reports (All) |
Granted |
This access will allow to view the reports of all the completed attestations |
|||||
|
Can View Past Attestation Reports (Self) |
Granted |
This access will allow to view the reports for the specific completed attestations where the logged in user is an attestor |
|||||
|
Add / Edit Accesses |
|
Granted |
This access will allow all add and edit related permissions in the Attestation module |
||||
|
Can Add / Edit an Attestation |
Granted |
This access will allow to schedule an attestation and edit existing attestations that have not yet been started |
|||||
|
Can Attest an Attestation |
Granted |
This access will allow to respond to the questionnaire of an assigned attestation |
|||||
|
Can Remediate an Attestation |
Granted |
This access will allow to remediate an attestation with red flags post execution stage |
|||||
|
Can Resolve Red Flagged Questions |
Granted |
This access will expose the Resolve button and will allow to resolve the red flagged questions in the remediation stage of an attestation |
|||||
|
Can Add / Edit Questionnaire Template |
Granted |
This access will allow to add a new covering email and questionnaire template and edit an existing questionnaire template in the Attestation module |
|||||
|
Can Send Reminder |
Granted |
This access will allow to send reminder to the attestors for an assigned attestation that has become overdue |
|||||
|
Delete Accesses |
|
Granted |
This access will allow all delete related permissions in the Attestation module |
||||
|
Can Delete a (Not Started) Attestation |
Granted |
This access will allow to delete an attestation that is in Not Started status |
|||||
|
Code of Ethics |
Can do all operations in the Code of Ethics module |
|
|
Granted |
This access will allow to do all operations in the Code of Ethics module |
||
|
View Accesses |
|
Granted |
This access will allow to view all Code of Ethics requests submitted in the application |
||||
|
Can View All Requests |
Granted |
This access will allow to view all Code of Ethics requests submitted in the application |
|||||
|
Can View Requests Submitted by Me or my subordinates |
Granted |
This access will allow to view all Code of Ethics requests submitted by the logged in user or his or her subordinates |
|||||
|
Can View Rules |
Granted |
This access will allow to view all the rules defined for Political Contributions, Outside Business Activities and Gifts & Entertainment |
|||||
|
Can View all Completed Requests |
Granted |
This access will allow to view all completed requests submitted in the Code of Ethics module |
|||||
|
Can View Completed Code of Ethics Requests submitted by me and my subordinates |
Granted |
This access will allow to view all completed requests submitted in the Code of Ethics module for which the logged in user is Submitter |
|||||
|
Add / Edit Accesses |
|
Granted |
This access will allow all add and edit related permissions in the Code of Ethics module |
||||
|
Can Add Requests |
Granted |
This access will allow to add a request in any of the types in the Code of Ethics module |
|||||
|
Can Approve or Reject all Requests |
Granted |
This access will allow to approve or reject all the pending review requests submitted in any of the types in the Code of Ethics module |
|||||
|
Can Approve / Reject Requests Submitted by my subordinates |
Granted |
This access will allow to approve or reject specific pending review requests submitted only by the subordinates of the logged in user in any of the types in the Code of Ethics module |
|||||
|
Can Add / Edit Rules |
Granted |
This access will allow to define a new rule and edit existing rules |
|||||
|
Vendor Management |
Can do all operations in the Vendor Management module |
|
|
Granted |
This access will allow to do all operations in the Vendor Management module |
||
|
View Accesses |
|
Granted |
This access will allow all view related permissions in the Vendor Management module |
||||
|
Can View All VDD |
Granted |
This access will allow to view all vendor assessments submitted in the application |
|||||
|
Can View My VDD |
Granted |
This access will allow to view all vendor assessments submitted in the application by the logged-in user |
|||||
|
Can Download VDD Report |
Granted |
This access will allow to download a vendor assessment report |
|||||
|
Can View Past / Completed Vendor Assessment Reports |
Granted |
This access will allow to view all the completed vendor assessment reports |
|||||
|
Add / Edit Accesses |
|
Granted |
This access will allow all add and edit related permissions in the Vendor Management module |
||||
|
Can Add / Edit a Vendor |
Granted |
This access will allow to add a vendor and edit any existing vendors |
|||||
|
Can Add / Edit an Assessment for all Vendors |
Granted |
This access will allow to schedule an assessment and edit existing assessments that have not yet been started |
|||||
|
Can Conduct All Assessments |
Granted |
This access will allow to conduct all vendor assessments |
|||||
|
Can Remediate Assessments |
Granted |
This access will allow to remediate an assessment with red flags post execution stage |
|||||
|
Can Resolve Red Flagged Questions |
Granted |
This access will expose the Resolve button and will allow to resolve the red flagged questions in the remediation stage of all vendor assessments |
|||||
|
Can Add / Edit Questionnaire Template |
Granted |
This access will allow to add a new questionnaire template and edit an existing questionnaire template in the Vendor assessment module |
|||||
|
Cyber |
Can do all operations related to Cyber Dashboard in terms of viewing as well as widget and dashboard configurations |
|
|
Granted |
This access will allow to do all operations in the Track Cyber / Cyber Compliance module |
||
|
Can do all operations related to Incident |
N/A |
Granted |
This access will allow to do all operation in the Incident Management module |
||||
|
Can resolve Incident |
N/A |
Granted |
This access will allow to resolve Incident |
||||
|
Marketing Review |
Can do all operations in the Marketing Review module |
|
Granted |
This access will allow to do all operations in the Marketing Review module |
|||
|
Can View Marketing Review |
N/A |
Granted |
This access will allow to view all Marketing Review submitted in the application |
||||
|
Can View Marketing Review Assign to me |
N/A |
Granted |
This access will allow to view all Marketing Review submitted by me |
||||
|
Add / Edit Marketing Review |
N/A |
Granted |
This access will permit all add and edit related accesses in the Marketing Review module |
||||
|
Delete Marketing Review |
N/A |
Granted |
This access will allow all delete related actions in the Marketing Review module |
||||
|
Upload Marketing Review |
N/A |
Granted |
This access will permit all upload related accesses in the Marketing Review module |
||||
|
Approve Marketing Review |
N/A |
Granted |
This access will permit all approve related accesses in the Marketing Review module |
||||
|
E-Comms |
Can do all operations in the E-Comms Surveillance module |
|
|
Granted |
This access will allow to do all operations in the E-Comms module |
||
|
Can View E-Comms Surveillance |
N/A |
Granted |
This access will allow to view all E-Comms submitted in the application |
||||
|
Can View E-Comms Surveillance Assign to me |
N/A |
Granted |
This access will allow to view all E-Comms submitted by me |
||||
|
Add / Edit E-Comms Surveillance |
N/A |
Granted |
This access will permit all add and edit related accesses in the E-Comms module |
||||
|
Delete E-Comms Surveillance |
N/A |
Granted |
This access will allow all delete related actions in the E-Comms module |
||||
3.2. Table of Audit Super Admin Role Permissions
| Main Tab Header | Sub-Tab Label | Operations | 1st Level | 2nd Level | Permission | Permission Description |
|---|---|---|---|---|---|---|
|
System Objects |
Audits |
Can do all operations in the Audit module |
|
|
Granted |
This access will allow to do all operations in the Audit module |
|
View Accesses |
|
Granted |
This access will allow all view related permissions in the Audit module |
|||
|
Can View All Audits |
Granted |
This access will allow to view all audits submitted in the application |
||||
|
Can View Audits assign to me |
Granted |
This access will allow to view those specific audits for which the logged in user is either the Submitter or Auditor or Auditee |
||||
|
Can Download an Audit Report |
Granted |
This access will allow to download an audit report for each audit from the Audit Calendar page or from the Past Audits report page |
||||
|
Can View Past / Completed Audit Reports |
Granted |
This access will allow to view all completed audit reports |
||||
|
Add / Edit Accesses |
|
Granted |
This access will allow add and edit related permissions in the Audit module |
|||
|
Can Add / Edit an Audit |
Granted |
This access will allow to schedule an audit and edit existing audits that have not yet been started |
||||
|
Can Conduct an Audit |
Granted |
This access will allow to conduct or execute an unassigned audit |
||||
|
Can Remediate an Audit |
Granted |
This access will allow to remediate an audit with red flags post execution stage |
||||
|
Can Resolve Red Flagged Questions |
Granted |
This access will expose the Resolve button and will allow to resolve the red flagged questions in the remediation stage of an audit |
||||
|
Can Add / Edit Questionnaire Template |
Granted |
This access will allow to add a new questionnaire template and edit an existing questionnaire template in the Audit module |
||||
|
Delete Accesses |
|
Granted |
This access will allow all delete related actions in the Audit module |
|||
|
Can Delete a (Not Started) Audit |
Granted |
This access will allow to delete an audit that is in Not Started status |
3.3. Table of Audit Admin Role Permissions
| Main Tab Header | Sub-Tab Label | Operations | 1st Level | 2nd Level | Permission | Permission Description |
|---|---|---|---|---|---|---|
|
System Objects |
Audits |
Can do all operations in the Audit module |
|
|
Partially Granted |
This access will allow to do all operations in the Audit module |
|
View Accesses |
|
Partially Granted |
This access will allow all view related permissions in the Audit module |
|||
|
Can View All Audits |
Disabled |
This access will allow to view all audits submitted in the application |
||||
|
Can View Audits assign to me |
Granted |
This access will allow to view those specific audits for which the logged in user is either the Submitter or Auditor or Auditee |
||||
|
Can Download an Audit Report |
Granted |
This access will allow to download an audit report for each audit from the Audit Calendar page or from the Past Audits report page |
||||
|
Can View Past / Completed Audit Reports |
Granted |
This access will allow to view all completed audit reports |
||||
|
Add / Edit Accesses |
|
Partially Granted |
This access will allow add and edit related accesses in the Audit module |
|||
|
Can Add / Edit an Audit |
Granted |
This access will allow to schedule an audit and edit existing audits that have not yet been started |
||||
|
Can Conduct an Audit |
Granted |
This access will allow to conduct or execute an unassigned audit |
||||
|
Can Remediate an Audit |
Granted |
This access will allow to remediate an audit with red flags post execution stage |
||||
|
Can Resolve Red Flagged Questions |
Granted |
This access will expose the Resolve button and will allow to resolve the red flagged questions in the remediation stage of an audit |
||||
|
Can Add / Edit Questionnaire Template |
Disabled |
This access will allow to add a new questionnaire template and edit an existing questionnaire template in the Audit module |
||||
|
Delete Accesses |
|
Granted |
This access will allow all delete related actions in the Audit module |
|||
|
Can Delete a (Not Started) Audit |
Granted |
This access will allow to delete an audit that is in Not Started status |
3.4. Table of Audit Access Role Permissions
| Main Tab Header | Sub-Tab Label | Operations | 1st Level | 2nd Level | Permission | Permission Description |
|---|---|---|---|---|---|---|
|
System Objects |
Audits |
Can do all operations in the Audit module |
|
|
Partially Granted |
This access will allow to do all operations in the Audit module |
|
View Accesses |
|
Partially Granted |
This access will allow all view related permissions in the Audit module |
|||
|
Can View All Audits |
Disabled |
This access will allow to view all audits submitted in the application |
||||
|
Can View Audits assign to me |
Granted |
This access will allow to view those specific audits for which the logged in user is either the Submitter or Auditor or Auditee |
||||
|
Can Download an Audit Report |
Granted |
This access will allow to download an audit report for each audit from the Audit Calendar page or from the Past Audits report page |
||||
|
Can View Past / Completed Audit Reports |
Granted |
This access will allow to view all completed audit reports |
||||
|
Add / Edit Accesses |
|
Partially Granted |
This access will allow add and edit related accesses in the Audit module |
|||
|
Can Add / Edit an Audit |
Disabled |
This access will allow to schedule an audit and edit existing audits that have not yet been started |
||||
|
Can Conduct an Audit |
Granted |
This access will allow to conduct or execute an unassigned audit |
||||
|
Can Remediate an Audit |
Granted |
This access will allow to remediate an audit with red flags post execution stage |
||||
|
Can Resolve Red Flagged Questions |
Disabled |
This access will expose the Resolve button and will allow to resolve the red flagged questions in the remediation stage of an audit |
||||
|
Can Add / Edit Questionnaire Template |
Disabled |
This access will allow to add a new questionnaire template and edit an existing questionnaire template in the Audit module |
||||
|
Delete Accesses |
|
Disabled |
This access will allow all delete related actions in the Audit module |
|||
|
Can Delete a (Not Started) Audit |
Disabled |
This access will allow to delete an audit that is in Not Started status |
3.5. Table of Attestation Admin Role Permissions
| Main Tab Header | Sub-Tab Label | Operations | 1st Level | 2nd Level | Permission | Permission Description |
|---|---|---|---|---|---|---|
|
System Objects |
Attestations |
Can do all operations in the Attestation module |
|
|
Granted |
This access will allow to do all operations in the Attestation module |
|
View Accesses |
|
Granted |
This access will allow all view related permissions in the Attestation module |
|||
|
Can View All Attestations |
Granted |
This access will allow to view all attestations submitted in the attestation |
||||
|
Can View Attestations assign to me |
Granted |
This access will allow to view specific attestations for which the logged in user is Submitter or Attestor |
||||
|
Can View Past Attestation Reports (All) |
Granted |
This access will allow to view the reports of all the completed attestations |
||||
|
Can View Past Attestation Reports (Self) |
Granted |
This access will allow to view the reports for the specific completed attestations where the logged in user is an attestor |
||||
|
Add / Edit Accesses |
|
Granted |
This access will allow all add and edit related permissions in the Attestation module |
|||
|
Can Add / Edit an Attestation |
Granted |
This access will allow to schedule an attestation and edit existing attestations that have not yet been started |
||||
|
Can Attest an Attestation |
Granted |
This access will allow to respond to the questionnaire of an assigned attestation |
||||
|
Can Remediate an Attestation |
Granted |
This access will allow to remediate an attestation with red flags post execution stage |
||||
|
Can Resolve Red Flagged Questions |
Granted |
This access will expose the Resolve button and will allow to resolve the red flagged questions in the remediation stage of an attestation |
||||
|
Can Add / Edit Questionnaire Template |
Granted |
This access will allow to add a new covering email and questionnaire template and edit an existing questionnaire template in the Attestation module |
||||
|
Can Send Reminder |
Granted |
This access will allow to send reminder to the attestors for an assigned attestation that has become overdue |
||||
|
Delete Accesses |
|
Granted |
This access will allow all delete related permissions in the Attestation module |
|||
|
Can Delete a (Not Started) Attestation |
Granted |
This access will allow to delete an attestation that is in Not Started status |
3.6. Table of Attestation Access Role Permissions
| Main Tab Header | Sub-Tab Label | Operations | 1st Level | 2nd Level | Permission | Permission Description |
|---|---|---|---|---|---|---|
|
System Objects |
Attestations |
Can do all operations in the Attestation module |
|
|
Partially Granted |
This access will allow to do all operations in the Attestation module |
|
View Accesses |
|
Partially Granted |
This access will allow all view related permissions in the Attestation module |
|||
|
Can View All Attestations |
Disabled |
This access will allow to view all attestations submitted in the attestation |
||||
|
Can View Attestations assign to me |
Granted |
This access will allow to view specific attestations for which the logged in user is Submitter or Attestor |
||||
|
Can View Past Attestation Reports (All) |
Disabled |
This access will allow to view the reports of all the completed attestations |
||||
|
Can View Past Attestation Reports (Self) |
Granted |
This access will allow to view the reports for the specific completed attestations where the logged in user is an attestor |
||||
|
Add / Edit Accesses |
|
Partially Granted |
This access will allow all add and edit related permissions in the Attestation module |
|||
|
Can Add / Edit an Attestation |
Disabled |
This access will allow to schedule an attestation and edit existing attestations that have not yet been started |
||||
|
Can Attest an Attestation |
Granted |
This access will allow to respond to the questionnaire of an assigned attestation |
||||
|
Can Remediate an Attestation |
Granted |
This access will allow to remediate an attestation with red flags post execution stage |
||||
|
Can Resolve Red Flagged Questions |
Disabled |
This access will expose the Resolve button and will allow to resolve the red flagged questions in the remediation stage of an attestation |
||||
|
Can Add / Edit Questionnaire Template |
Disabled |
This access will allow to add a new covering email and questionnaire template and edit an existing questionnaire template in the Attestation module |
||||
|
Can Send Reminder |
Disabled |
This access will allow to send reminder to the attestors for an assigned attestation that has become overdue |
||||
|
Delete Accesses |
|
Disabled |
This access will allow all delete related permissions in the Attestation module |
|||
|
Can Delete a (Not Started) Attestation |
Disabled |
This access will allow to delete an attestation that is in Not Started status |
3.7. Table of Code of Ethics Admin Role Permissions
| Main Tab Header | Sub-Tab Label | Operations | 1st Level | 2nd Level | Permission | Permission Description |
|---|---|---|---|---|---|---|
|
System Objects |
Code of Ethics |
Can do all operations in the Code of Ethics module |
|
|
Granted |
This access will allow to do all operations in the Code of Ethics module |
|
View Accesses |
|
Granted |
This access will allow to view all Code of Ethics requests submitted in the application |
|||
|
Can View All Requests |
Granted |
This access will allow to view all Code of Ethics requests submitted in the application |
||||
|
Can View Requests Submitted by Me or my subordinates |
Granted |
This access will allow to view all Code of Ethics requests submitted by the logged in user or his or her subordinates |
||||
|
Can View Rules |
Granted |
This access will allow to view all the rules defined for Political Contributions, Outside Business Activities and Gifts & Entertainment |
||||
|
Can View all Completed Requests |
Granted |
This access will allow to view all completed requests submitted in the Code of Ethics module |
||||
|
Can View Completed Code of Ethics Requests submitted by me and my subordinates |
Granted |
This access will allow to view all completed requests submitted in the Code of Ethics module for which the logged in user is Submitter |
||||
|
Add / Edit Accesses |
|
Granted |
This access will allow all add and edit related permissions in the Code of Ethics module |
|||
|
Can Add Requests |
Granted |
This access will allow to add a request in any of the types in the Code of Ethics module |
||||
|
Can Approve or Reject all Requests |
Granted |
This access will allow to approve or reject all the pending review requests submitted in any of the types in the Code of Ethics module |
||||
|
Can Approve / Reject Requests Submitted by my subordinates |
Granted |
This access will allow to approve or reject specific pending review requests submitted only by the subordinates of the logged in user in any of the types in the Code of Ethics module |
||||
|
Can Add / Edit Rules |
Granted |
This access will allow to define a new rule and edit existing rules |
3.8. Table of Code of Ethics Access Role Permissions
| Main Tab Header | Sub-Tab Label | Operations | 1st Level | 2nd Level | Permission | Permission Description |
|---|---|---|---|---|---|---|
|
System Objects |
Code of Ethics |
Can do all operations in the Code of Ethics module |
|
|
Partially Granted |
This access will allow to do all operations in the Code of Ethics module |
|
View Accesses |
|
Partially Granted |
This access will allow to view all Code of Ethics requests submitted in the application |
|||
|
Can View All Requests |
Disabled |
This access will allow to view all Code of Ethics requests submitted in the application |
||||
|
Can View Requests Submitted by Me or my subordinates |
Granted |
This access will allow to view all Code of Ethics requests submitted by the logged in user or his or her subordinates |
||||
|
Can View Rules |
Granted |
This access will allow to view all the rules defined for Political Contributions, Outside Business Activities and Gifts & Entertainment |
||||
|
Can View all Completed Requests |
Disabled |
This access will allow to view all completed requests submitted in the Code of Ethics module |
||||
|
Can View Completed Code of Ethics Requests submitted by me and my subordinates |
Granted |
This access will allow to view all completed requests submitted in the Code of Ethics module for which the logged in user is Submitter |
||||
|
Add / Edit Accesses |
|
Partially Granted |
This access will allow all add and edit related permissions in the Code of Ethics module |
|||
|
Can Add Requests |
Granted |
This access will allow to add a request in any of the types in the Code of Ethics module |
||||
|
Can Approve or Reject all Requests |
Disabled |
This access will allow to approve or reject all the pending review requests submitted in any of the types in the Code of Ethics module |
||||
|
Can Approve / Reject Requests Submitted by my subordinates |
Granted |
This access will allow to approve or reject specific pending review requests submitted only by the subordinates of the logged in user in any of the types in the Code of Ethics module |
||||
|
Can Add / Edit Rules |
Disabled |
This access will allow to define a new rule and edit existing rules |
3.9. Table of Vendor Admin Role Permissions
| Main Tab Header | Sub-Tab Label | Operations | 1st Level | 2nd Level | Permission | Permission Description |
|---|---|---|---|---|---|---|
|
System Objects |
Vendor Management |
Can do all operations in the Vendor Management module |
|
|
Granted |
This access will allow to do all operations in the Vendor Management module |
|
View Accesses |
|
Granted |
This access will allow all view related permissions in the Vendor Management module |
|||
|
Can View All VDD |
Granted |
This access will allow to view all vendor assessments submitted in the application |
||||
|
Can View My VDD |
Granted |
This access will allow to view all vendor assessments submitted in the application by the logged-in user |
||||
|
Can Download VDD Report |
Granted |
This access will allow to download a vendor assessment report |
||||
|
Can View Past / Completed Vendor Assessment Reports |
Granted |
This access will allow to view all the completed vendor assessment reports |
||||
|
Add / Edit Accesses |
|
Granted |
This access will allow all add and edit related permissions in the Vendor Management module |
|||
|
Can Add / Edit a Vendor |
Granted |
This access will allow to add a vendor and edit any existing vendors |
||||
|
Can Add / Edit an Assessment for all Vendors |
Granted |
This access will allow to schedule an assessment and edit existing assessments that have not yet been started |
||||
|
Can Conduct All Assessments |
Granted |
This access will allow to conduct all vendor assessments |
||||
|
Can Remediate Assessments |
Granted |
This access will allow to remediate an assessment with red flags post execution stage |
||||
|
Can Resolve Red Flagged Questions |
Granted |
This access will expose the Resolve button and will allow to resolve the red flagged questions in the remediation stage of all vendor assessments |
||||
|
Can Add / Edit Questionnaire Template |
Granted |
This access will allow to add a new questionnaire template and edit an existing questionnaire template in the Vendor assessment module |
3.10. Table of Cyber Admin Role Permissions
| Main Tab Header | Sub-Tab Label | Operations | 1st Level | 2nd Level | Permission | Permission Description |
|---|---|---|---|---|---|---|
|
System Objects |
Cyber |
Can do all operations related to Cyber Dashboard in terms of viewing as well as widget and dashboard configurations |
|
|
Granted |
This access will allow to do all operations in the Track Cyber / Cyber Compliance module
|
|
Can do all operations related to Incident |
N/A |
Granted |
This access will allow to do all operation in the Incident Management module |
|||
|
Can resolve Incident |
N/A |
Granted |
This access will allow to resolve Incident |
3.11. Table of Registered Representative Role Permissions
| Main Tab Header | Sub-Tab Label | Operations | 1st Level | 2nd Level | Permission | Permission Description |
|---|---|---|---|---|---|---|
|
System Objects |
Audits |
Can do all operations in the Audit module |
|
|
Partially Granted |
This access will allow to do all operations in the Audit module |
|
View Accesses |
|
Partially Granted |
This access will allow all view related permissions in the Audit module |
|||
|
Can View All Audits |
Disabled |
This access will allow to view all audits submitted in the application |
||||
|
Can View Audits assign to me |
Granted |
This access will allow to view those specific audits for which the logged in user is either the Submitter or Auditor or Auditee |
||||
|
Can Download an Audit Report |
Granted |
This access will allow to download an audit report for each audit from the Audit Calendar page or from the Past Audits report page |
||||
|
Can View Past / Completed Audit Reports |
Granted |
This access will allow to view all completed audit reports |
||||
|
Add / Edit Accesses |
|
Partially Granted |
This access will allow add and edit related accesses in the Audit module |
|||
|
Can Add / Edit an Audit |
Disabled |
This access will allow to schedule an audit and edit existing audits that have not yet been started |
||||
|
Can Conduct an Audit |
Granted |
This access will allow to conduct or execute an unassigned audit |
||||
|
Can Remediate an Audit |
Granted |
This access will allow to remediate an audit with red flags post execution stage |
||||
|
Can Resolve Red Flagged Questions |
Disabled |
This access will expose the Resolve button and will allow to resolve the red flagged questions in the remediation stage of an audit |
||||
|
Can Add / Edit Questionnaire Template |
Disabled |
This access will allow to add a new questionnaire template and edit an existing questionnaire template in the Audit module |
||||
|
Delete Accesses |
|
Disabled |
This access will allow all delete related actions in the Audit module |
|||
|
Can Delete a (Not Started) Audit |
Disabled |
This access will allow to delete an audit that is in Not Started status |
||||
|
Attestations |
Can do all operations in the Attestation module |
|
|
Partially Granted |
This access will allow to do all operations in the Attestation module |
|
|
View Accesses |
|
Granted |
This access will allow all view related permissions in the Attestation module |
|||
|
Can View All Attestations |
Granted |
This access will allow to view all attestations submitted in the attestation |
||||
|
Can View Attestations assign to me |
Granted |
This access will allow to view specific attestations for which the logged in user is Submitter or Attestor |
||||
|
Can View Past Attestation Reports (All) |
Granted |
This access will allow to view the reports of all the completed attestations |
||||
|
Can View Past Attestation Reports (Self) |
Granted |
This access will allow to view the reports for the specific completed attestations where the logged in user is an attestor |
||||
|
Add / Edit Accesses |
|
Partially Granted |
This access will allow all add and edit related permissions in the Attestation module |
|||
|
Can Add / Edit an Attestation |
Disabled |
This access will allow to schedule an attestation and edit existing attestations that have not yet been started |
||||
|
Can Attest an Attestation |
Granted |
This access will allow to respond to the questionnaire of an assigned attestation |
||||
|
Can Remediate an Attestation |
Granted |
This access will allow to remediate an attestation with red flags post execution stage |
||||
|
Can Resolve Red Flagged Questions |
Disabled |
This access will expose the Resolve button and will allow to resolve the red flagged questions in the remediation stage of an attestation |
||||
|
Can Add / Edit Questionnaire Template |
Disabled |
This access will allow to add a new covering email and questionnaire template and edit an existing questionnaire template in the Attestation module |
||||
|
Can Send Reminder |
Granted |
This access will allow to send reminder to the attestors for an assigned attestation that has become overdue |
||||
|
Delete Accesses |
|
Disabled |
This access will allow all delete related permissions in the Attestation module |
|||
|
Can Delete a (Not Started) Attestation |
Disabled |
This access will allow to delete an attestation that is in Not Started status |
||||
|
Code of Ethics |
Can do all operations in the Code of Ethics module |
|
|
Partially Granted |
This access will allow to do all operations in the Code of Ethics module |
|
|
View Accesses |
|
Partially Granted |
This access will allow to view all Code of Ethics requests submitted in the application |
|||
|
Can View All Requests |
Granted |
This access will allow to view all Code of Ethics requests submitted in the application |
||||
|
Can View Requests Submitted by Me or my subordinates |
Granted |
This access will allow to view all Code of Ethics requests submitted by the logged in user or his or her subordinates |
||||
|
Can View Rules |
Granted |
This access will allow to view all the rules defined for Political Contributions, Outside Business Activities and Gifts & Entertainment |
||||
|
Can View all Completed Requests |
Granted |
This access will allow to view all completed requests submitted in the Code of Ethics module |
||||
|
Can View Completed Code of Ethics Requests submitted by me and my subordinates |
Disabled |
This access will allow to view all completed requests submitted in the Code of Ethics module for which the logged in user is Submitter |
||||
|
Add / Edit Accesses |
|
Partially Granted |
This access will allow all add and edit related permissions in the Code of Ethics module |
|||
|
Can Add Requests |
Granted |
This access will allow to add a request in any of the types in the Code of Ethics module |
||||
|
Can Approve or Reject all Requests |
Granted |
This access will allow to approve or reject all the pending review requests submitted in any of the types in the Code of Ethics module |
||||
|
Can Approve / Reject Requests Submitted by my subordinates |
Granted |
This access will allow to approve or reject specific pending review requests submitted only by the subordinates of the logged in user in any of the types in the Code of Ethics module |
||||
|
Can Add / Edit Rules |
Disabled |
This access will allow to define a new rule and edit existing rules |
||||
|
Cyber |
Can do all operations related to Cyber Dashboard in terms of viewing as well as widget and dashboard configurations |
|
|
Disabled |
This access will allow to do all operations in the Track Cyber / Cyber Compliance module
|
|
|
Can do all operations related to Incident |
N/A |
Granted |
This access will allow to do all operation in the Incident Management module
|
|||
|
Can resolve Incident |
N/A |
Granted |
This access will allow to resolve Incident
|
3.12. Table of Incident Manager Role Permissions
| Main Tab Header | Sub-Tab Label | Operations | 1st Level | 2nd Level | Permission | Permission Description |
|---|---|---|---|---|---|---|
|
System Objects |
Cyber |
Can do all operations related to Cyber Dashboard in terms of viewing as well as widget and dashboard configurations |
|
|
Disabled |
This access will allow to do all operations in the Track Cyber / Cyber Compliance module
|
|
Can do all operations related to Incident |
N/A |
Granted |
This access will allow to do all operation in the Incident Management module |
|||
|
Can resolve Incident |
N/A |
Granted |
This access will allow to resolve Incident |
3.13. Table of Incident Resolution Team Role Permissions
| Main Tab Header | Sub-Tab Label | Operations | 1st Level | 2nd Level | Permission | Permission Description |
|---|---|---|---|---|---|---|
|
System Objects |
Cyber |
Can do all operations related to Cyber Dashboard in terms of viewing as well as widget and dashboard configurations |
|
|
Partially Granted |
This access will allow to do all operations in the Track Cyber / Cyber Compliance module
|
|
Can do all operations related to Incident |
N/A |
Disabled |
This access will allow to do all operation in the Incident Management module |
|||
|
Can resolve Incident |
N/A |
Granted |
This access will allow to resolve Incident |
3.14. Table of Marketing Review Super Admin Role Permissions
| Main Tab Header | Sub-Tab Label | Operations | 1st Level | 2nd Level | Permission | Permission Description |
|---|---|---|---|---|---|---|
|
System Objects |
Marketing Review |
Can do all operations in the Marketing Review module |
|
Partially Granted |
This access will allow to do all operations in the Marketing Review module |
|
|
Can View Marketing Review |
N/A |
Granted |
This access will allow to view all Marketing Review submitted in the application |
|||
|
Can View Marketing Review Assign to me |
N/A |
Granted |
This access will allow to view all Marketing Review submitted by me |
|||
|
Add / Edit Marketing Review |
N/A |
Granted |
This access will permit all add and edit related accesses in the Marketing Review module |
|||
|
Delete Marketing Review |
N/A |
Granted |
This access will allow all delete related actions in the Marketing Review module |
|||
|
Upload Marketing Review |
N/A |
Granted |
This access will permit all upload related accesses in the Marketing Review module |
|||
|
Approve Marketing Review |
N/A |
Disabled |
This access will permit all approve related accesses in the Marketing Review module |
3.15. Table of Marketing Review Content Approver Role Permissions
| Main Tab Header | Sub-Tab Label | Operations | 1st Level | 2nd Level | Permission | Permission Description |
|---|---|---|---|---|---|---|
|
System Objects |
Marketing Review |
Can do all operations in the Marketing Review module |
|
Partially Granted |
This access will allow to do all operations in the Marketing Review module |
|
|
Can View Marketing Review |
N/A |
Granted |
This access will allow to view all Marketing Review submitted in the application |
|||
|
Can View Marketing Review Assign to me |
N/A |
Disabled |
This access will allow to view all Marketing Review submitted by me |
|||
|
Add / Edit Marketing Review |
N/A |
Granted |
This access will permit all add and edit related accesses in the Marketing Review module |
|||
|
Delete Marketing Review |
N/A |
Granted |
This access will allow all delete related actions in the Marketing Review module |
|||
|
Upload Marketing Review |
N/A |
Granted |
This access will permit all upload related accesses in the Marketing Review module |
|||
|
Approve Marketing Review |
N/A |
Granted |
This access will permit all approve related accesses in the Marketing Review module |
3.16. Table of Marketing Review Content Provider Role Permissions
| Main Tab Header | Sub-Tab Label | Operations | 1st Level | 2nd Level | Permission | Permission Description |
|---|---|---|---|---|---|---|
|
System Objects |
Marketing Review |
Can do all operations in the Marketing Review module |
|
Partially Granted |
This access will allow to do all operations in the Marketing Review module |
|
|
Can View Marketing Review |
N/A |
Disabled |
This access will allow to view all Marketing Review submitted in the application |
|||
|
Can View Marketing Review Assign to me |
N/A |
Granted |
This access will allow to view all Marketing Review submitted by me |
|||
|
Add / Edit Marketing Review |
N/A |
Disabled |
This access will permit all add and edit related accesses in the Marketing Review module |
|||
|
Delete Marketing Review |
N/A |
Disabled |
This access will allow all delete related actions in the Marketing Review module |
|||
|
Upload Marketing Review |
N/A |
Granted |
This access will permit all upload related accesses in the Marketing Review module |
|||
|
Approve Marketing Review |
N/A |
Disabled |
This access will permit all approve related accesses in the Marketing Review module |
3.17. Table of E-Comms Surveillance Super Admin Role Permissions
| Main Tab Header | Sub-Tab Label | Operations | 1st Level | 2nd Level | Permission | Permission Description |
|---|---|---|---|---|---|---|
|
System Objects |
E-Comms |
Can do all operations in the E-Comms Surveillance module |
|
|
Granted |
This access will allow to do all operations in the E-Comms module |
|
Can View E-Comms Surveillance |
N/A |
Granted |
This access will allow to view all E-Comms submitted in the application |
|||
|
Can View E-Comms Surveillance Assign to me |
N/A |
Granted |
This access will allow to view all E-Comms submitted by me |
|||
|
Add / Edit E-Comms Surveillance |
N/A |
Granted |
This access will permit all add and edit related accesses in the E-Comms module |
|||
|
Delete E-Comms Surveillance |
N/A |
Granted |
This access will allow all delete related actions in the E-Comms module |
3.18. Table of E-Comms Surveillance Admin Role Permissions
| Main Tab Header | Sub-Tab Label | Operations | 1st Level | 2nd Level | Permission | Permission Description |
|---|---|---|---|---|---|---|
|
System Objects |
E-Comms |
Can do all operations in the E-Comms Surveillance module |
|
|
Partially Granted |
This access will allow to do all operations in the E-Comms module |
|
Can View E-Comms Surveillance |
N/A |
Granted |
This access will allow to view all E-Comms submitted in the application |
|||
|
Can View E-Comms Surveillance Assign to me |
N/A |
Disabled |
This access will allow to view all E-Comms submitted by me |
|||
|
Add / Edit E-Comms Surveillance |
N/A |
Granted |
This access will permit all add and edit related accesses in the E-Comms module |
|||
|
Delete E-Comms Surveillance |
N/A |
Granted |
This access will allow all delete related actions in the E-Comms module |
3.19. Table of E-Comms Surveillance Access Role Permissions
| Main Tab Header | Sub-Tab Label | Operations | 1st Level | 2nd Level | Permission | Permission Description |
|---|---|---|---|---|---|---|
|
System Objects |
E-Comms |
Can do all operations in the E-Comms Surveillance module |
|
|
Partially Granted |
This access will allow to do all operations in the E-Comms module |
|
Can View E-Comms Surveillance |
N/A |
Disabled |
This access will allow to view all E-Comms submitted in the application |
|||
|
Can View E-Comms Surveillance Assign to me |
N/A |
Granted |
This access will allow to view all E-Comms submitted by me |
|||
|
Add / Edit E-Comms Surveillance |
N/A |
Disabled |
This access will permit all add and edit related accesses in the E-Comms module |
|||
|
Delete E-Comms Surveillance |
N/A |
Disabled |
This access will allow all delete related actions in the E-Comms module |
4. Annexure #2 > Inter-Dependencies of the Granular Permissions
4.1. View Accesses Dependencies- Enabling the View All access enables the view related permissions assigned to me in all the tabs except for Company and Cyber
- View related permissions assigned to me cannot be disabled if the View All related permissions access is enabled (throws an error). Refer to the following screenshot which displays the triggered notification after clicking on the View Accesses slider of the Audit tab view. The implemented logic gets triggered since the view access must be granted to at least the see the audit records assigned to self - as there are dependent permissions enabled for the associated module.
- Enabling any access except Can Add/Edit Questionnaire Template automatically enables View All and View Assigned to Me accesses of all tabs, except for Company and Cyber
- Enabling the Can Add/Edit Questionnaire Template access will require users to enable at least one view access from any tab except company (throws an error if only the Can Add/Edit Questionnaire Template access is enabled
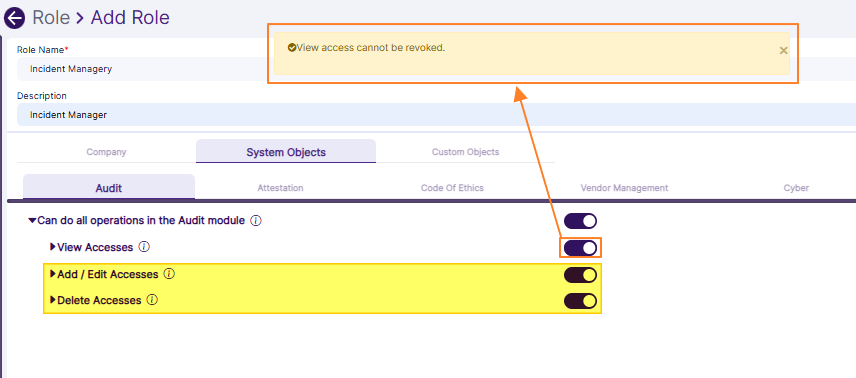 Fig: 63 - Validation notification triggered when the view access cannot be revoked
- Enabling the Can Resolve Red Flag Questions access will automatically enable the Can Remediate Questions Access in Audits, Attestations, Vendor Assessments
- Disabling the Can Remediate Questions Access when the Can Resolve Red Flag Questions access is enabled will throw an error
4.3.1. Attestations
- Enabling the Can View Past Attestation Reports (All) access will automatically enable the Can View Past Attestation Reports (Self) access
- Disabling the Can View Past Attestation Reports (Self) access will automatically disable the Can View Past Attestation Reports (All) access
- Enabling the Can View all Completed Requests access will automatically enable the Can View Completed Code of Ethics Requests submitted by Me and my subordinates access
- Disabling the Can View Completed Code of Ethics Requests submitted by Me and my subordinates access will automatically disable the Can View all Completed Requests access
- Enabling the Can Download a VDD Report access will automatically enable the Can View Past / Completed Vendor Assessment Reports access
- Disabling the Can View Past / Completed Vendor Assessment Reports access will automatically disable the Can Download a VDD Report access
- Enabling the Can do all operations in all the modules in SurgeONE.ai slider of the Company tab enables all permissions of all the other tabs
- Enabling the Can Add / Edit / Clone / Delete Roles access will automatically enable the Can View Roles access
- Enabling the Can Edit Mail Templates access will automatically enable the Can View Mail Templates access
- Enabling the Can Add / Edit / Delete Manage Objects access will automatically enable the Can View Manage Objects access
5. Annexure #3 > Multi-Role Users & Impact of Permissions Granted on Application Startup Page
5.1. Understanding Multi-Role UsersWhen users are assigned to multiple roles, they inherit the permissions associated with each of those roles.
This means that the permissions from all assigned roles are combined, or superimposed, to determine the overall access rights of the assigned user. For example, if a user is assigned to both Audit Access and Attestation Admin roles, where the Audit Access role is granted permissions to view audit data and the Attestation Admin role is granted permissions to delete attestation data.
In this scenario, the assigned user will have the combined permissions from both roles, allowing them to both view audit data and delete attestation data. This superimposed impact ensures that users have all the necessary permissions from their various roles, providing a comprehensive set of access rights.
5.2. Startup Page Validation
At least one permission must be granted for the view accesses within any one module out of the Audit, Attestation, Code of Ethics, Vendor Management, Company and Cyber tabs when you are either creating or editing a custom role.
For example, consider that you have granted no permission to a custom role except for Can Access Settings > Can Access Mail Templates > Can View Mail Templates permission within the Company tab. Now, if you try to save this custom role, then the following validation tooltip is displayed below the Submit button since no view access has been granted to any SurgeONE.ai startup page.
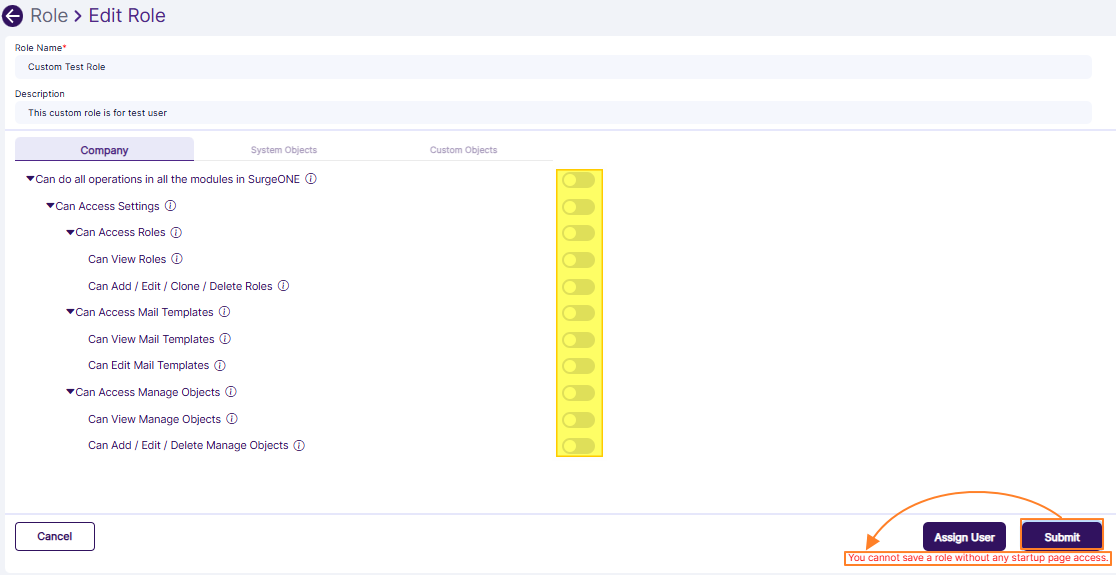 Fig: 64 - Validation notification triggered when any startup page view access is not granted
NOTE: The same validation is triggered when a custom role is granted no access to any permission.
5.3. SurgeONE.ai Dashboard Variations
Depending on the View Accesses category permissions set, the visibility of the various tabs of the SurgeONE.ai Dashboard can differ.
- When only View Accesses category > Can View All Audits and / or Can View Audits assign to me permissions are granted, then only the Audit tab is visible in the Dashboard. You can find the Audit Trend visualization, audit Status breakdown, Statistics related to audits, Actions Required for audits and Upcoming Audits sections getting displayed. On the left panel menu, you can find the Audits menu item to access the respective page.
- When only View Accesses category > Can View All Attestations and / or Can View Attestations assign to me permissions are granted, then only the Attestation tab is visible in the Dashboard. You can find the Attestations Trend visualization, attestation Status breakdown, Statistics related to attestations, Actions Required for attestations and Latest Attestations sections getting displayed. On the left panel menu, you can find the Attestations menu item to access the respective page.
- When only Code of Ethics tab > View Accesses category > Can View All Requests and / or Can View Requests Submitted by Me or my subordinates permissions are granted, then only the Code of Ethics tab is visible in the Dashboard. You can find the Code of Ethics Trend visualization, Code of Ethics Status breakdown, Statistics related to Code of Ethics entries and Actions Required for code of ethics sections getting displayed. On the left panel menu, you can find the Code of Ethics menu item to access the respective page.
- As mentioned in the above three points, the combination of the view related permissions decide the visibility of the three tabs on the Dashboard to the user.
- When the Can do all operations related to Cyber Dashboard in terms of viewing as well as widget and dashboard configurations permission of the Cyber tab is granted, then on the left panel menu, you can find the Cyber Compliance menu item to access the respective page. If this is the only view access granted to the assigned user, then this becomes the startup or landing page of that user.
Consider the following screenshot which displays only the Attestion tab on the Dashboard.
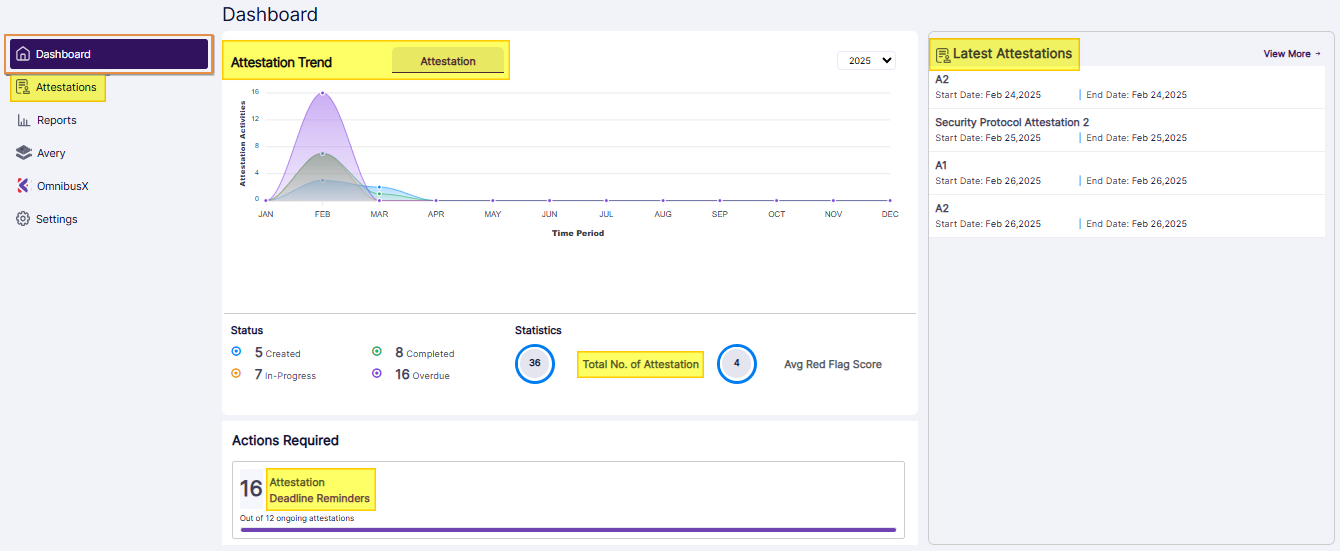 Fig: 65 - Only Attestation tab visible in Dashboard
Consider the following screenshot which displays only the Cyber Compliance menu and the respective Device Statistics page by default.
 Fig: 66 - Only Cyber Compliance accessible as per the set permissions