
 This online help page is dedicated to the SurgeONE.ai Cyber Compliance - Cyber Services screen and its associated functionalities.
The accessibility and functionalities of the different sections of this page are dependant on the role based access controls / permissions set for the logged-in user. For more details refer to the Roles online help.
1. Navigating to the Cyber Services page
Click on the Cyber Compliance menu option of the left panel menu. An expanded sub-menu option labeled as Cyber Services is displayed below it. Click on that.
 NOTE: By default, the sub-menu item labeled as Device Statistics is pre-selected.
The following screenshot displays the Cyber Services screen which loads. The page lists the enrollment details, as per the configurations of your organization.
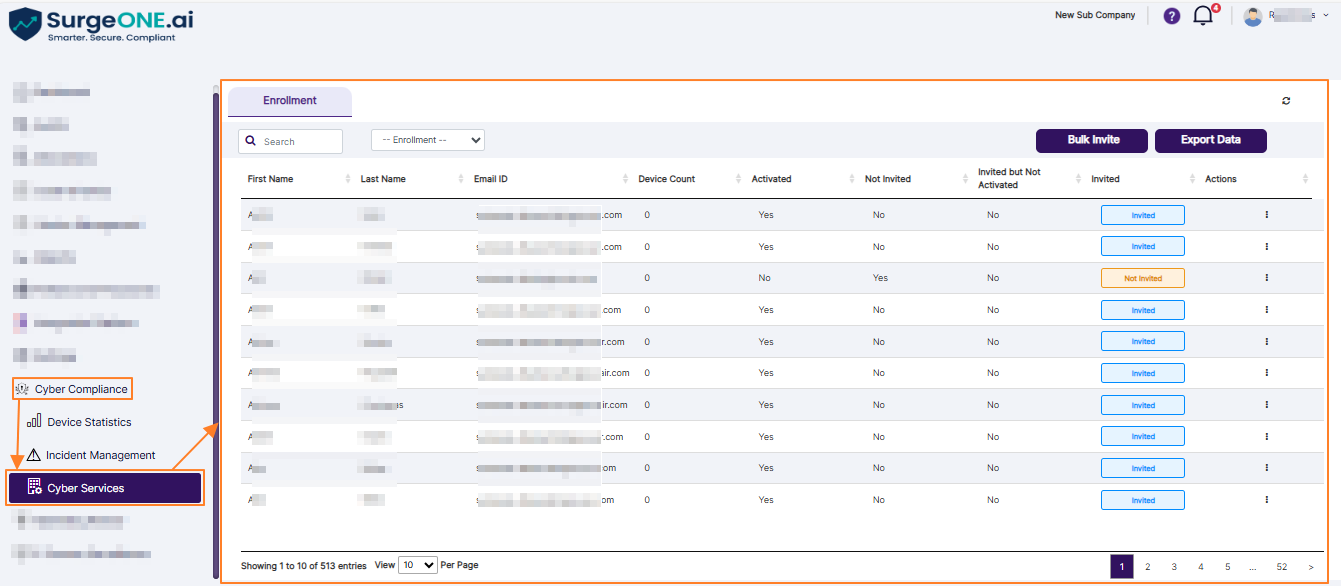
Fig: 1 - Cyber Services page
NOTE:
- The data visibility on the grid will be restricted to the users such that they can only see:
- Their own data
- Data related to any users who are hierarchially beneath them
- The visibility of the left panel menu and this page depends on the role based access control permissions granted to the logged-in user.
2. Understanding the Various Elements of the Cyber Services page > Enrollment tab
This dedicated Enrollment tab enables the logged-in user to view the enrolled users, invited users and application installation status, so that you can easily keep track of the users who are yet to join, or install any requisite application. Note that the users mentioned here are only the ones who are hierarchially under you - either as a direct hierarchical line or exist under a user who is a direct hierarchical line under you. It also provides the ability to send invite/reminder emails, view devices of user, and applications installed in those, etc.
Refer to the following screenshot which is marked with numerical values that correspond to the below stated sections.

Fig: 2 - Understanding the Cyber Services page Enrollment tab
2.1. Top bar
The top bar displays the tab option label and a refresh icon.
 Fig: 3 - Top bar elements
Over at the right, you can click on the refresh  icon to reload the search input bar or clear any text entered in it, set the Enrollment dropdown to its default state and refresh the grid view data.
 Fig: 4 - Refresh icon
2.2. Search bar and Enrollment dropdown filter
Enter the text in the search bar, based on which you want to execute the search by. If matching entry is found, it will populate the grid view. The search operation can be executed on all of the grid view columns' data.
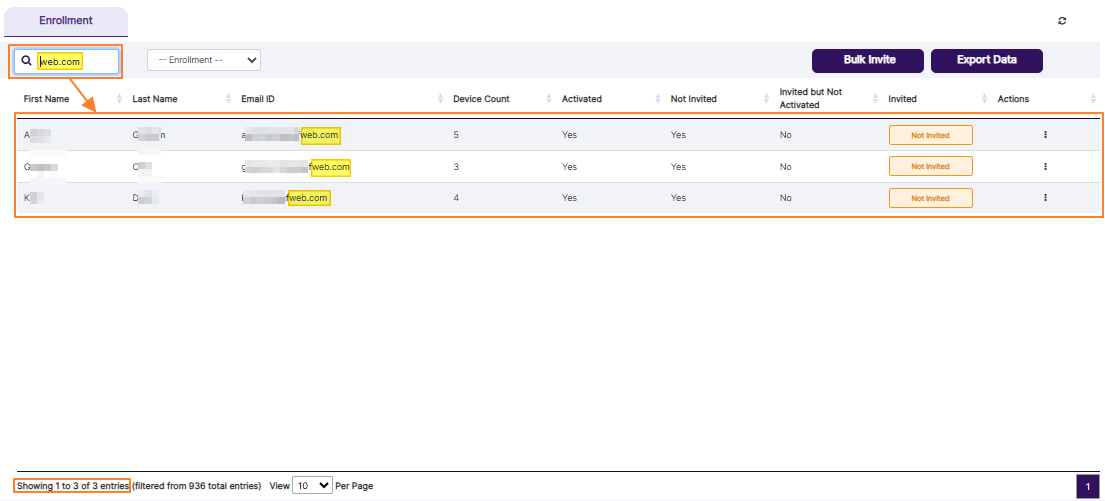 Fig: 5 - Using the search bar to find matching entries
If no matching entry is found, a No matching records found label can be seen displayed in the grid view.
 Fig: 6 - No search results found
There is a filter provided to control the results which populate the grid view. The Enrollment dropdown can be used to filter out results based on the enrollment type. The following options populate the Enrollment dropdown.
- All
- Computer Enrolled
- Mobile Enrolled
- Both enrolled
- Non-enrolled Users
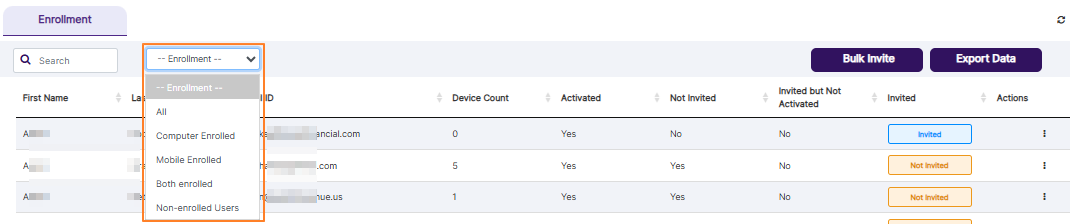 Fig: 7 - Enrollment filter dropdown options
2.3. Bulk Invite button
The cyber admin or any user with similar permissions granted can invite the non-enrolled users either individually or in bulk. Selecting the Invite option with a specified email template, for a single user or bulk invite option for multiple users, results in the automated generation of an email notification to all such users. The email contains a link for the recipient user to enroll for the particular device and / or mobile device.
Understand how to bulk invite the non-enrolled users in SurgeONE.ai for TrackCyber installation using this Bulk Invite button.
- On top of the grid, there is an Enrollment dropdown list, which loads after you select the Enrollment tab. The dropdown contains the following option values:
- All - Displays both enrolled and non-enrolled users
- Computer Enrolled - Displays only the enrolled users whose computer/laptop/workstation details have been captured
- Mobile Enrolled - Displays only the enrolled users whose mobile device details have been captured
- Both enrolled - Displays the enrolled users whose computer/laptop/workstation details as well as mobile devices details have been captured
- Non-enrolled Users - Displays only the non-enrolled users (the Device Enrolled column of the grid view displays only the No value)
- Select the Non-enrolled Users option from the dropdown list. The grid data gets refreshed and fetches only the non-enrolled users who have not yet enrolled to any of the devices.
- Click on the Bulk Invite button to the top-right corner of the grid. A new window is invoked enlisting all the non-enrolled users selected who were displayed on the grid on the dashboard.
- Select the checkboxes against all or specified users from the list who all are to be invited. You can use the top checkbox to toggle the selection of all or no users displayed in the list. By default, the non-enrolled users are displayed as a list and all the checkboxes against the non-enrolled users are selected.
- Next, select the appropriate email template - which is either the Invite as SurgeONE Users option or the Invite as Other Apps Users option of the Select Email Template dropdown list, to be used for this invitation purpose.
- Click on the Done button to trigger the mail invitation(s). The system automatically sends out an email invitation to each one of the selected users and the selected email template.
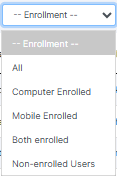 Fig: 8 - Enrollment dropdown filter options
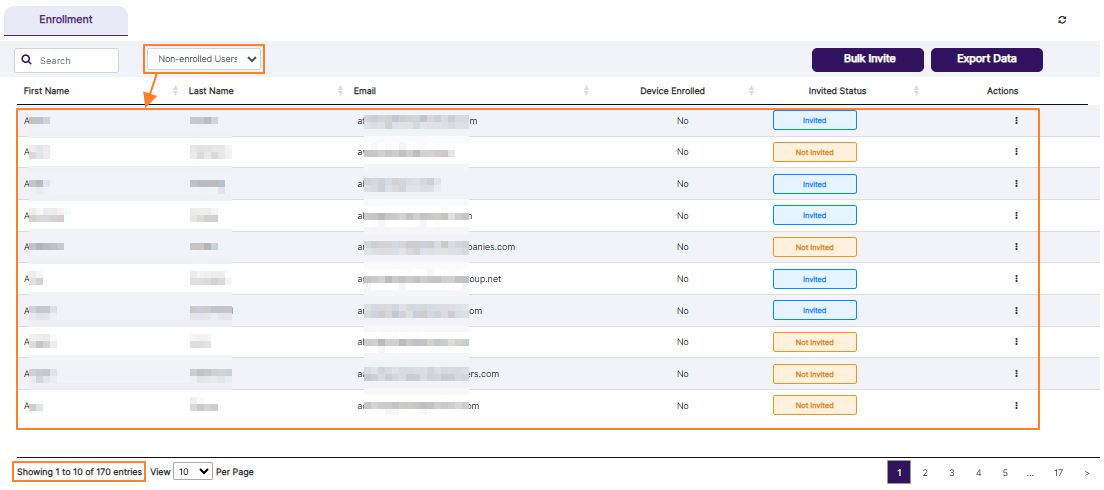 Fig: 9 - Selecting non-enrolled users filter option
 Fig: 10 - Bulk Invite button
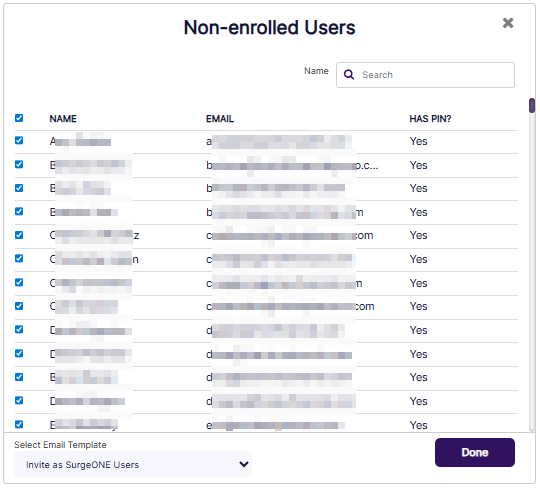 Fig: 11 - Selecting checkboxes to invite users
 Fig: 12 - Selecting email template
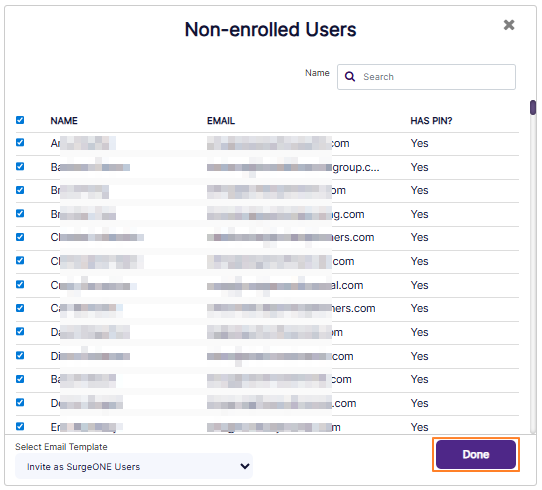 Fig: 13 - Clicking on Done to invite selected non-enrolled users
NOTE:
- You can use the search bar to manually find user(s) whom you know are not enrolled yet.
- Validation is employed on the template selection to trigger the invitation email. If you click on the Done button without selecting any checkboxes against the listed users, then the system prompts the following tooltip above the dropdown.
 Fig: 14 - Search for user to invite
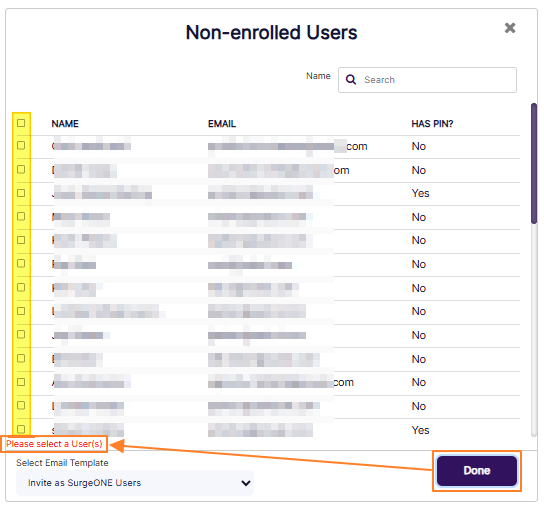 Fig: 15 - Validation prompt to select user(s) to invite
2.4. Export Data button
Click on the Export Data button to export the data in either csv or pdf format. Here is the view of the options which load after clicking on the button.
 Fig: 16 - Export Data options
2.5. Grid view
NOTE: The following points are related to the logic based on which data populates the Cyber Compliance Enrollment grid view:
- User account (of self and subordinates) with no reference number will not populate the grid view.
- This grid view section lists out all the users in the system who are your direct downward hierarchy subordinates, are active and who have the reference identifier value set.
The names, email address, device name(s) (if any installed), whether email invite has been sent to them, user details and the option to re-send email invite (if user is yet to sign up) are present in the grid view. You can sort the columns.
The following columns are present (by default when the Enrollment dropdown is set to All) to display the grid items:
- First Name - Displays the first name of the user which was provided at the time of user enrollment/registration, or was edited/updated later on. It is also displayed in the NAME column of Enroll Users page.
- Last Name - Displays the last name of the user which was provided at the time of user enrollment/registration, or was edited/updated later on. It is also displayed in the NAME column of Enroll Users page.
- Email ID - Displays the email address of the user which was provided at the time of user enrollment/registration. It is also displayed in the EMAIL column of Enroll Users page.
- Device Count - Displays the numeric value denoting the number of captured device(s) which are associated with the user. It can also be displayed as zero if no device is captured yet.
- Activated - Displays Yes or No label to indicate whether the user is an active user of SurgeONE.
- Not Invited - Displays Yes or No label to indicate whether the user is already invited to access SurgeONE or not. An email is triggered to the registered email address if the user is already invited.
- Invited but Not Activated - Displays either a Yes label when both Activated and Not Invited are set to No, or displays a No label when at least any one column out of the Activated and Not Invited columns is set to Yes.
- Invited - Displays either a blue color-coded Invited status tag when the user is already invited into SurgeONE.ai platform, or displays a orange color-coded Not Invited status tag when the user is not yet invited into SurgeONE.ai platform.
- Actions - Displays the vertical ellipsis icon to toggle the row-context menu options, such as User Details, Send Invite and Re-send Invite.
However, when the Enrollment dropdown is set to any other dropdown option except for the All option, then the grid columns change to the following:
- First Name - Displays the first name of the user which was provided at the time of user enrollment/registration, or was edited/updated later on. It is also displayed in the NAME column of Enroll Users page.
- Last Name - Displays the last name of the user which was provided at the time of user enrollment/registration, or was edited/updated later on. It is also displayed in the NAME column of Enroll Users page.
- Email - Displays the email address of the user which was provided at the time of user enrollment/registration. It is also displayed in the EMAIL column of Enroll Users page.
- Device Enrolled - Displays Yes or No label to indicate whether the user device is already captured into SurgeONE or not.
- Invited Status - Displays either a blue color-coded Invited status tag when the user is already invited into SurgeONE.ai platform, or displays a orange color-coded Not Invited status tag when the user is not yet invited into SurgeONE.ai platform.
- Actions - Displays the vertical ellipsis icon to toggle the row-context menu options, such as User Details, Send Invite and Re-send Invite.
The following screenshot displays both the grid views with the difference in columns that are indicated in it.
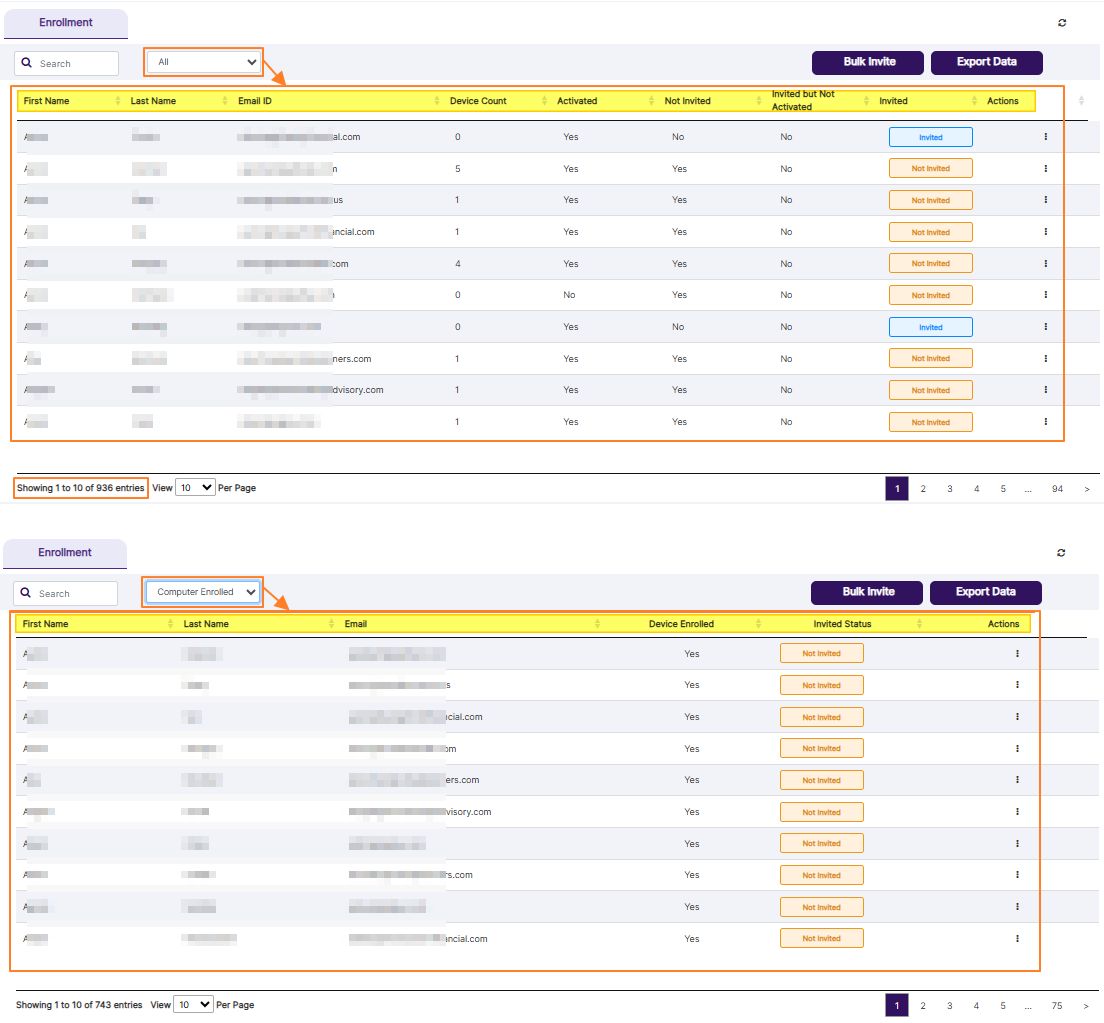 Fig: 17 - Enrollment grid view depending on Enrollment dropdown selection
NOTE: The following two points are related to the Invited Status column.
- The Invited tag indicates that a user is already sent a welcome email and is invited into the SurgeONE.ai platform.
- The Not Invited tag indicates that a user is present (created or imported via excel template file) in SurgeONE.ai, but they have not been sent a welcome/invitation email yet.
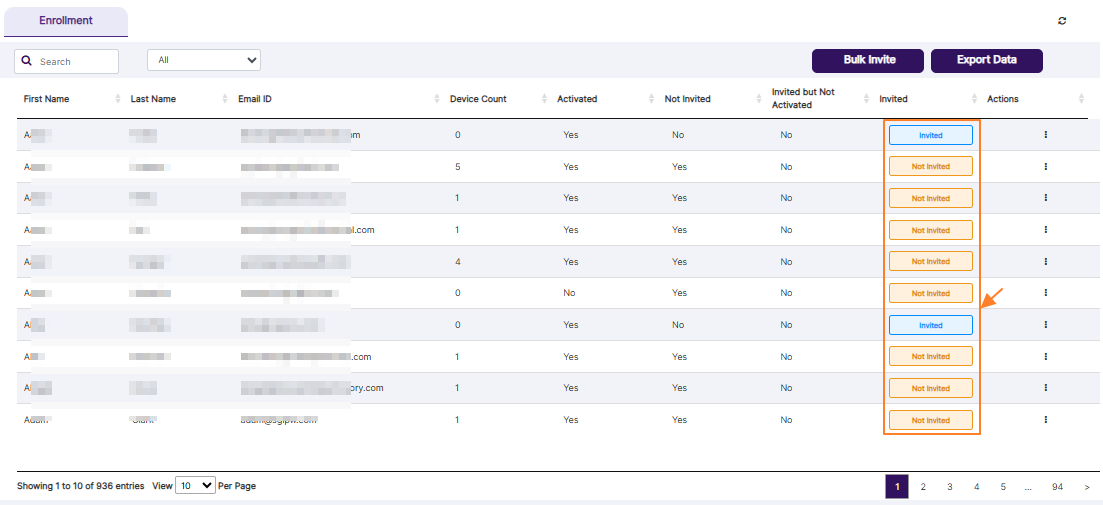 Fig: 18 - Invited Statuses
Let us now understand the options which can be toggled from the vertical ellipsis  menu icon of the Actions column.
2.5.1. Viewing User Details
Click on the vertical ellipsis menu icon of the Actions column and then on the expanded User Details menu option.
 Fig: 19 - User Details menu option
The following view loads. Various information pertaining to the devices and installed applications associated with the user is displayed here. At the top, you can find the device compliant status and training status.
 Fig: 20 - Detailed view of devices and SaaS applications associated with the user
You can hover your mouse pointer over the info icon beside the Training Status label to reveal the associated toolip. Refer to the following image.
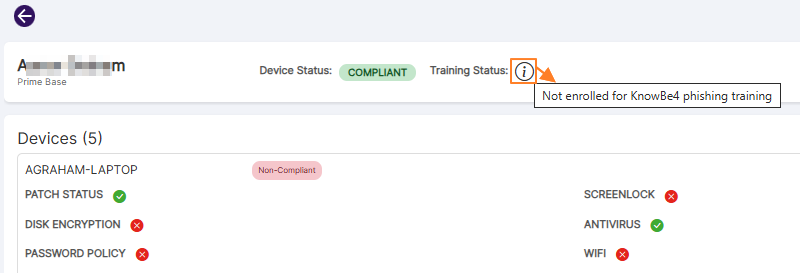 Fig: 21 - Training Status tooltip
In the grid view, you can also search for installed applications.
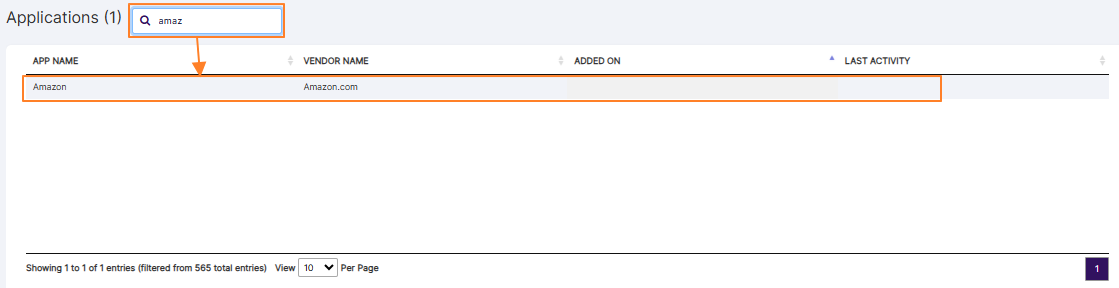 Fig: 22 - Searching for installed applications
If multiple devices are present then all the applications of total devices are displayed in the grid view. The following columns are displayed in the grid:
- APP NAME - Displays the name of the application
- VENDOR NAME - Displays the company name which has created/hosted the application
- ADDED ON - Displays the date on which the application was installed in the user device
- LAST ACTIVITY - Displays the date on which the application was used/run by the user
At the bottom of the grid items, pagination controls are provided for the ease of access.
NOTE: Data pertaining to the Devices and Applications is visible if the users are active, have installed the Belarc application which has provided enrollment data into SurgeONE.ai, and have the reference identifier value set.
When multiple devices are linked, then the details of the first device is displayed, while details for others are collapsed. You can click on the down arrow  icon to reveal its details. After you do so, the icon changes to an up arrow
  icon, as indicated in the following image.
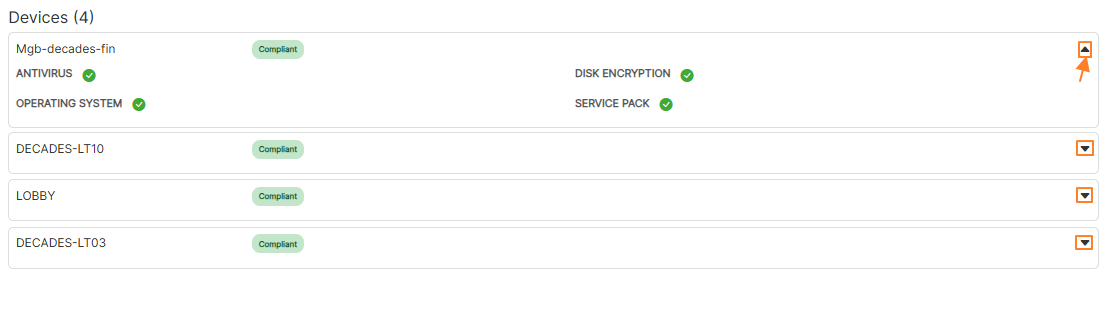 Fig: 23 - Expanding the collapsed details of a device
2.5.2. Inviting User
You can invite an user or resend the email invite again.
Send invite:
- This only applies to users who have the Not Invited status
- This sends the welcome email
 Fig: 24 - Send Invite menu option
Re-send invite:
- This only applies to users who have the Invited status
- This re-sends the welcome email to the user
 Fig: 25 - Re-send Invite menu option
2.6. Pagination options
At the bottom of the grid items, pagination controls are provided for the ease of access.
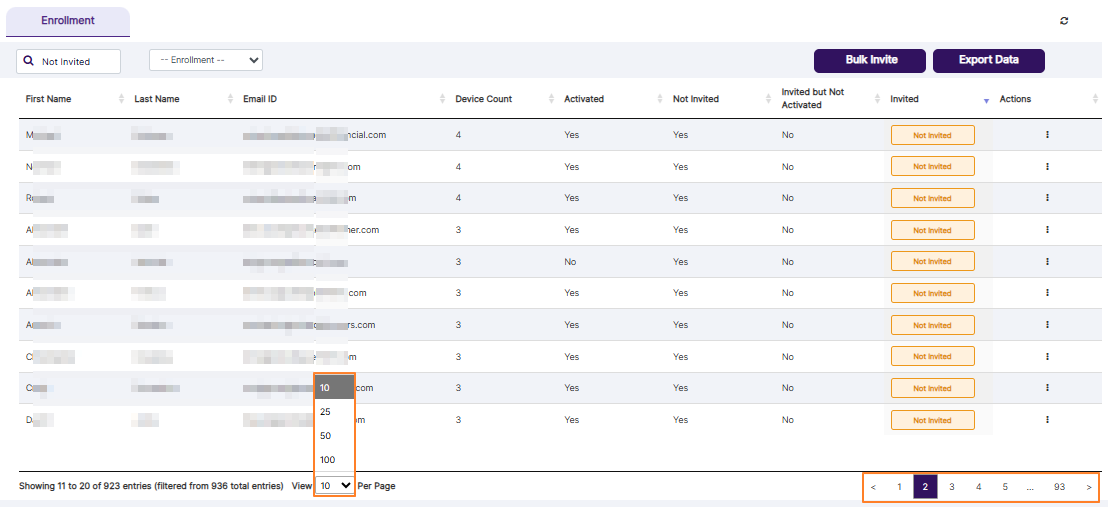 Fig: 26 - Pagination options