
 This online help page is dedicated to the SurgeONE.ai Audits screen and its associated functionalities. Experience hassle-free, comprehensive audits, saving you time and ensuring accuracy.
The accessibility and functionalities of the different sections of the Audits module, as well as its reports are dependant on the role based access controls / permissions set for the logged-in user. For more details refer to the Roles online help.
1. Navigating to the Audits page
Click on the Audits menu of the left navigation panel. The following screenshot displays the Audits screen. The page lists the audits that are created for your organization in the system.
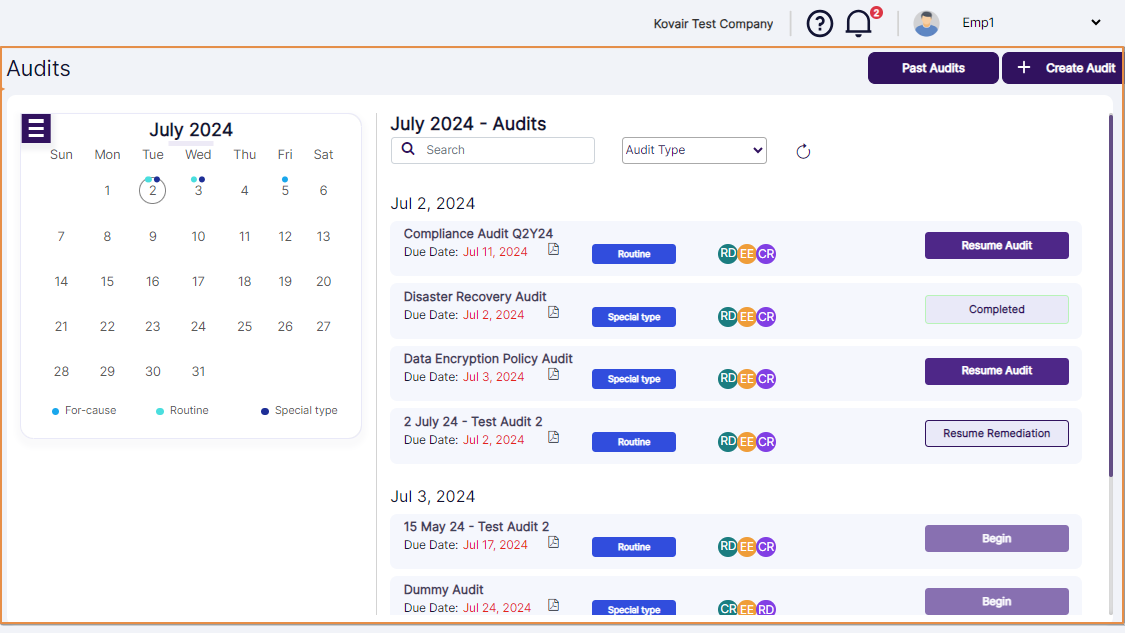
Fig: 1 - Audits page
 NOTE:
NOTE:
-
Applicable Only for Permitted Users
- If there are any audits with upcoming start dates or those whose start dates have already passed, a call-to-action button will appear in the Upcoming Audits section of the Dashboard. Clicking this button will take you directly to the respective audit processing stage. This way, you might not need to visit the Audits page to perform the audit.
- If multiple audits are upcoming (greater than four) then a View More button is present. Use it to navigate to the Audits page.
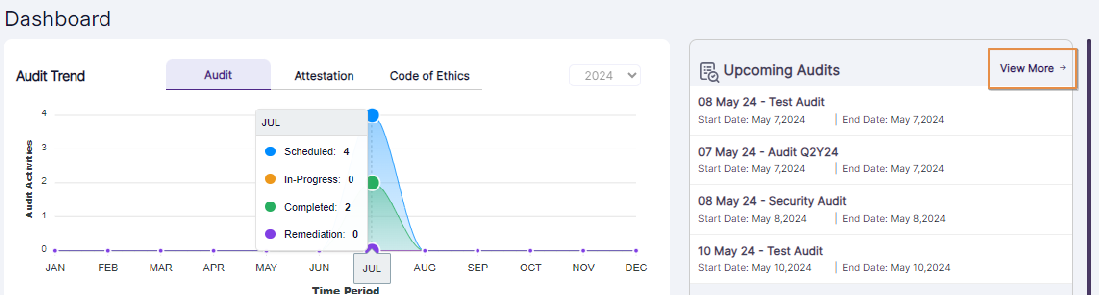
Fig: 2 - Dashboard page Upcoming Audits section displaying the View More button
2. Understanding the Various Elements of the Audits page
Refer to the following screenshot which is marked with numerical values that correspond to the below stated points.

Fig: 3 - Understanding the Audits page
-
2.1. Calendar selection
- Each of these audit categories are color coded. Hover your mouse pointer over the donut chart to reveal a tooltip text about the audits count per audit category, out of the total audits count for that year. Refer to the following image to understand better.
- By default, the current year is selected. You can select another year from the year selection dropdown (at the top right of this section) to load the count of existing audits of different category types (of that year).
- By default, the current year is selected. You can select another year from the year selection dropdown at the top right of this section.
- Hover your mouse pointer over a displayed bar chart to reveal a tooltip text about the red flags count of that audit category. Refer to the following image to understand better.
- You can click on the Type dropdown to expand its options. The selectable options are Special type, For-cause and Routine. By default, no option is selected. These are the different audit types which can be created in the system.
- You can select the date range using the provided Start Date and End Date calendars.
- You can click on the Auditor dropdown to expand its options. Existing permitted/set users populate this dropdown.
- You can click on the Recipient dropdown to expand its options. This dropdown displays the full names of all users who are set as Recipient in different audits, as assigned in the Audit Details tab during audit creation.
- You can click on the RedFlags dropdown to expand its options. Selectable options are All, Yes and No.
- The following image shows the view when there report results are fetched to populate the grid view.
- All of the columns are sortable except for the ACTION column.
- The following columns populate the grid view:
- AUDIT NAME
- TYPE
- START DATE
- END DATE
- AUDITOR
- RECIPIENT
- NO. OF RED FLAGS
- ACTION
- Click on the Export button to load the export options (to download a local copy the generated report). Two options labeled as CSV and PDF load below the button. Click on the former to download an excel file or on the latter to download a .pdf copy.
- Here is the view of the contents of the exported PDF file, after clicking on the PDF option. The file is named as AuditReport_YYYYMMDD_HHMMSS, where the timestamp is the Coordinated Universal Time (UTC).
- The start date of the audit.
- The name of the audit.
- The due date of the audit (in red font).
- Pdf
 icon to download the audit report. The downloaded .pdf file will be titled as per the name of the audit.
 - The type of the audit (in white font with blue box shading).
- The name initials of the Submitter (creator) of the audit (in white font with metallic seaweed colored round shading).
- The name initials of the Auditor (can begin and complete audit) of the audit (in white font with orange colored round shading).
- The name initials of the Recipient (provides additional information or documentation if required) of the audit (in white font with purple colored round shading).
The calendar month loads as the current month, but you can change it using the hamburger  icon at the top left. Select the desired month and year and click again on the hamburger icon to collapse this selection view.
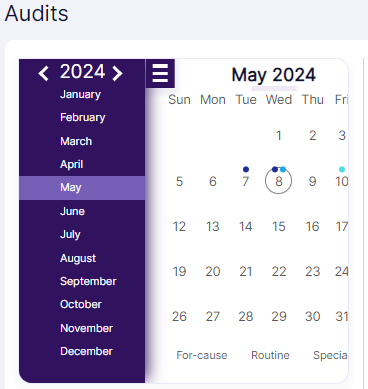 Fig: 4 - Calendar selection view
2.2. Calendar view
View the audits created for the current calendar month. The current date is highlighted in the calendar with a circle. Click on a specific date to see audits that have the same start date. After selecting a specific date, audits with different start dates within the same month will not be displayed.
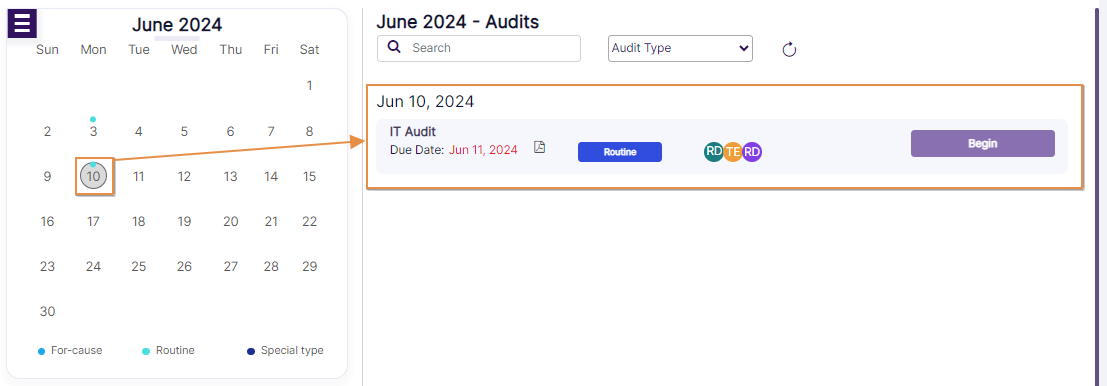 Fig: 5 - Date selection on calendar month loads Audits starting on that date
If you select a calendar date that does not have any created audits starting on the same date, then the system will display a No records found for the selected date text.
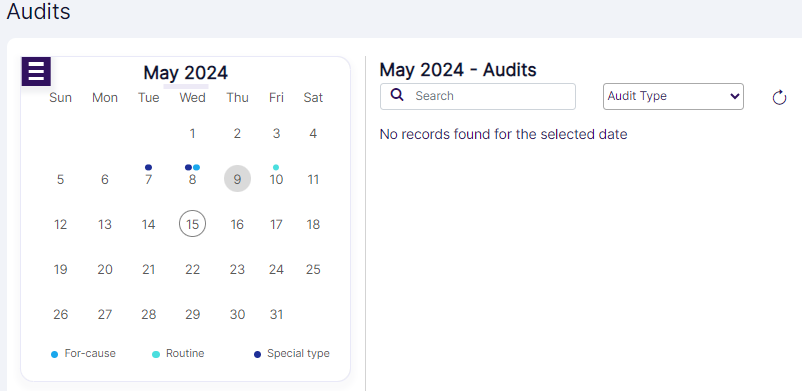 Fig: 6 - No audit records found for the selected date
You can also notice that the audit type legends are present at the bottom of the calendar. Small colored dots corresponding to the same color of the legend items are displayed above the numeric dates in the calendar, so that the user can easily understand which audit types are present on which date without having to click on those dates. Multiple colored dots over a date indicate multiple audits starting on the same day.
2.3. Create Audit
Click on the + Create Audit button at the top right, to proceed to create a new audit for your organization. A detailed description of the entire process has been explained in the following Creating a New Audit section.
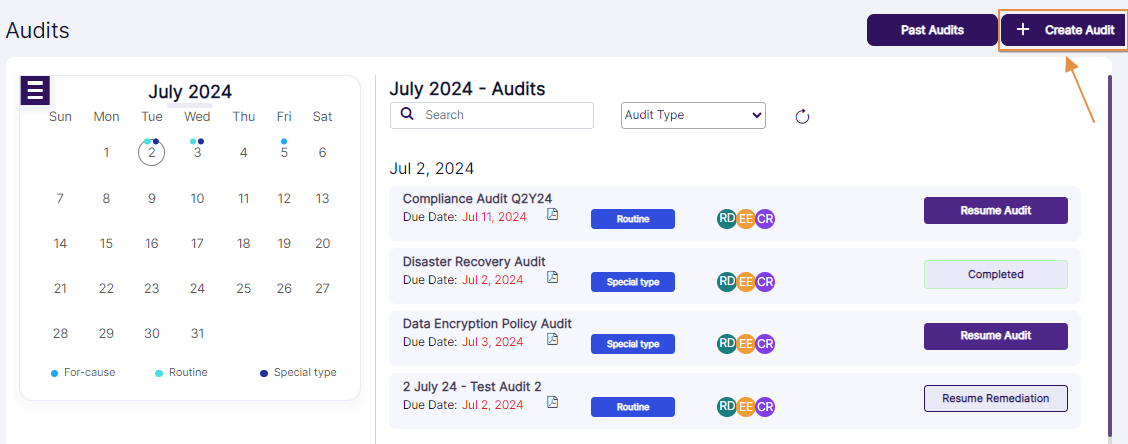 Fig: 7 - + Create Audit button
2.4. Past Audits
Click on the Past Audits button at the top right, to proceed to view the completed audit report. A user can view audits that they have created or audits where they have been assigned as an auditor or a recipient.
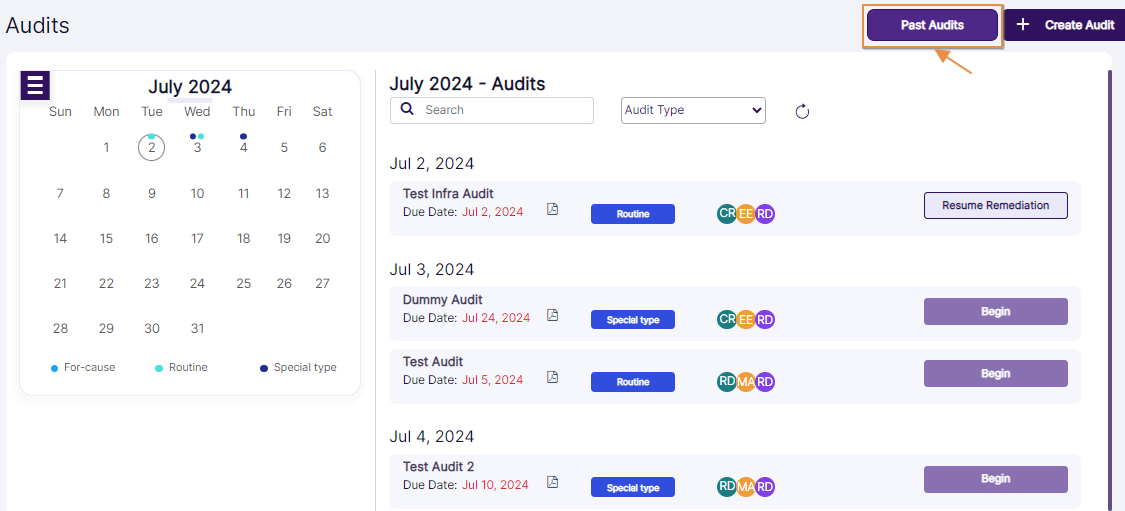 Fig: 8 - Past Audits button
Consider this screen as a combination of dashboard and report view, where you can view drilldown of past audits, as well as search for past audits.

Fig: 9 - Past Audit Reports view
Let us illustrate the three sections which are present:
2.4.1. Audits by Category
This section shows a donut chart illustration to represent the number of audits per audit category. There are four different types of audit categories as follows - Cybersecurity, Operational, Financial and Custom.
 Fig: 10 - Audits By Category
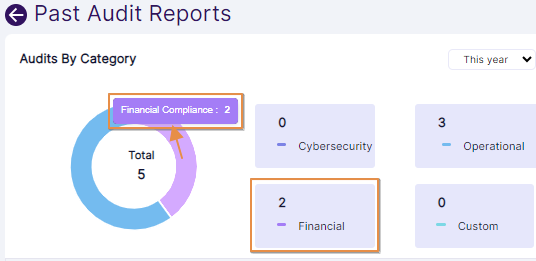 Fig: 11 - Audits By Category tooltip view
 Fig: 12 - Year selection dropdown expanded view
This section shows a horizontal bar chart illustration to represent the red flags count per audit category type. There are three categories labeled as - Financial Compliance, Cyber Security, Operational, Outside Business Activities and 3rd Party Vendors. If there is no bar chart present for a category, then there is no red flagged question response for it yet.
 Fig: 13 - Chart view of Red Flags section
 Fig: 14 - Year selection dropdown expanded view
 Fig: 15 - Tooltip view of Red Flags of Operational audit category
You can search for and view existing audits from this section. Let us first have a look at the different filters that can be set.
 Fig: 16 - Audits section filter options of Past Audits Report
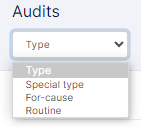 Fig: 17 - Type dropdown options
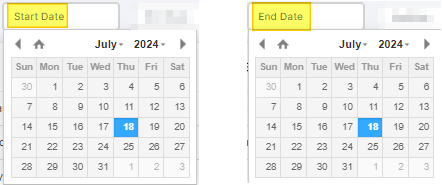 Fig: 18 - Date range fields
 Fig: 19 - Auditor dropdown
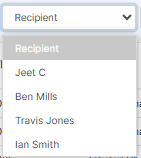 Fig: 20 - Recipient dropdown
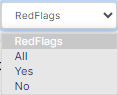 Fig: 21 - RedFlags dropdown
 Fig: 22 - Report results in grid view
NOTE:
The following image shows the view when there is no fetched data to populate the grid view.
 Fig: 23 - No results found label
2.4.3.1. Reset filters
You can click on the reset  icon to reset the report filters.
2.4.3.2. Exporting report results
 Fig: 24 - Export button
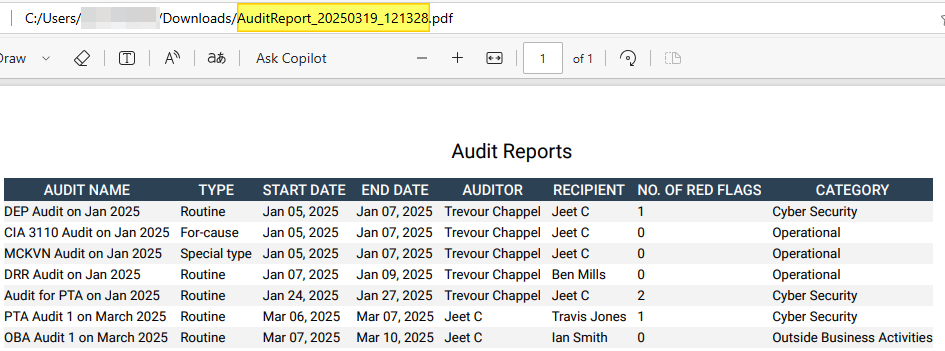 Fig: 25 - Exported PDF file content view
2.5. Search Audit(s)
Use the search bar to enter text and find matching audits (by the name of the existing audit).
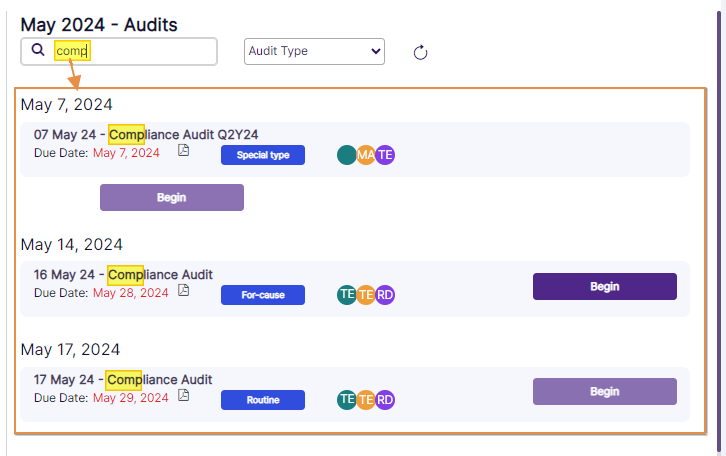 Fig: 26 - Searching for audit
Use the Audit Type dropdown to filter the listed audits based on the audit type. The available options in the dropdown are Branch and Rep.
 Fig: 27 - Filter dropdown options
Based on the selection made here, or both the filters set, matching audits are listed out.
 Fig: 28 - Filtered results
Click on reset  icon to remove any search query or dropdown filter set.
2.6. Audit details
View the audits which are scheduled for the calendar month. The following details are visible:
2.7. Audit Call to Action button
An action button is present against the listed audits. Usually, the action button of any audit is present on the right side. However, if the audit period is past dated, then the action button can be seen below the listed audit entry.
The audit action button labels can vary according to the stage or status of the audit viz. Begin, Resume Audit, Start Remediation, Resume Remediation and Completed.
 Fig: 29 - Audit Call to Action button view
NOTE:
- If the audit is yet to start (the audit starting calendar date is yet to come), then the Begin button is disabled.
- After the role based access control implementation, Anyone with view all access, conduct access, remediation and resolve red flag access will be able to begin an audit.
- If the audit is completed (without remediation or with red flag remediation), then the Begin button label changes to Completed.
3. Creating a New Audit
Let us assume that you have navigated to the Audits page, and clicked on the + Create Audit button at the top right (to proceed to create a new audit for your organization).
Fig: 30 - Create Audit button
The following screenshot displays the Audit Details page that loads.
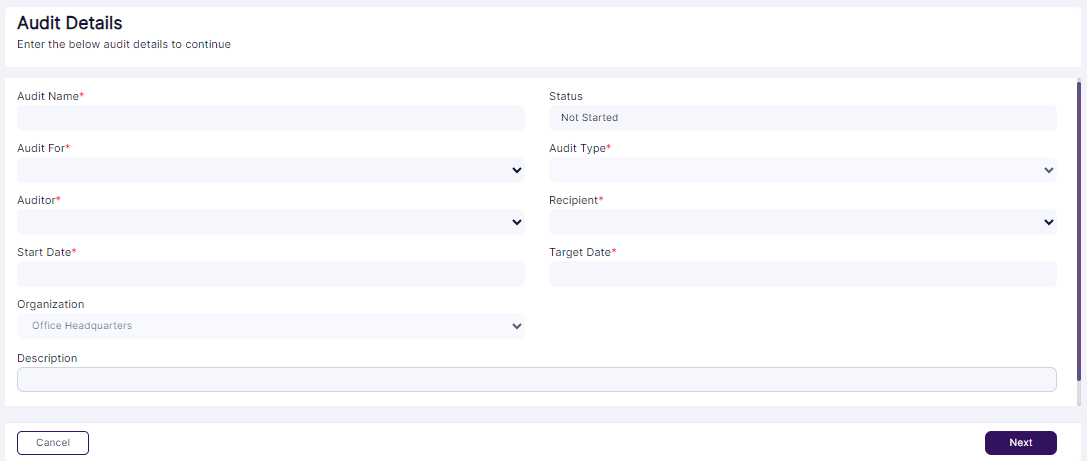
Fig: 31 - Audit Details
NOTE: There are two entities for which there are audits in SurgeONE.ai. They are branch audit and rep audit, both of which are comprising of few types.
There are three stages labeled as follows: Audit Details, Template Selection and Template Preview. Each stage has been briefly described in the following sub-sections.
3.1. Step #1 - Providing Audit Details
Enter audit-specific details here. Perform the following activities to provide necessary details in the Audit Details tab:
- Enter a suitable name for the new audit in the Audit Name field. The system applies validation to ensure the audit name meets the required criteria.
- The Status field is disabled and set as Not Started by default.
- Select either Branch or Rep within the Audit For dropdown, to specify the entity for which the new audit is being created.
- Select the desired audit type from the Audit Type dropdown field. The options available in the Audit Type dropdown will be dynamically populated based on the selection made in the Audit For dropdown field.
- Select the auditor who will be responsible for performing the audit from the Auditor dropdown.
- Next, choose the user who will receive update on this audit. Permitted users will be listed out in the Recipient dropdown.
- Choose the date on which the audit is to be scheduled to begin from. Click on the Start Date field to load the calendar and make a date selection accordingly. You can only select an upcoming calendar date and not a past date.
- Similarly, choose the date on which the audit is intended to be completed. Click on the Target Date field to load the calendar and make a date selection accordingly. You can only select an upcoming calendar date and not a past date and the date must be later than the audit start date.
- The Organization field is also disabled and shows the name of the current organization.
- You may enter a suitable audit description in the Description field. It is an optional field.
- Click on the Next button to proceed to the Template Selection tab.
 Fig: 32 - Audit For dropdown options
 Fig: 33 - Audit Type dropdown options
NOTE: Branch dropdown option selection in the Audit For dropdown loads the three options - Routine, For-cause and Special type in the Audit Type dropdown field, while the Rep dropdown option selection in the Audit For dropdown loads the two options - Routine and Special type in the Audit Type dropdown field.
NOTE: The users who are permitted in your organization will be listed here.
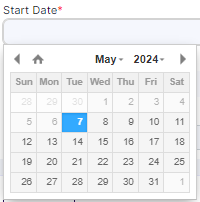 Fig: 34 - Audit Start Date calendar view for date selection
NOTE: The audit Start Date must be earlier than the audit Target Date. Otherwise, the system will prompt the tooltip - Start Date cannot be greater than Target Date.
 Fig: 35 - Start Date cannot be greater than Target Date tooltip

Fig: 36 - Next button to proceed
NOTE: You can proceed only if all the field validations are met on this page. Otherwise, the system will prompt appropriate validation tooltips below the field(s).
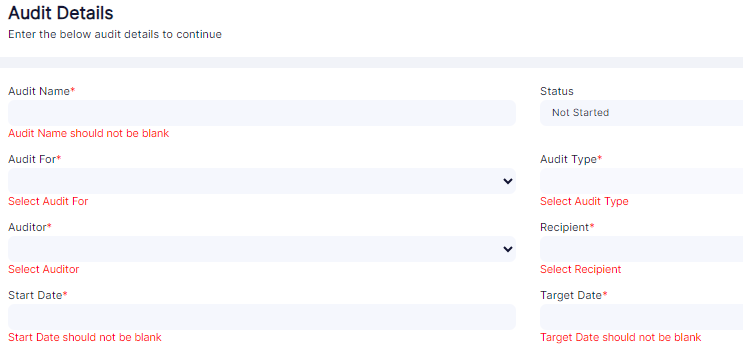 Fig: 37 - Field validations
3.2. Step #2 - Selecting Audit Template
Proceed to choose a pre-built audit template.
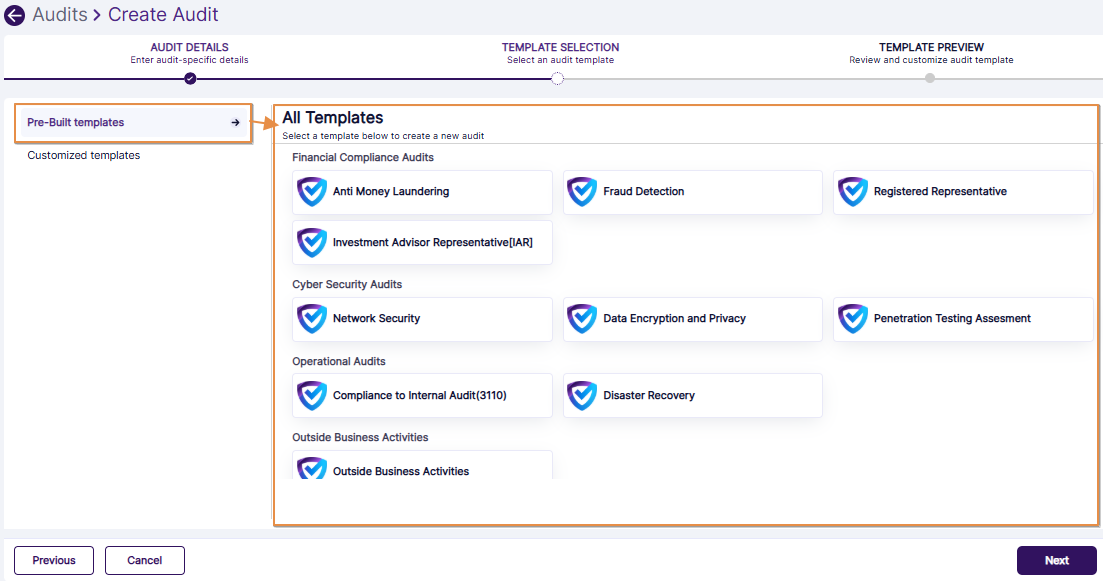 Fig: 38 - Available Audit Templates
You can select only one out of the available templates. A Selected label can be seen above the selected template type.
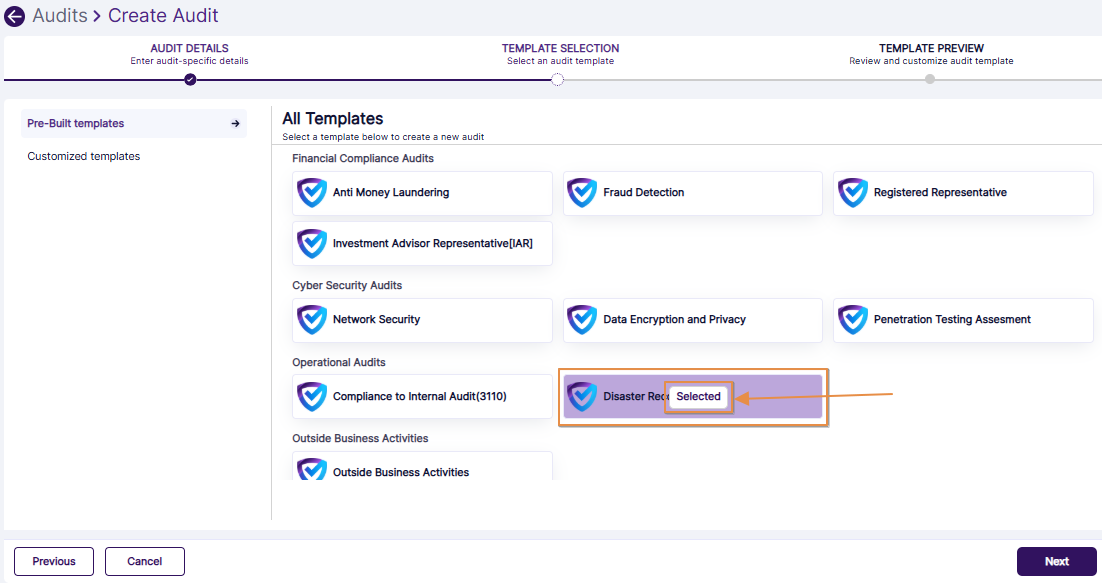 Fig: 39 - Selected Template
The following templates are provided (at the time of writing this guide):
- Financial Compliance Audits
- Anti Money Laundering
- Fraud Detection
- Registered Representative
- Investment Advisor Representative[IAR]
- Cyber Security Audits
- Network Security
- Data Encryption and Privacy
- Penetration Testing Assesment
- Operational Audits
- Compliance to Internal Audit(3110)
- Disaster Recovery
- Outside Business Activities
- Outside Business Activities
- 3rd Party Vendors
- Security Implementation Questionnaire
 Fig: 40 - Next button to proceed
NOTE: There is option to choose custom template, if created. Custom templates can be created from the Settings menu > Template Library menu option > Add Template page.
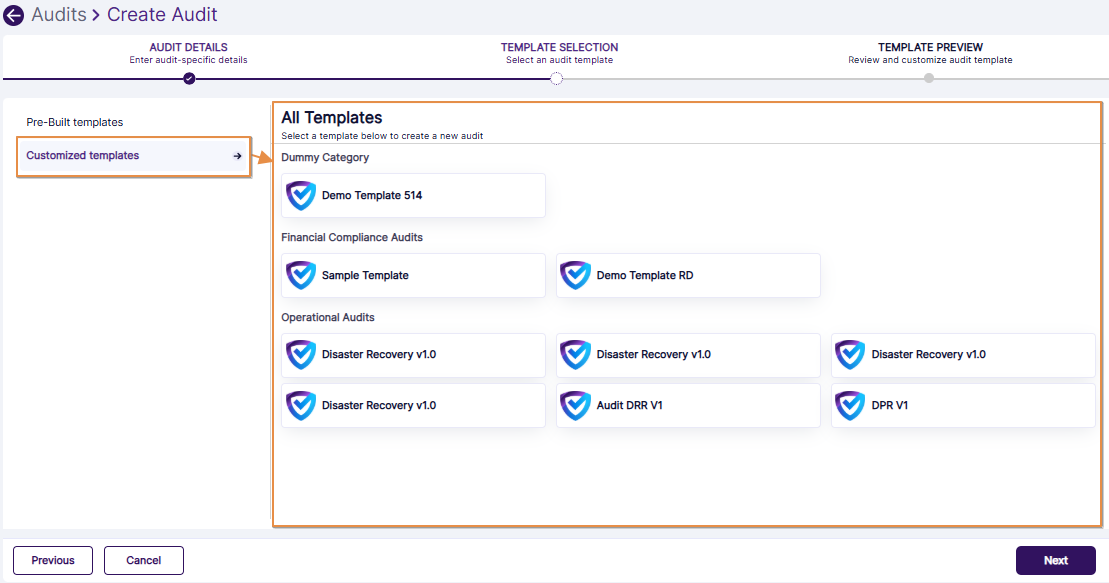 Fig: 41 - Custom template
3.3. Step #3 – Previewing Audit Template
In the Template Preview stage, you can view audit template category questionnaires. Based on the template selected in the Template Selection stage, audit questions are loaded in the third Template Preview stage.
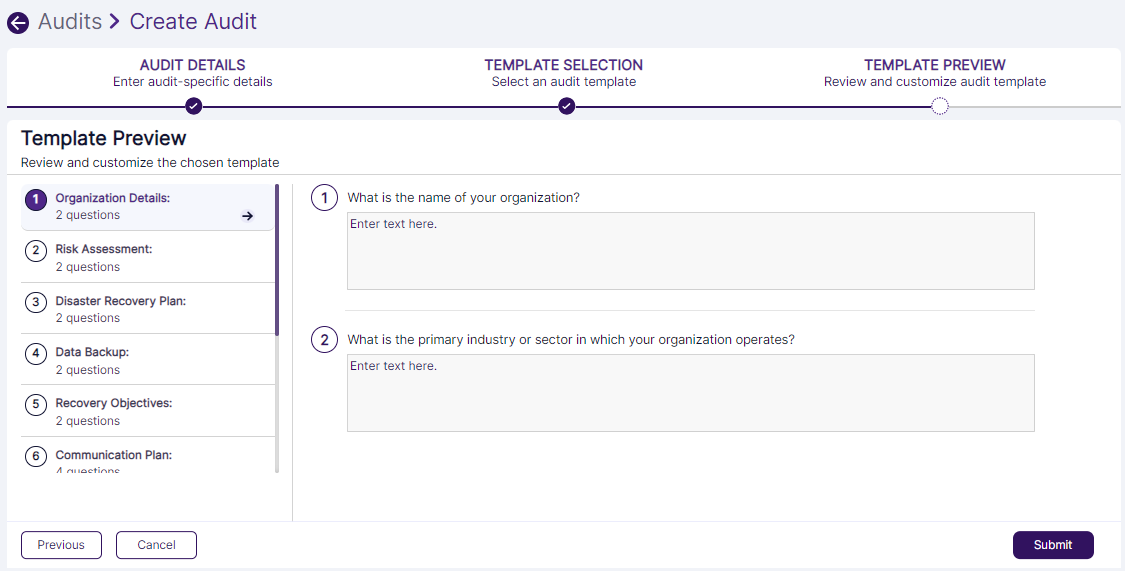
Fig: 42 - Selected Template Preview
3.3.1. Submitting the Selected Template
The left panel will display certain sections which are related to the template. Each selection loads a set of questions to the right side of it. After you are done editing the chosen template, click on the Submit button to create the audit as per the template.

Fig: 43 - Submit button to create Audit
The created audit will get listed in the Audits page.
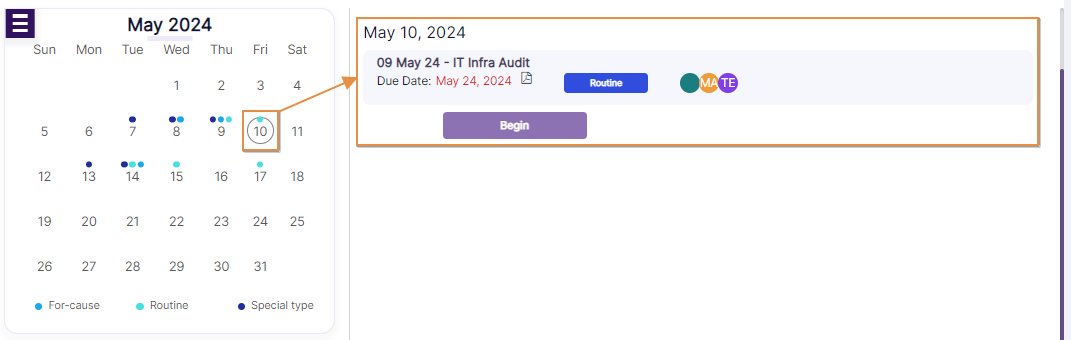
Fig: 44 - New Audit displayed on the Audits page
NOTE:
- An audit can be created by permitted user of your firm. The following image shows a different user has created the audit, a different auditor is assigned and a different recipient is related to the created audit.
- The audit is visible to the assigned user(s). The following screenshot shows that some assigned audits are visible to the Test Employee user.
- However, the below screenshot shows that the same audits are not visible to the Test Employee 2 user, since this user is not assigned to perform any audit activities.
 Fig: 45 - Different users related to a created audit
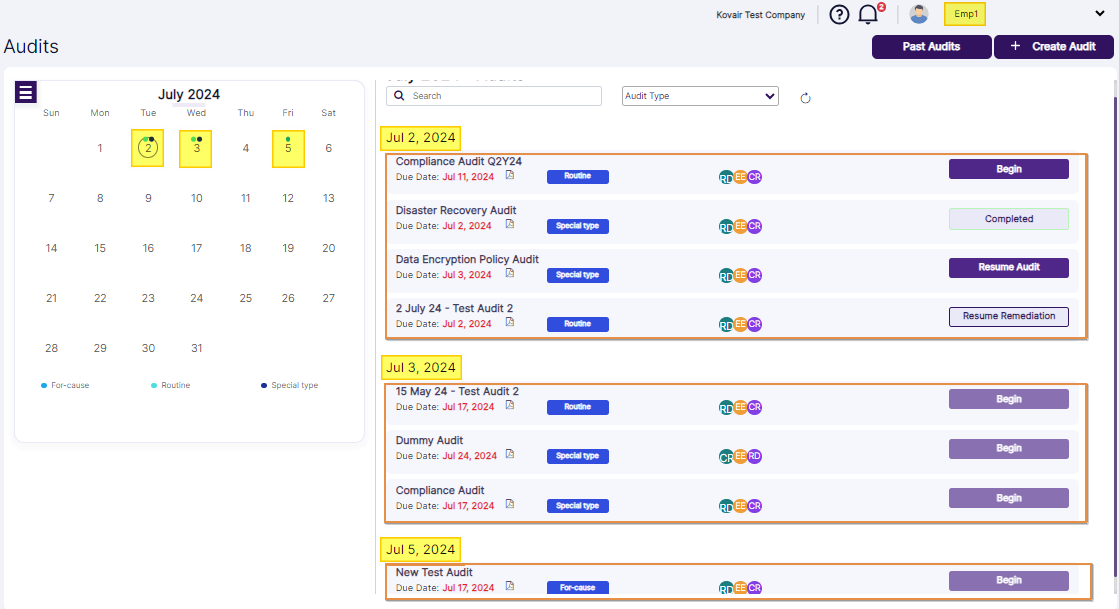 Fig: 46 - Created audit visible to related user who is either auditor or recipient
 Fig: 47 - Created audit not visible to user who is not the specified auditor or recipient
4. Viewing Existing Audits
The permitted user can view own audits on the Audits page.
 Fig: 48 - Audits view
Toggle the month selection calendar using the hamburger icon at the top left.
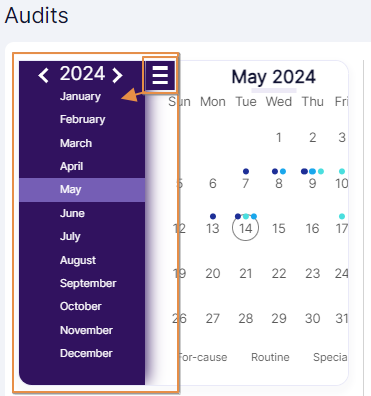 Fig: 49 - Expanded calendar view
Select desired month/year and any audits created on that get displayed on the right side of the calendar view.
Fig: 50 - Audit displayed for selected month
NOTE: You can navigate to the Audits page using the View More option on the Dashboard.
Fig: 51 - View More button of Dashboard
5.1. Beginning Audit Process
Applicable Only for Permitted UsersClick on the Begin action button to initiate the audit. The Begin button is disabled (identifiable through the lighter shade of violet colored background of the button) if the user is not the assigned Auditor for the audit or is not granted requisite permissions.
Fig: 52 - Begin button to start audit
Considering the user is the designated auditor and the audit start date is same as the current date, after clicking on the Begin button of that audit, the following page loads.
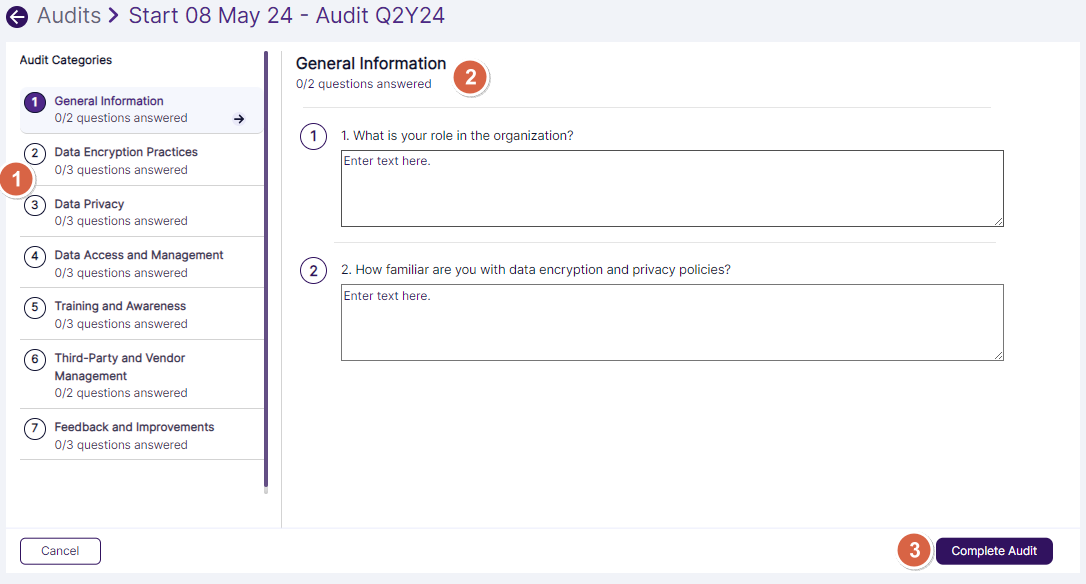
Fig: 53 - Audit questionnaires
The following three points correlate with the numerical values indicated in the above screenshot.
- The left panel lists out selectable sections that are part of the audit.
- The right panel loads out questions which belong to the selected audit category or section. User/Auditor must provide responses to all questions. Proceed to complete the questions of each category/section one by one. You can view how many questions have been answered in comparison to the total number of questions of that category. Refer to the following screenshot.
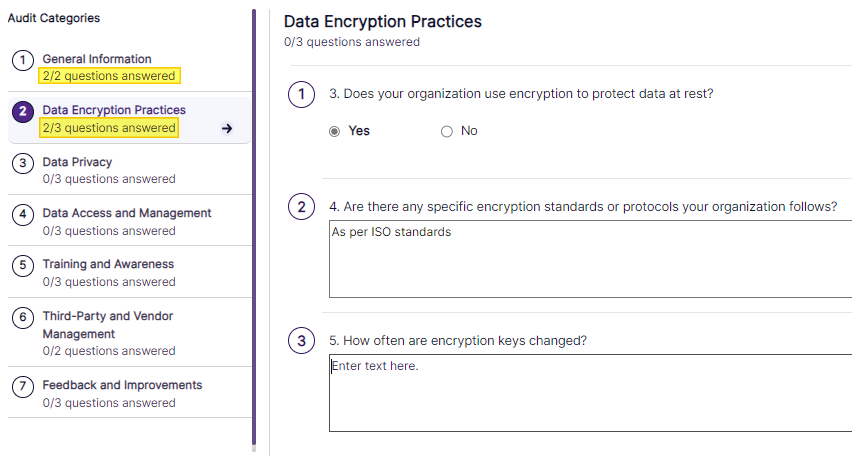 Fig: 54 - Number of questions answered
NOTE:
Fig: 54 - Number of questions answered
NOTE:
- If you click on the Begin button but you do not end up responding to all of the audit questions, then the next time you view the Audits page, the button label will display Resume Audit.
 Fig: 55 - Begin button label changes to Resume Audit
- The system automatically saves your responses that load the next time you resume auditing.
- If you click on the Begin button but you do not end up responding to all of the audit questions, then the next time you view the Audits page, the button label will display Resume Audit.
- Click on the Complete Audit button to record the completed audit.
5.2. Completing Audit Process
Applicable Only for Permitted Users- Click on the Complete Audit button after responses to all the question are provided.
- After you click on the Complete Audit button, the following success dialog box is prompted.
- Click on the Back to Audits button to close the success dialog box and navigate to the Audits page.
- You will notice that the status of the audit action button label has changed from Begin to Completed if the system does not detect any red flagged questions. No remediation is required in this case.
- You will notice that the status of the audit action button label has changed from Begin to Start Remediation if the system detects any red flagged questions.
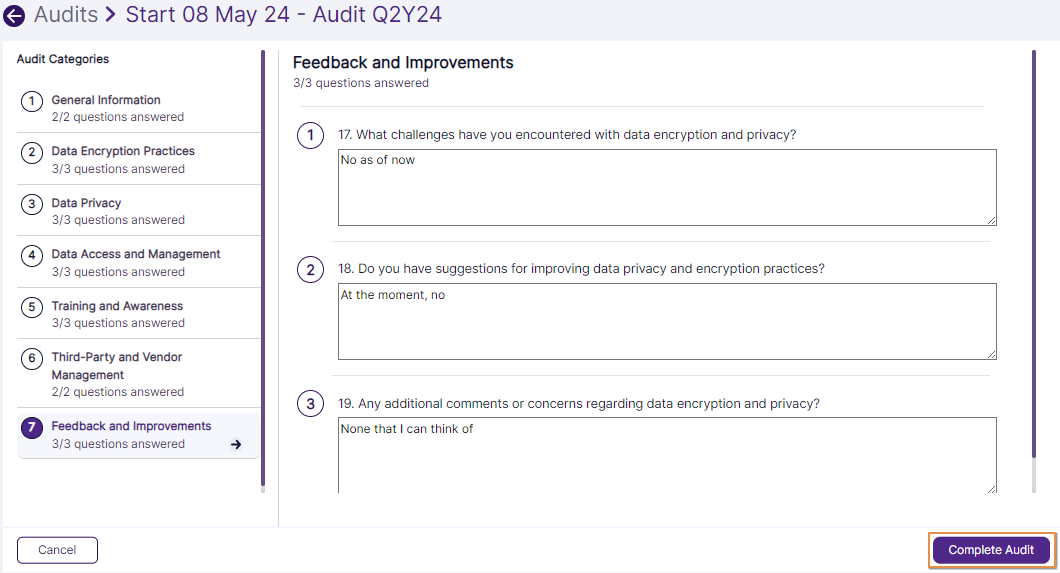
Fig: 56 - Complete Audit button
NOTE:
If you click on the Complete Audit button before all questions are responded, the system will display the following dialog box. Click on the Ok button to close it.
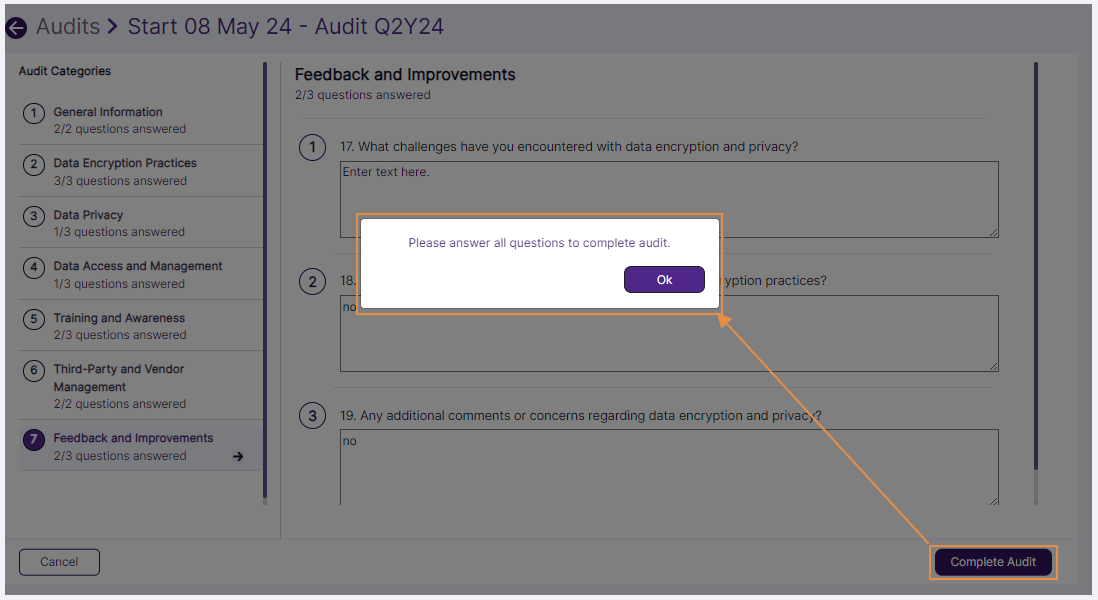 Fig: 57 - All questions are not responded dialog box
 Fig: 58 - Success dialog box
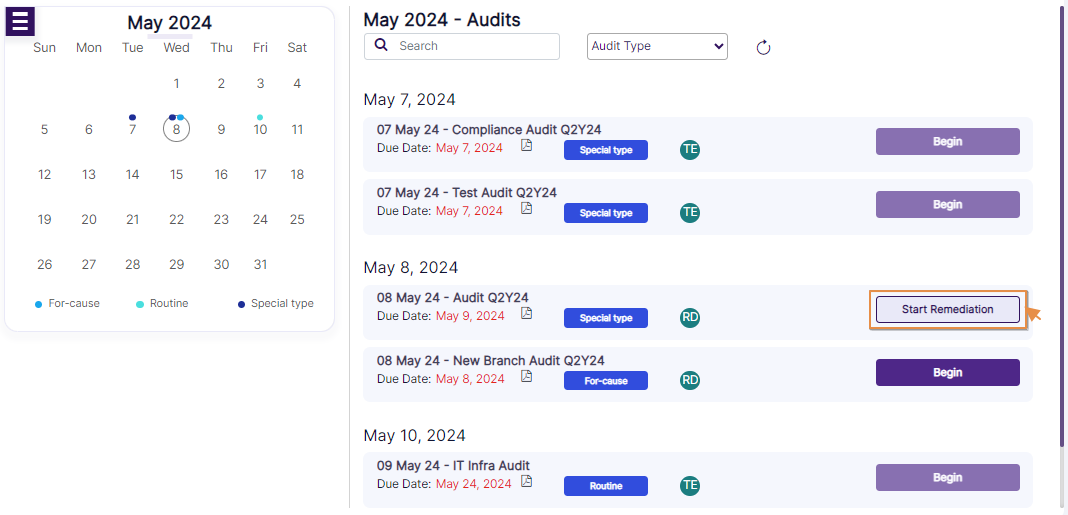 Fig: 59 - Audit action button label changed from Begin to Start Remediation
NOTE:
The Dashboard shows the audit status after it is processed.
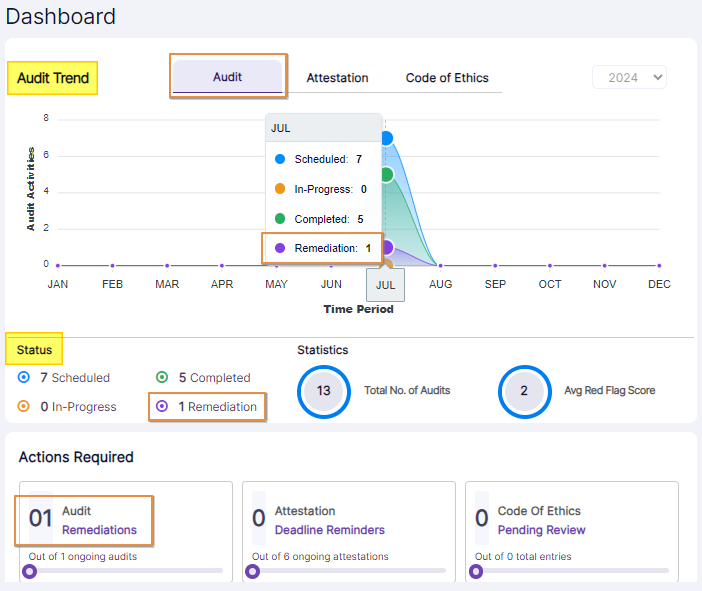 Fig: 60 - Dashboard shows the updated audit status
5.3. Starting Audit Remediation
NOTE:
- This section is applicable only when you have completed the audit processing and there is at least one red flagged question response.
- If the audit is completed without any red flags, then the Begin Audit or Resume Audit button label changes to Completed on the Audits page.
- If the audit is completed with any red flagged question responses, then the Begin Audit or Resume Audit button label changes to Start Remediation on the Audits page.
- This Start Remediation button is disabled for the users who are not permitted.
Applicable Only for Permitted Users
- Click on the Start Remediation button against the flagged audit.
- The response(s) to certain question(s) that need to be addressed to are present during audit remediation. One such red flag question which is to be remediated can be seen in the following screenshot.
- Provide the necessary response in the form of a note. You, as the Auditor, can enter your note as a Private Notes entry or a Public Notes entry or make both. As the name suggests, the former have limited visibility while the latter is visible to all existing users.
- Click on the send (paper plane)
 icon to post your note. You can post any number of notes. The profile picture preview of the poster, the full name, and the timestamp is visible above the note. The timestamp format is MM/DD/YYYY HH:MM:SS AM/PM.
- Click on the expand
 icon to focus and view the note section.
- Click on the attach
 icon to post any attachment.
- Click on the delete
 icon to remove your posted note.
- Click on the Request Info/Docs button to request furnishing of any additional documentation to support the audit response. After you click on it a confirmation dialog box will be prompted.
- Click on the Continue button to confirm the request.
- A Preview dialog box will load next.
- Click on the Confirm button. The system will display a success notification as Request sent successfully at the top.
Fig: 61 - Start Remediation button
NOTE:
This Start Remediation button against the flagged audit is enabled or disabled depending on the logged-in user permissions set.
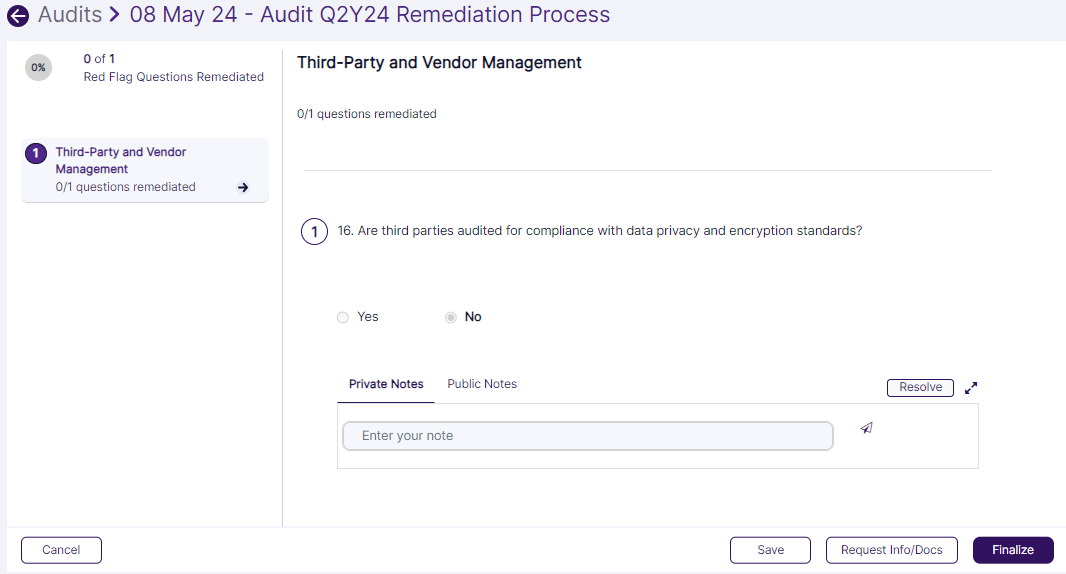
Fig: 62 - View of red flag question which is to be remediated
NOTE:
The following five bulleted items consists of optional activities.
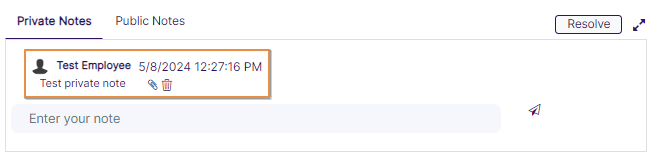 Fig: 63 - Sample note posted
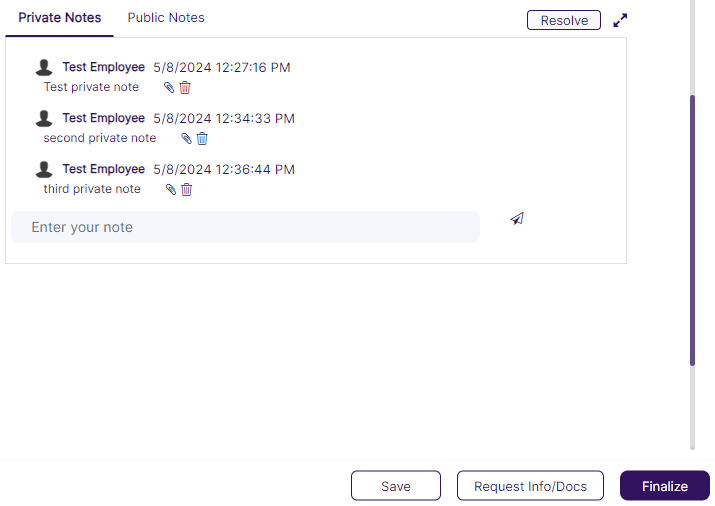 Fig: 64 - Expanded view
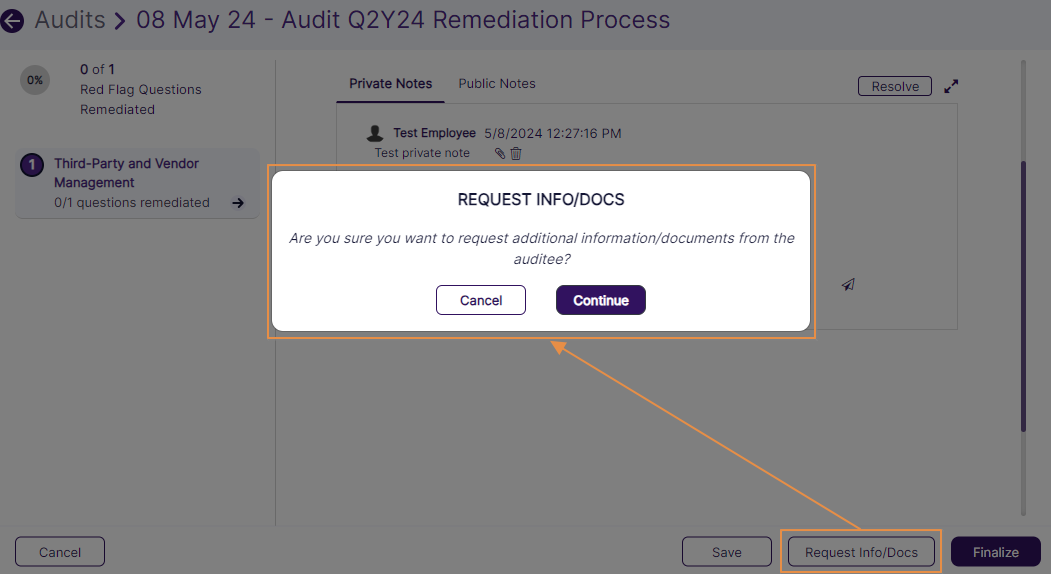 Fig: 65 - Requesting for additional information or documentation
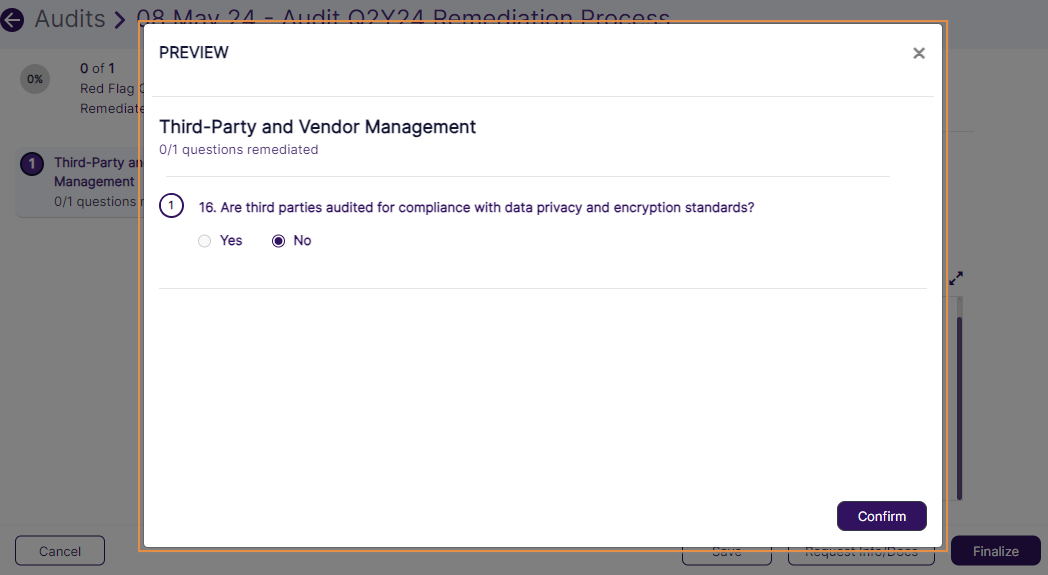 Fig: 66 - View of Preview dialog box
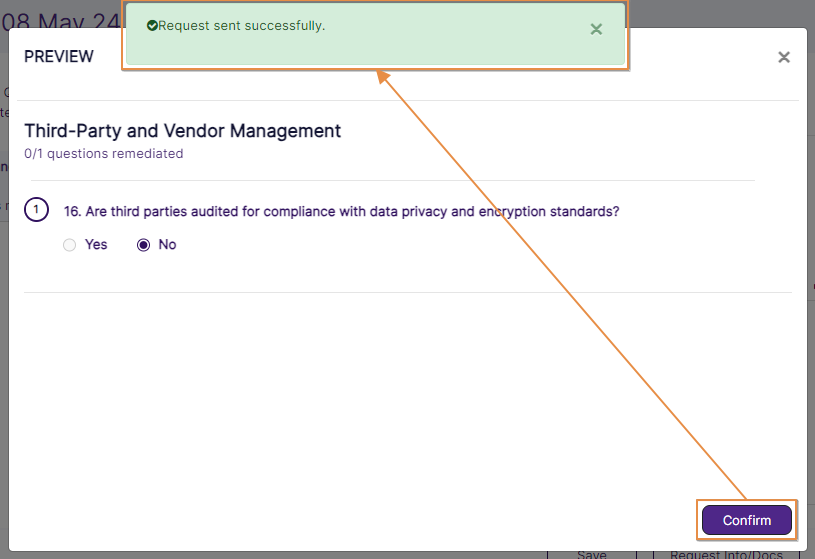 Fig: 67 - View of success notification of request sent
Applicable Only for Recipients
- Receive an email about the request for additional information. You can use the embedded link to navigate to SurgeONE.ai.
- Click on the Resume Remediation button of the Audits page against the flagged audit.
- The response(s) to certain question(s) that need to be addressed to are present during audit remediation. One such red flag question has been commented in the following screenshot. Relevant attachment can also be uploaded for the Auditor to review after a public note is posted.
- Click on the Send Requested Data button to forward the provided information/details.
- The system will display a success notification after the Recipient clicks on it.
 Fig: 68 - View of received email
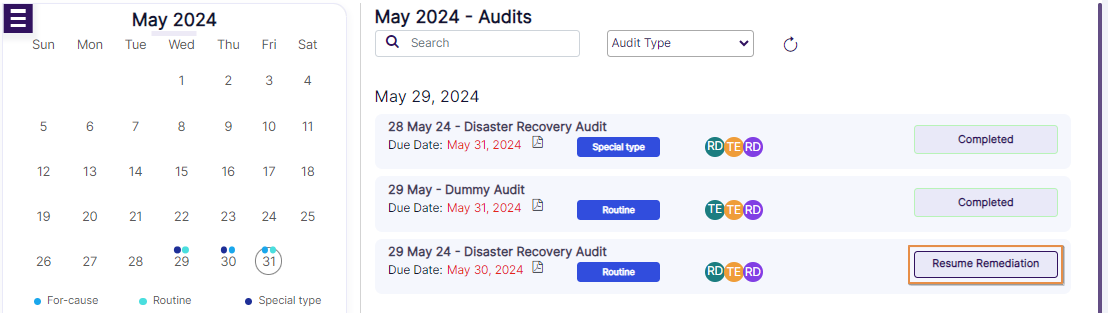
Fig: 69 - Resume Remediation button
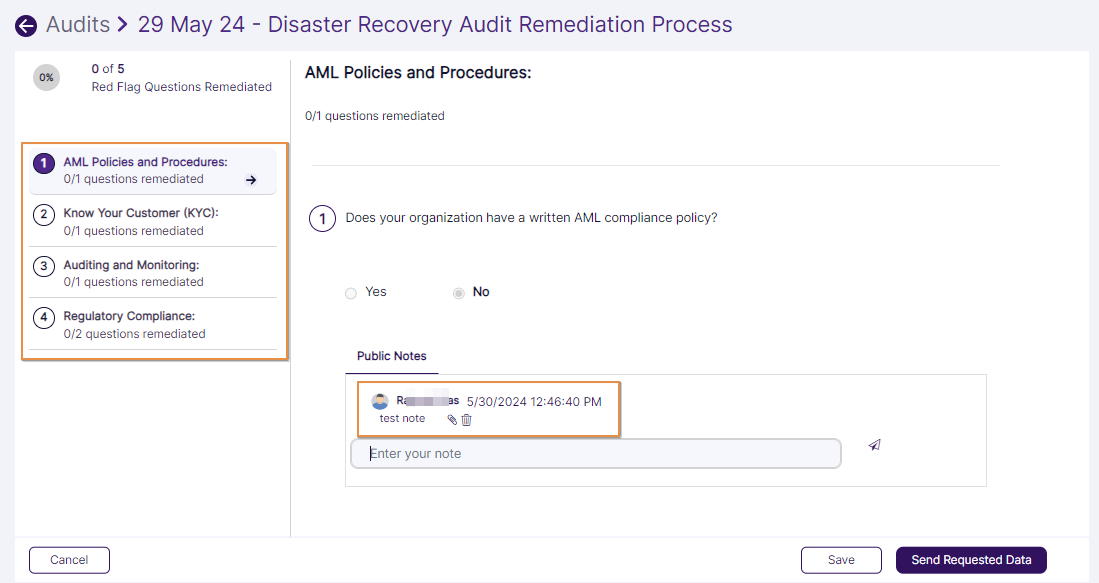
Fig: 70 - Comment added
NOTE:
For the Auditor, Notes are of two types: Public and Private. For the sake of own benefit, only the Auditor user can post notes that are visible only to self and not to others. But, for the Recipient, only the Public Notes option is present. This note (when posted) is visible to the Auditor during audit remediation.
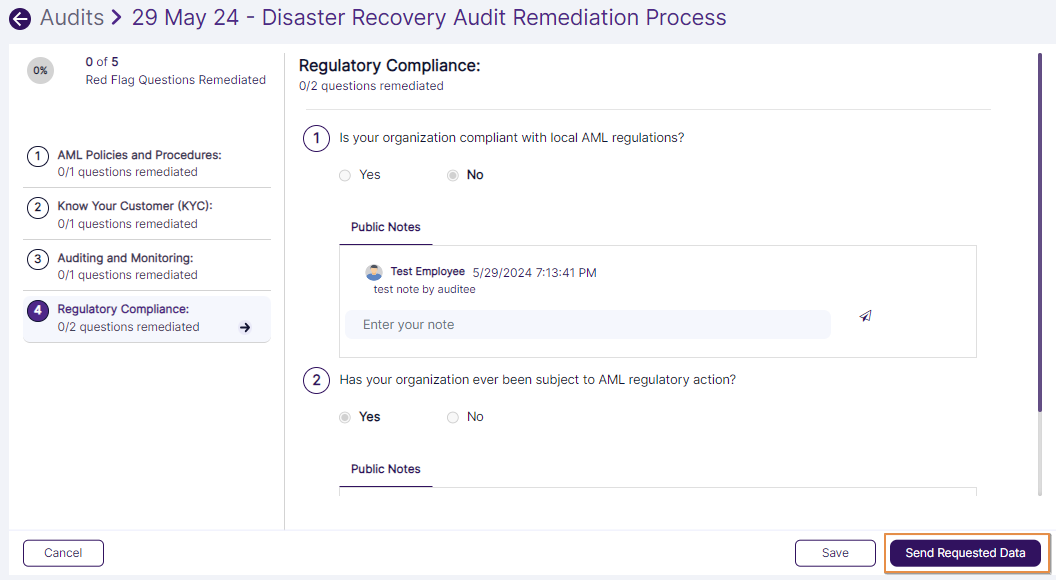
Fig: 71 - View of Send Requested Data button
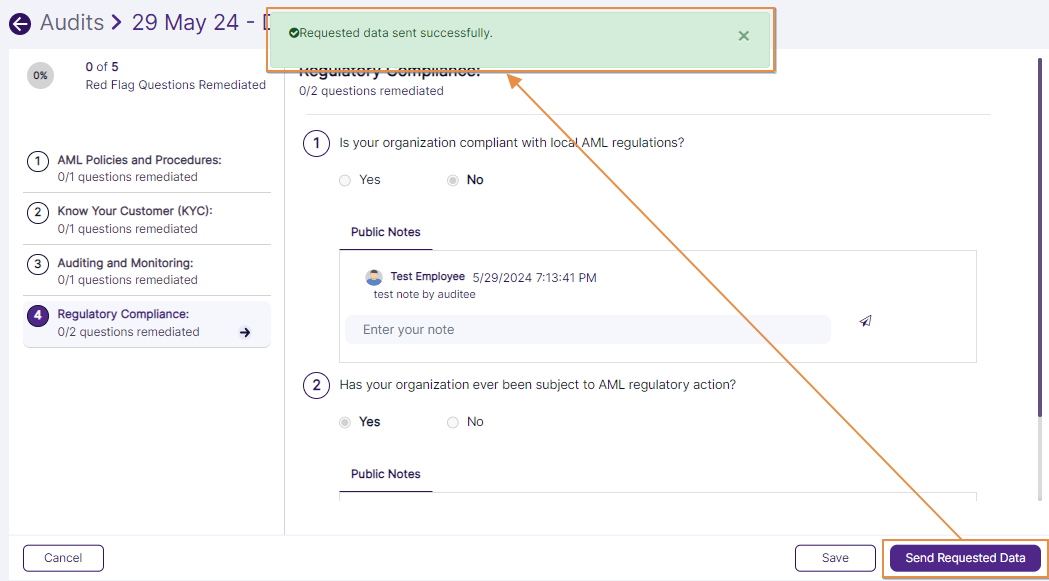 Fig: 72 - View of save success notification
NOTE: You can use the Save button to store the information and send it at a later time. The system will display a success notification after the Recipient clicks on it.
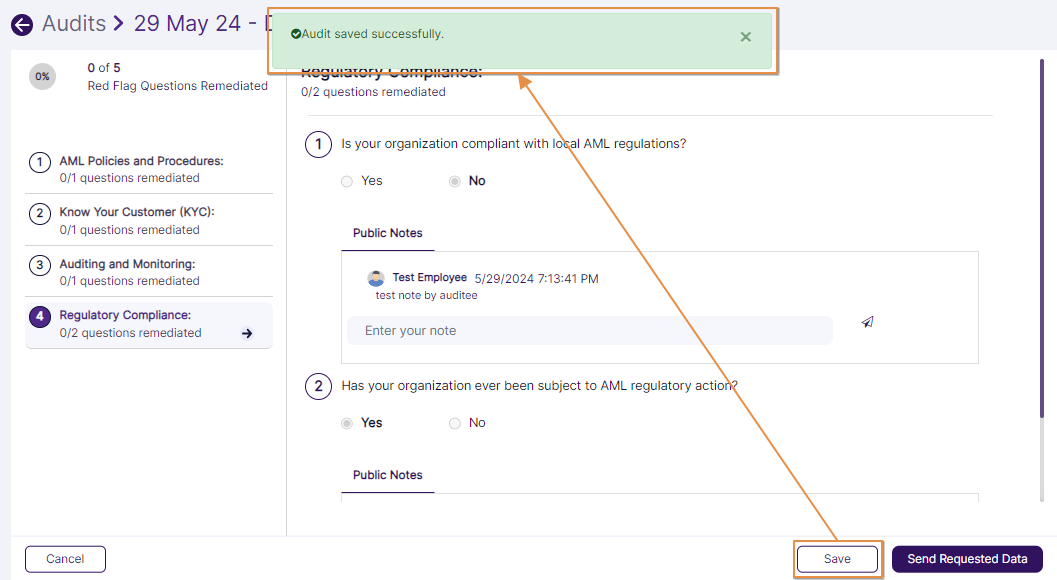 Fig: 73 - View of save success notification
5.4. Resuming Audit Remediation
NOTE:
- This section is relevant only when you have started the audit remediation process, but have not resolved all of the red flagged question responses.
- The Resume Remediation button can be found on the Audits page only when you begin an audit remediation process, but not finalize the audit at one go.
One such scenario can be when you click on the Request Info/Docs button to request furnishing of any additional information or documentation and the Recipient has provided the requested information..
Applicable Only for Permitted Users
- The Auditor will receive a system generated email about the furnishing of requisite information by the Recipient. You can use the embedded link to navigate to SurgeONE.ai to review the update.
- The audit action button label can be seen as updated from Start Remediation to Resume Remediation.
- Click on the Resume Remediation button to go back to the audit remediation red flagged question(s).
- Click on the Resolve button of a particular flagged audit response question to mark it as resolved.
- A confirmation dialog box is prompted. Click on the Resolve button to confirm.
- That red flagged question gets resolved and the label of the Resolve button changes to Unresolve.
- Repeat this resolution activity for all the red flagged ones. The percentage at the top left increases up to 100%, which indicates completeness of all red flagged question responses.
- Click on the Finalize button if there are no more red flagged questions as unresolved. A confirmation dialog box is displayed. Click on the Finalize button of the dialog box to proceed.
- You will get redirected to the Audits page. The audit gets marked as Completed.
- The Auditor will receive an email regarding the audit completion.
- The Auditor can receive application notification on audit completion.
- The same is reflected in the Dashboard view.
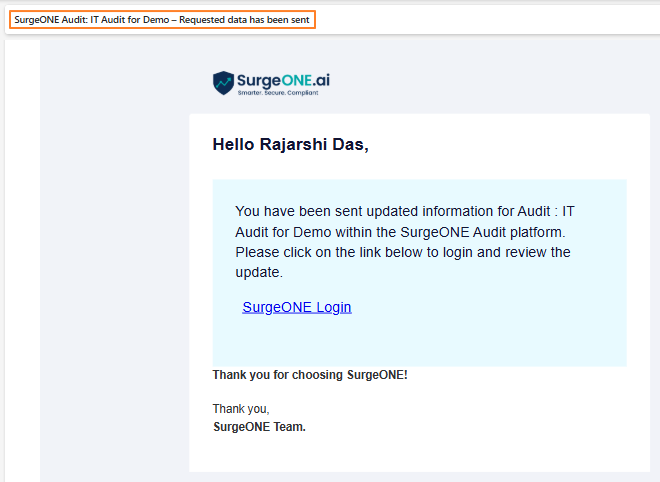 Fig: 74 - View of received email
Fig: 75 - Resume Remediation button
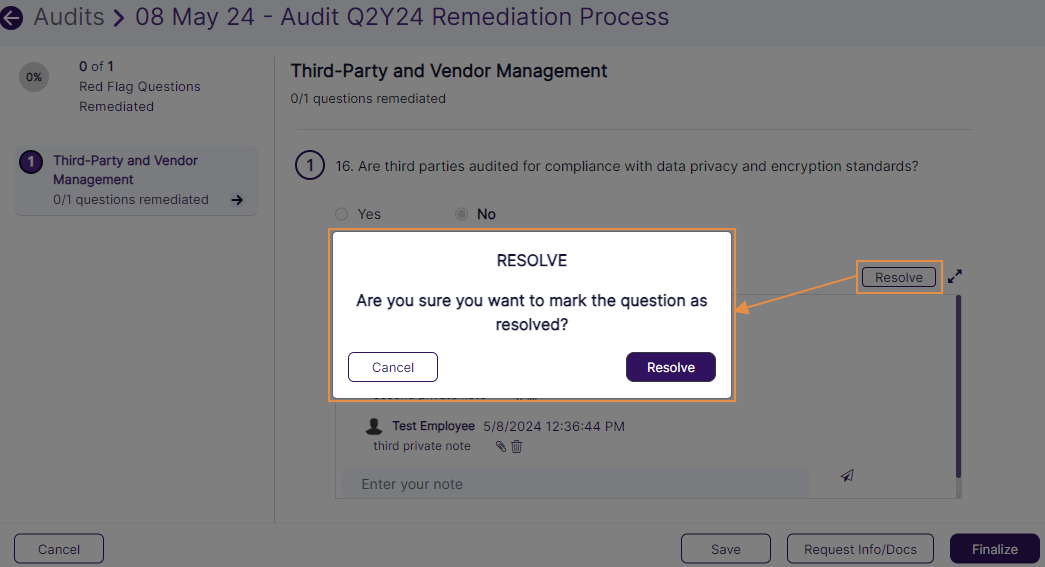
Fig: 76 - Resolve dialog box prompted
NOTE:
Click on the Unresolve button to again raise the red flagged question response, if you need to.
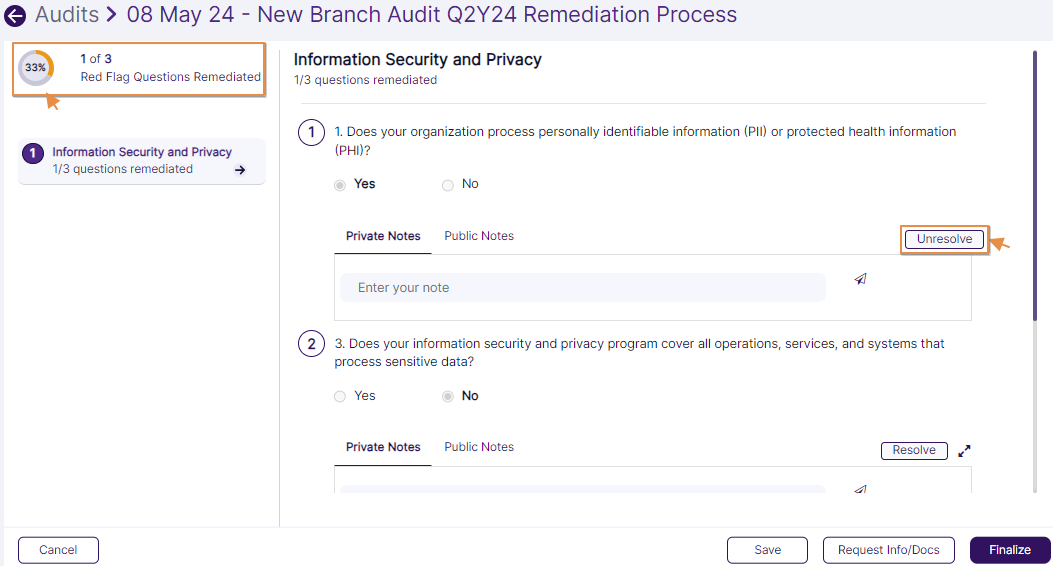 Fig: 77 - Unresolve button
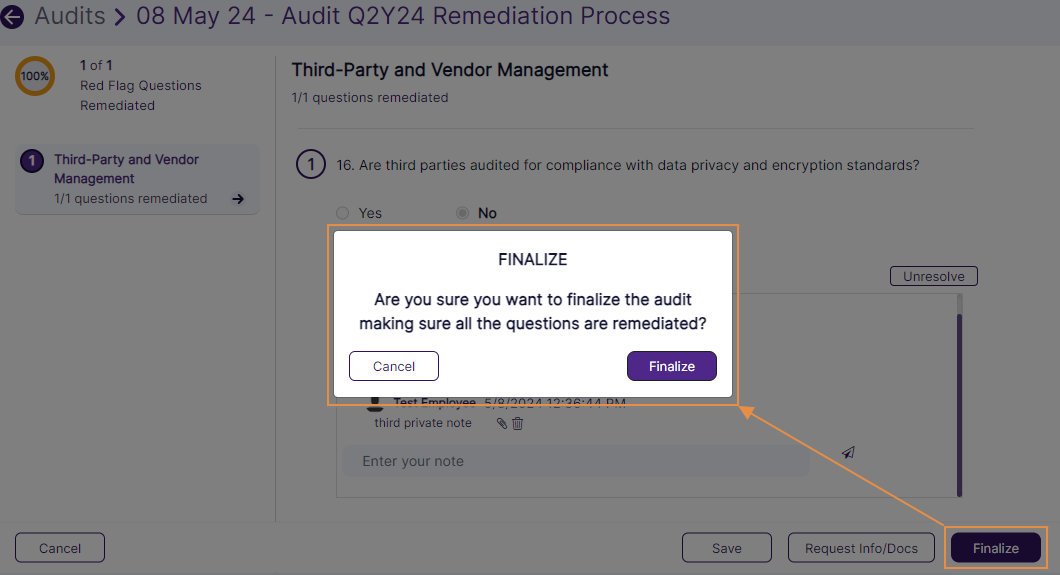 Fig: 78 - Finalization when no red flagged questions are left in the audit
NOTE:
You cannot finalize an audit unless you ensure that there are no pending red flagged questions which are unresolved. Consider the following screenshot where the system prompts an error dialog box. The system instructs the user to resolve all such items first.
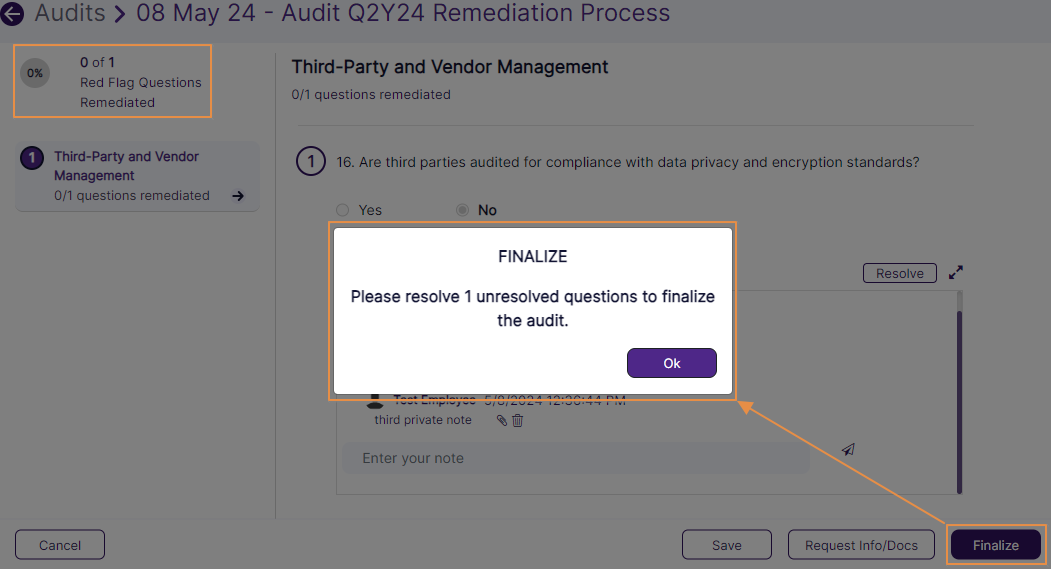 Fig: 79 - Finalization error prompt
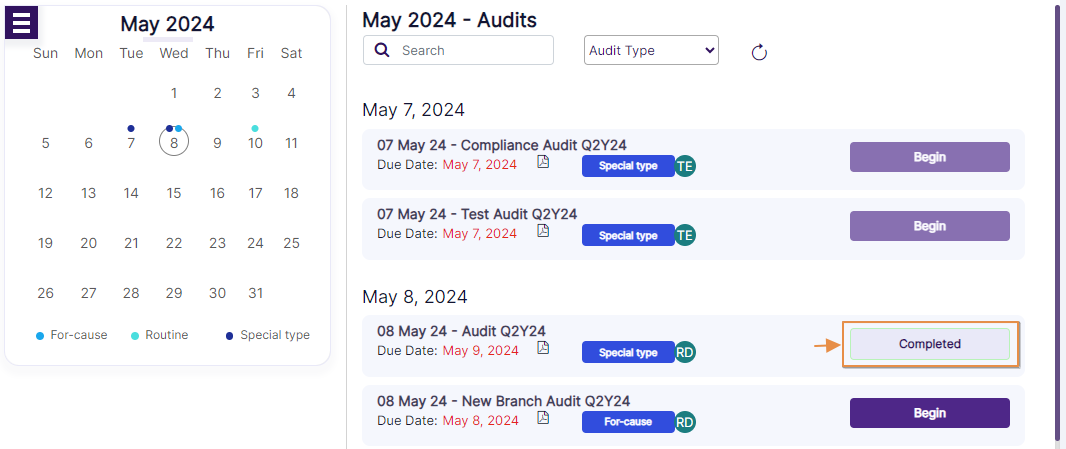 Fig: 80 - View of audit marked as Completed
NOTE:
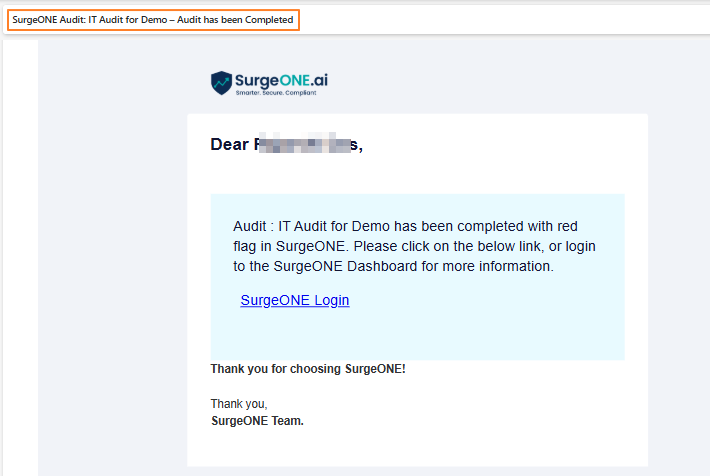 Fig: 81 - View of email regarding the audit completion
 Fig: 82 - View of success notification
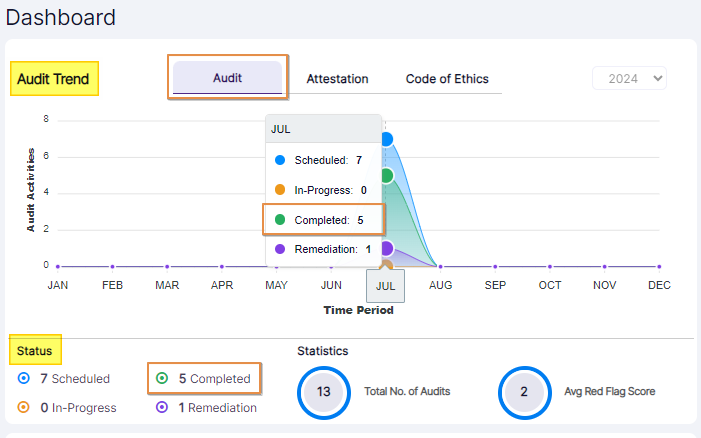 Fig: 83 - View of Dashboard showing audit completion data
5.5. Editing an Audit
NOTE: An audit can be edited if permission is provided and the audit is yet to be started.
- Click on the enabled edit icon to proceed to edit an audit.
- You can modify any fields data of the Audit Details tab view - except for the Audit For field. Click on the Submit button to save your changes.
- Get redirected to the Audits page. A success notification gets displayed at the top.
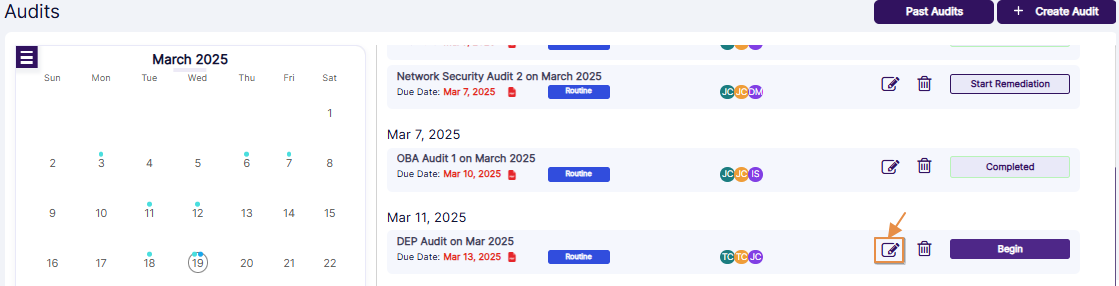 Fig: 84 - Option to edit an audit which is not started
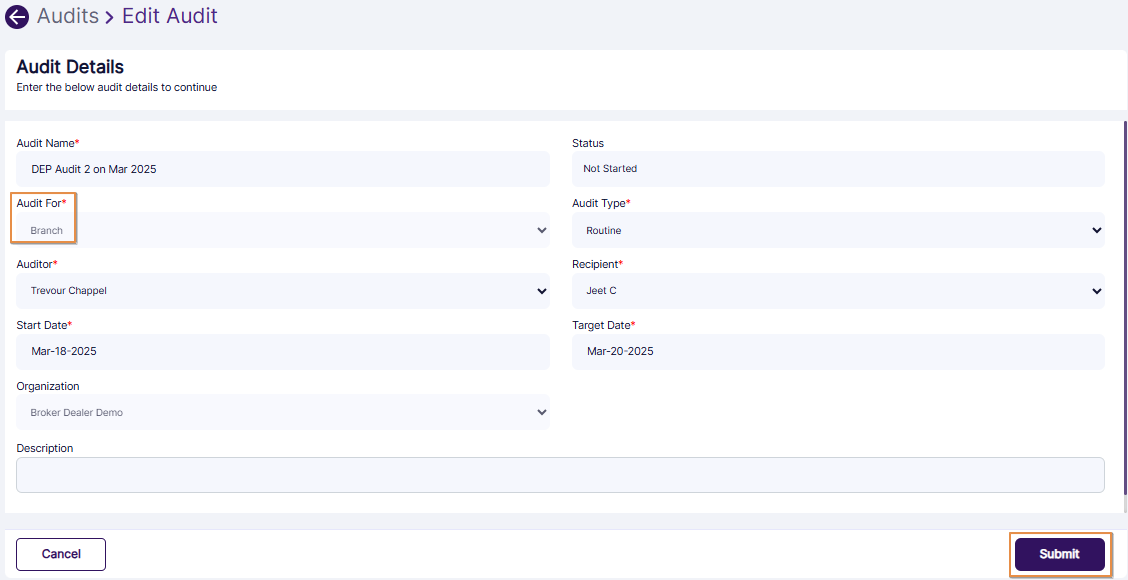 Fig: 85 - Editing an audit
 Fig: 86 - View of the success notification
5.6. Deleting an Audit
NOTE: An audit can be deleted if permission is provided and the audit is yet to be started.
- Click on the enabled delete icon to proceed to delete an audit.
- A modal window loads to obtain your confirmation. Click on Yes button to proceed.
- Get redirected to the Audits page. The audit gets removed.
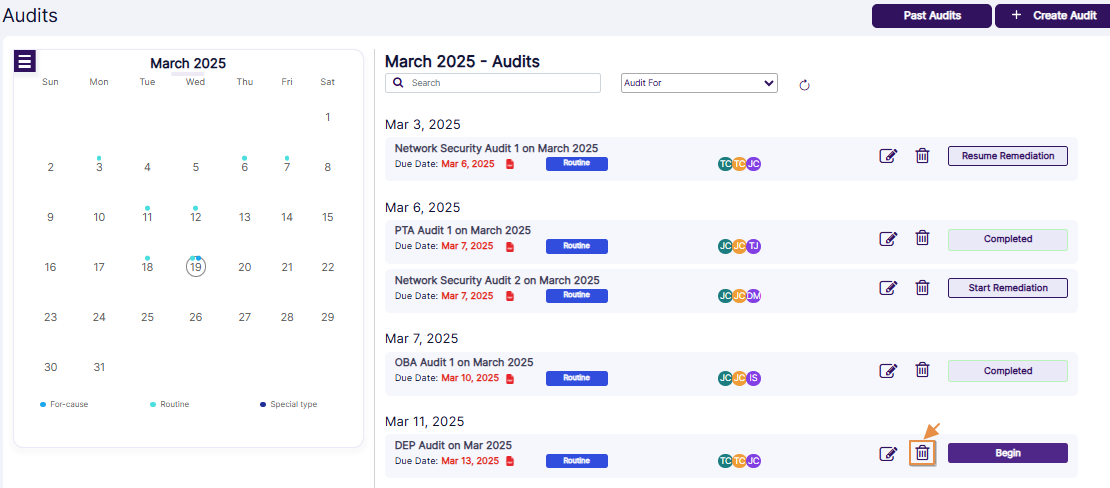 Fig: 87 - Option to delete an audit which is not started
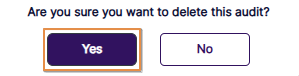 Fig: 88 - Confirmation modal window
6. Customizing the Past Audits Report columns
- Click on the vertical ellipsis icon to the right of the Export button.
- The following Audit Attributes modal window loads.
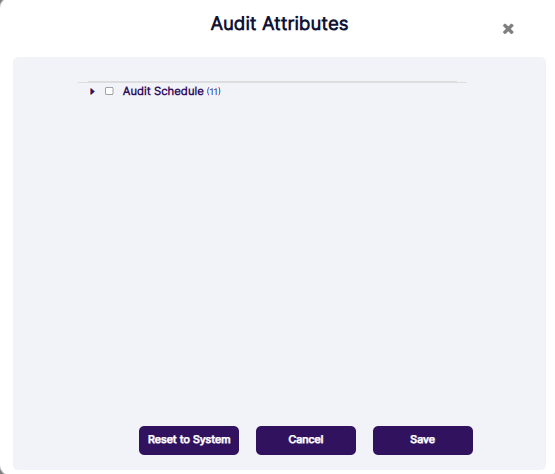 Fig: 90 - Audit Attributes modal window
- Click on the right arrow icon to expand the column labels and its selection status.
- Make checkbox selections against the labels which you wish to display in the grid view. The greyed-out checkboxes cannot be deselected since those are always displayed in the grid. Click on the Save button after your checkbox selections are done. The modal window will close and the column changes made will get reflected in the grid view.
 Fig: 89 - Icon to load modal window to customize grid view columns
 Fig: 91 - Expanded view of the various column labels and its selection status
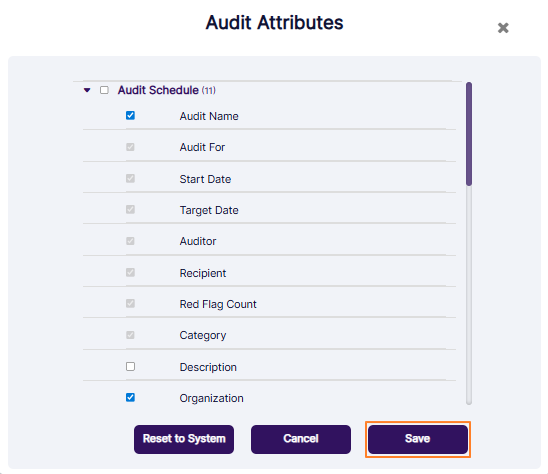 Fig: 92 - Saving the column checkbox selections
You can click on the Reset to System button to restore the column selections to the default setting.
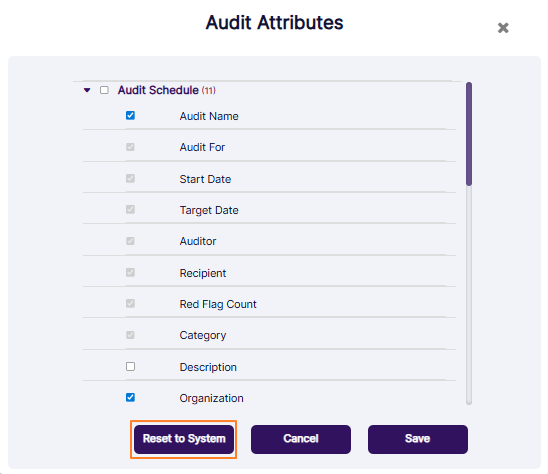 Fig: 93 - Button to reset columns display to default view
7. Appendix - Audit Lifecycle Flowchart
The following image depicts the flowchart of Audit life cycle in SurgeONE.ai:
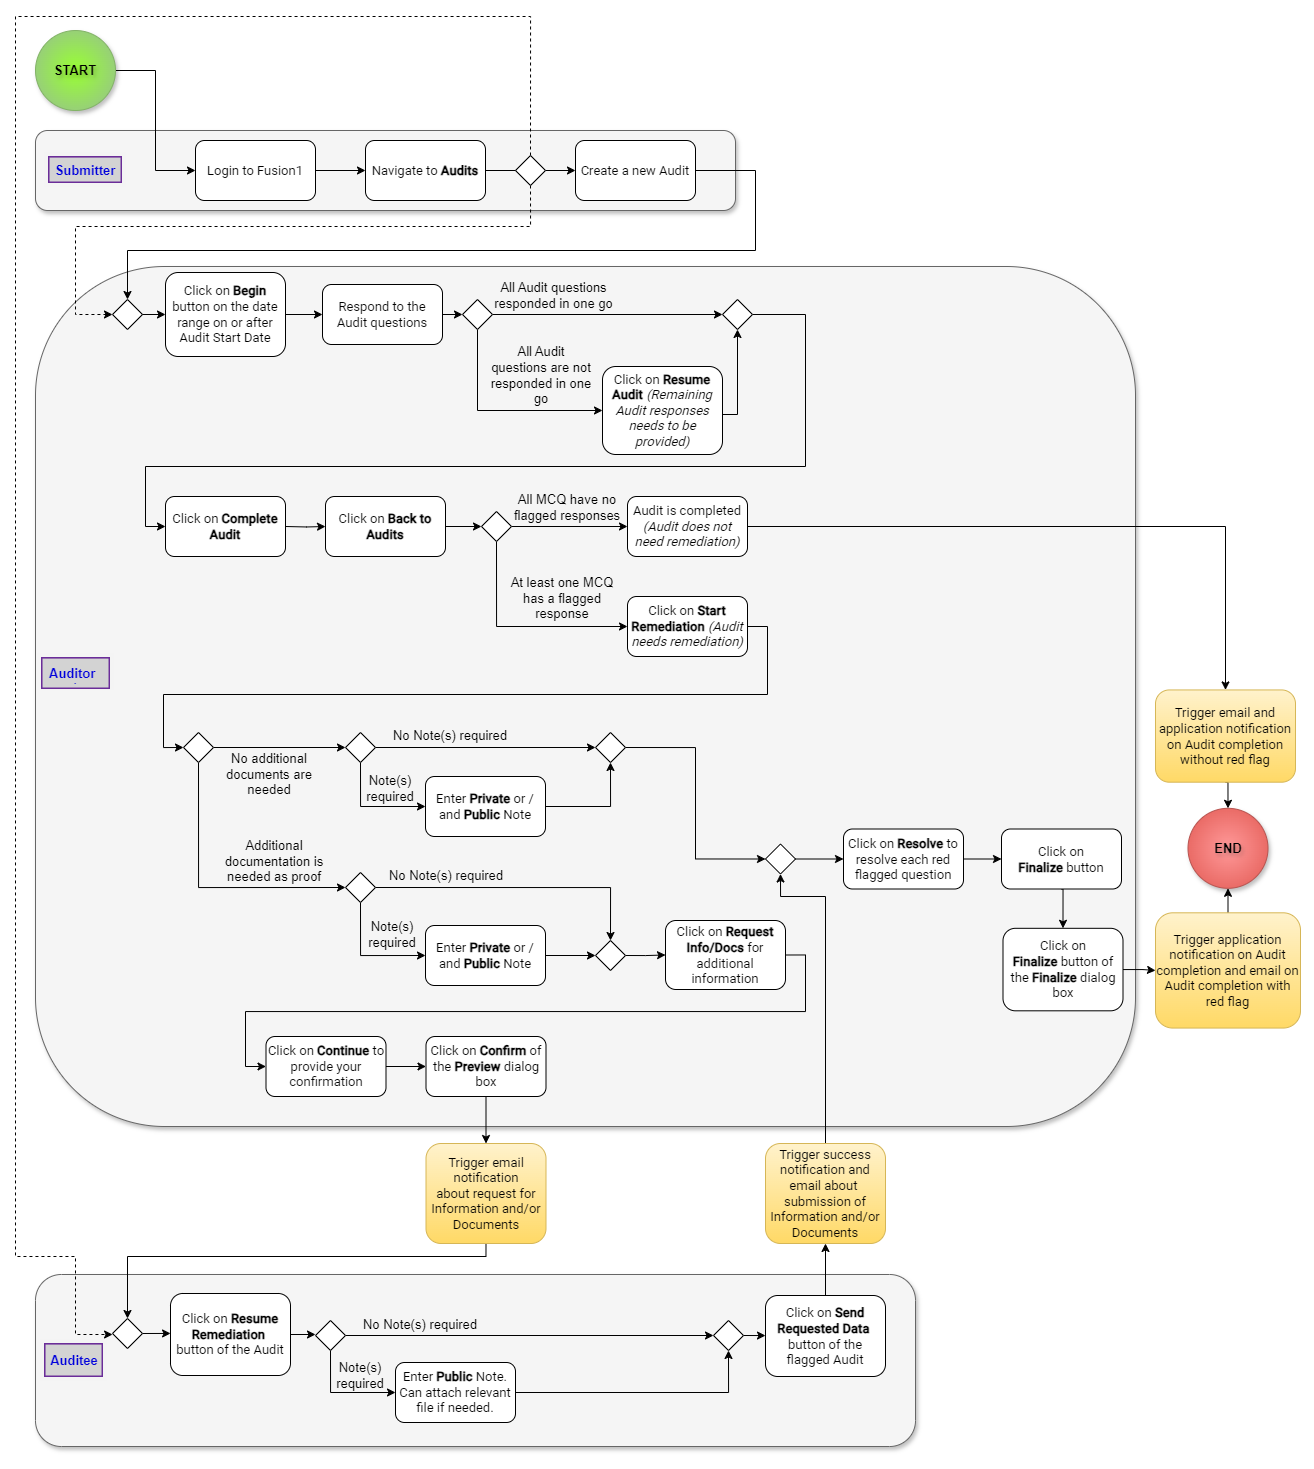
Fig: 94 - SurgeONE.ai audit lifecycle flowchart
NOTE:
It is recommended to save this image and open the downloaded image in a magnified view, since the on-hover zoom might not be enough for ease of visibility.